manualshive.com logo in svg
background image

User’s Manual

TM

Merlin Plus

Содержание Merlin LCD Plus

Страница 1: ...User s Manual TM Merlin Plus ...

Страница 2: ...In order to maintain the consistency with the printed version of this manual this page is intentionally left without manual content ...

Страница 3: ...Foot Switch Viewing Modes 22 Changing Magnification 23 Using Line Markers a With Control Box 24 b With Remote Software 24 Using Windowing a With Control Box 25 b With Remote Software 25 Using Split Screen a With Control Box 26 b With Remote Software 26 Setting Magnification Presets 27 28 Object Locator 28 Intelligent Focus Lock 29 Using Merlin Plus Color Select Options 30 31 Using the X Y Table 32...

Страница 4: ...ead this booklet and familiarize yourself with Merlin Plus features and operation before using this system Merlin Plus is ready to use right out of the box By reviewing Merlin Plus features and controls before using it and following the directions carefully you ll be able to enjoy all the great benefits from your purchase Enhanced Vision products are designed to give you the highest quality image ...

Страница 5: ...tium III 500mhz Hard Disk 50MB of hard disk space available Monitor VGA SVGA XGA monitor with 15 pin analog connector Peripherals CD ROM drive One 9 pin serial port available No Internet connection is required No additional software is required besides Merlin Plus Remote Software For system video requirements refer to the PC Compatibility section on Page 40 Computer System Recommended Configuratio...

Страница 6: ...X Y table locking lever 9 Recessed handles for carrying Merlin Plus 10 3 foot RCA video cable 11 Power supply and power cord 12 VGA extension cable 13 Merlin Plus control box with coil cable 14 Foot Switch 15 Software cable and adapter 16 Merlin Plus Remote Software CD ROM 17 3 foot S Video cable 18 Light ON OFF Switch 19 USB Adapter Additional Options not included 20 17 VGA Monitor 21 20 TV Monit...

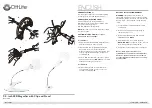
Страница 7: ...7 1 4 6 7 8 9 Merlin Plus at a Glance 10 3 12 2 5 17 16 15 14 13 18 20 not included 19 11 ...

Страница 8: ... to be used on a stable level surface such as a solid desk or table Do not place Merlin Plus on an unstable table cart or stand It may fall causing serious damage to the unit or bodily injury to a user Merlin Plus should be used indoors and should not be exposed to extreme or rapid changes in temperature or humidity Do not place Merlin Plus near a radiator or heater or where it will be exposed to ...

Страница 9: ...form Disconnect and secure all power and video cables and lock the X Y table before moving the unit Carry Merlin Plus only by the two recessed handles located on either side of its base Situate Merlin Plus securely in its new location before replacing the monitor on the upper platform Caring for Merlin Plus Always turn the power OFF for both Merlin Plus and the monitor when the system is not in us...

Страница 10: ...back of Merlin Plus see figure 2 Plug the VGA Monitor s power cord into the outlet 4 Connect the female end of the VGA extension cable provided item 12 on page 7 into the port labeled COMPUTER on the back of your Merlin Plus Connect the male end of the VGA extension cable into the 15 pin VGA output port on your computer This is usually where you would connect your VGA monitor to your computer see ...

Страница 11: ... platform and the other to the S VIDEO jack on the back of the monitor see figure 2 4 Plug the power supply cord item 11 on page 7 into the outlet and the other end into the DC IN 12V jack on the back of Merlin Plus base see figure 3 5 Plug the TV monitor s power cord into the outlet Note You may use the RCA yellow jack labeled VIDEO OUT on the back of Merlin Plus to connect a secondary TV monitor...

Страница 12: ...able item 15 on page 7 Plug the phone jack end into the port labeled CONTROL BOX on the back of Merlin Plus Plug the USB end into your computer see figure 1 OR B Connect using the serial port on your computer Connect the software cable phone jack cord item 15 on page 7 into the port labeled CONTROL BOX on the back of Merlin Plus Connect the 9 pin female adapter end of the software cable into a ser...

Страница 13: ...zard to walk you through the set up process At the end of the installation process you may choose to run the application immediately It is recommended you choose this option Please note that the software will be always running as a permanent application in the background on your computer For further details about the Remote Software please click on the HELP menu on the main application window see ...

Страница 14: ...the Power button is located in the lower far right corner of the monitor 2 above Press the Power button and wait a few moments for the picture to come on If Merlin Plus and the monitor are plugged into a power strip surge protector make sure its power switch is turned ON before attempting to turn on Merlin Plus or the monitor If the power strip surge protector comes with a circuit breaker make sur...

Страница 15: ...n application window of the remote software as shown on figure 2 you may either Double left click on the EV Remote Software icon as shown on figure 1 Right click on the EV Remote Software icon as shown on figure 1 and left click on MAXIMIZE on the drop down list Press the CONTROL F5 keys simultaneously on your computer keyboard You should then see the main application window as shown on figure 2 N...

Страница 16: ...is allows you to keep your hands on the keyboard at all times Note The HOT KEYS serve the same function as the Control Box Programming New HOT KEYS HOT KEYS may be reprogrammed to your liking or to avoid a conflict with third party software To view or change the HOT KEYS panel you may either Right click on the EV icon see figure 1 on page 15 and left click on HOT KEYS on the drop down list Left cl...

Страница 17: ...face You may also use the HOT KEYS as described above for quicker access Note A full description of each control is provided with the software To access the help click on HELP CONTENTS on the main application menu as shown on figure 4 About the CONNECTION STATUS Indicator The CONNECTION STATUS indicates if a valid connection is detected with Merlin Plus A green indicator shows an active connection...

Страница 18: ...OT KEYS on page 16 anymore To run the software again use the START MENU PROGRAMS MERLIN PLUS REMOTE and click on the MERLIN PLUS REMOTE icon Uninstalling Merlin Plus Remote Software To uninstall the application completely from your system use the START MENU PROGRAMS MERLIN PLUS REMOTE and click on the UNINSTALL icon In the uninstall window click on YES to proceed with the un installation About Mer...

Страница 19: ...llows Full Color Image Black and White Image Enhanced Positive Image Enhanced Negative Image Color Select 1 Color Select 2 Color Select 3 Full Color Image This mode is used most often because it gives you a true color representation of the image that is being magnified When Merlin Plus is first turned on it displays the image in full color Black and White Image Based on your preference you can cho...

Страница 20: ...on Color Select 2 This mode provides a black background with green text Color Select 3 This mode provides a black background with yellow text NOTE The control panel viewing modes are applicable to either a VGA monitor or a 20 TV monitor b Using Merlin Plus Control Box Viewing Modes You can choose a viewing mode by pressing the OPTIONS button on the control box This will change the current viewing ...

Страница 21: ...n Plus lights using the light control See item 18 on page 7 This will prevent glare while keeping Merlin Plus ON Split Screen Between Computer Image and Video Magnifier Image This mode displays a split screen between the video magnifier image and the computer image If the computer source is not available an On Screen Display will warn you once see figure 3 Full Image with External Camera This mode...

Страница 22: ...re Viewing Modes The software provided on the CD ROM features identical capabilities as the control box Please refer to previous section b on page 20 for a list of all viewing options The Remote Software uses a click and drag type of interface Simply click on the OPTIONS icon to toggle through the available viewing modes see figure 6 d Using Merlin Plus Foot Switch Viewing Modes The foot switch is...

Страница 23: ...rease the size of the image turn the dial clockwise or to the right To decrease the size of the image turn the dial counterclockwise or to the left The size you selected will be displayed in the upper left corner of your monitor see figure 2 On the voice recognition model only Merlin Plus will verbally confirm the magnification size you have selected Changing Magnification SIZE 7 figure 1 figure 2...

Страница 24: ...ine markers position across the screen in the horizontal or vertical direction by turning the POSITION knob on the control box b With the Remote Software You can choose horizontal or vertical line markers by clicking on the LINES icon on the graphical user interface see figure 2 Line markers are available in full video magnifier mode and external video source mode See Viewing Mode Features Availab...

Страница 25: ...een in the horizontal or vertical direction by turning the POSITION knob on the control box b With Remote Software You can choose horizontal or vertical windowing by clicking the WINDOW icon on the graphical user interface see figure 2 Windowing is available in full video magnifier mode and external video source mode See Viewing Mode Features Available on page 42 You can increase or decrease the s...

Страница 26: ...n split screen mode You change the viewable split areas position by turning the POSITION knob on the control box b With the Remote Software You can choose horizontal or vertical split screen by clicking the WINDOW icon on the graphic user interface see figure 2 Split screen is only available with a computer attached and a compatible VGA signal See Viewing Mode Features Available on page 42 You can...

Страница 27: ...erlin Plus To Program Magnification Presets 1 Press and hold the PRESET button 1 above and then at the same time press and hold the MODE button 2 The words PRESET SETUP will appear on your monitor 2 Take your hands off the two buttons and SET PRESET 1 will appear on the monitor 3 Turn the SIZE dial to any size you desire 4 Press the PRESET button once to make that selection 5 The monitor will now ...

Страница 28: ... you quickly locate something you re looking for on a page or a specific part of an object you want to view more closely To Locate the Desired Object 1 Select the level of magnification desired 2 Press and hold the PRESET button Merlin Plus will automatically zoom out to the widest field of view and a target as shown in figure 1 will appear in the center of the monitor screen ntinue to hold the bu...

Страница 29: ...for Writing 1 Place your note paper stationery checkbook or other writing material on the X Y table 2 Press the LOCK button on the control panel The letters FL will appear and remain in the upper left corner of the monitor Merlin Plus will now keep your writing in focus rather than your hand when it comes into the camera s frame If you change magnification sizes INTELLIGENT FOCUS LOCK will automat...

Страница 30: ...grammed for ease of use Up to five color select viewing modes can be programmed per your personal preferences How to Program a Color Select Option With Merlin Plus turned ON place a piece of reading material on the X Y table so that it appears on your monitor at a magnification size that is comfortable for viewing Follow these steps to program the color select options Step 1 Press and hold the MOD...

Страница 31: ...ton If you want to turn OFF the current COLOR SELECT 1 5 option select OFF by turning the SIZE button clockwise OR if no change is desired select EXIT by turning the SIZE button clockwise Then press the PRESET button to save the settings Step 4 To program another color select viewing mode repeat steps 2 4 If you are finished turn the SIZE dial counterclockwise to EXIT and press PRESET to return to...

Страница 32: ...on the start of your reading in the approximate center of the monitor screen 3 Use the PRESET button voice control For Voice Recognition Models only or SIZE dial to enlarge the image to a comfortable viewing size 4 Glide the X Y table to the left which will make the words flow across the screen for reading 5 When you have reached the end of a line glide the table back to the beginning of the line ...

Страница 33: ...ading to quickly find your place Writing with Merlin Plus Beginners should start at smaller magnification sizes and then increase magnification as they become more comfortable using Merlin Plus for writing The smaller the magnification size the bigger you tend to write the higher the magnification size the smaller you ll write Use a pen that makes a bold line such as a heavy point rollerball pen a...

Страница 34: ... up Options In clockwise order starting at Exit the options you can program are Exit When programming is complete select this option and press PRESET to exit Screen Messages If Screen Messages are turned off Merlin Plus will not display magnification sizes or viewing modes Voice Messages If Voice Messages are turned OFF Merlin Plus will not verbally confirm magnification sizes or viewing modes Rec...

Страница 35: ...ises such as a radio TV or people talking during the training session If there is an unusual noise that occurs while you are recording such as a cough or a door closing loudly simply remain silent for approximately 10 seconds and Merlin Plus will exit the training session automatically To restart begin with step 2 again Exiting Set up 1 Turn the SIZE dial all the way counterclockwise or to the lef...

Страница 36: ...our voice at its normal volume when facing the microphone on the control panel If there is any background noise such as a radio or television Merlin Plus may not respond because it is not able to distinguish your voice from the other sounds Reduce the background noise and try again If you want to make more than one move between magnification levels or choices of visual mode pause between commands ...

Страница 37: ...ou turn Merlin Plus OFF by pressing the POWER button see figure 1 The computer s display signal will automatically flow through the Merlin Plus even with it turned OFF There is no need to disconnect any cables see figure 2 37 Using a Computer with Merlin Plus OFF figure 1 figure 2 ...

Страница 38: ...e switching with 6 foot cable Auto focus camera Intelligent focus lock function for fixed targets applications Large onscreen display Auto detection of computer external camera presence Camera 60Hz 1 4 IT CCD EXview HAD NTSC Resolution 768 H 494 V 470 TV lines XY Table XY table size 17 5 44 5cm 12 5 32cm Working space height 7 5 19cm Total X dimension travel 11 28cm Total Y dimension travel 10 5 2...

Страница 39: ...ct Orange text on White background Color Select Green text on White background Color Select Green text on Yellow background Color Select Green text on Black background Color Select Orange text on Black background Color Select Blue text on Black background Color Select Yellow text on Black background Color Select Purple text on Black background Color Select Red text on Black background Color Select...

Страница 40: ...and VGA attached PC Compatibility Connects to any computer with external VGA SUB D15 connector outputting at least one of the following resolutions VESA DMT 1 0 VGA 640 480 at 60 72 75 85Hz VESA DMT 1 0 SVGA 800 600 at 60 72 75 85Hz VESA DMT 1 0 XGA 1024 768 at 60 70 75Hz Magnification 6X to 72X on a 20 monitor Field of view 2 8 7 2cm H 2 1 5 4cm V at 6X 5X to 61X on a 17 monitor 4X to 50X on a 14...

Страница 41: ...llow text on Blue background Color select Green text on Black background Color select Yellow text on Black background Mode to enter interactive menu for settings adjustments Screen messages ON OFF Voice messages ON OFF Optional Voice recognition ON OFF Optional Voice training mode Optional 5 user defined color select modes External Control Box Window Adjusts the Video Magnifier VGA split screen Op...

Страница 42: ...ter Image NO NO 3 Split Screen video magnifier computer image NO YES 4 Full External Video YES YES 5 Split Screen external video computer image NO YES TV Monitor Features Available FEATURES AVAILABLE LINE MARKERS WINDOWING Viewing Mode 1 Full Video Magnifier YES YES 2 Full Computer Image N A N A 3 Split Screen video magnifier computer image N A N A 4 Full External Video YES YES 5 Split Screen exte...

Страница 43: ...D15 Split screen VGA output SUB D15 Foot pedal jack input Control box RJ 11 input Power 100 240V 50 60Hz 29W max External power supply with removable power cord Connector IEC C13 14 Weight Dimensions Base unit 23lbs 10 5kg Height 13 75 35cm Length 20 5 52cm Width 19 48cm Environment Operating temperature 32F to 122F 0C to 50C Storage temperature 4F to 140F 20C to 60C Operating humidity 20 to 95 St...

Страница 44: ... Not Turn ON Make sure the VGA monitor power cord is completely plugged into the AC outlet Check the power strip surge connector if the monitor is plugged into one Check that Merlin Plus is ON a green light should be lit next to the control panel POWER button If not check FAQ 1 Check that the VGA monitor cable is properly secured into the port labeled MONITOR in the back of Merlin Plus see page 10...

Страница 45: ... Merlin Plus is ON If not check FAQ 1 Check that the light switch item 18 on page 7 under Merlin Plus control panel is ON 7 The Foot Switch Does Not Work Check that the foot switch cable is properly secured into the part labeled foot switch Check that a valid computer signal or external video is connected to the back of Merlin Plus If no computer or external video is connected to Merlin Plus you w...

Страница 46: ...If not check that all VGA cable connections are secured Once you can see the computer image with Merlin Plus OFF check that your computer is set to one of the compatible resolutions and refresh rates listed on the PC Compatibility Specifications on page 40 For directions on how to change display properties on your operating system please refer to your operating system user s guide Once a compatibl...

Страница 47: ...m A TV or monitor larger than 20 or weighing more than 100 lbs must be placed next to Merlin Plus on the desk or table at which you will be working It should be connected to the VIDEO OUT jack on the back of Merlin Plus base 15 Light Bulb Burns Out Your Merlin Plus comes equipped with two 10 000 hour fluorescent light bulbs designed to provide years of trouble free service However if one burns out...

Страница 48: ...ad write get more out of life Our innovative camera design lets you magnify in almost any position with images in full color Magnification 1X 44X With optional stand Available with Color and Black White Display Modes Acrobat The Acrobat s innovative rotating camera design enables people with low vision to perform daily tasks more effectively By rotating the camera the user can read write self view...

Страница 49: ...so converts quickly to a desktop Video Magnifier once the user points the Flipper camera down towards the table Max Powerful Magnifier A powerful magnifier for reading Connects to any TV in seconds Magnification 17X 25X on a 20 Television Available in Color or Black White Amigo Amigo is a truly portable desktop magnifier Optimal viewing is achieved with a tilting 6 5 inch viewing screen Amigo prov...

Страница 50: ...nced Vision products MaxTrak An essential accessory to keep your Max straight while rolling across a page Battery Rechargeable batteries for Enhanced Vision s low vision devices Other Enhanced Vision Products Contact information Toll Free 800 440 9476 www enhancedvision com Phone 714 465 3400 evinfo enhancedvision com Fax 714 374 1821 evsupport enhancedvision com ...

Страница 51: ...harge either repair the product or replace it during the warranty period The Monitor is not covered by the lifetime warranty and it is covered for three years only The lifetime warranty is non transferable and does not apply to groups multi users or agencies This warranty is not available for International Customers On the warranty card the purchaser will be asked to select between the three year ...

Страница 52: ...ther externally exposed parts that are scratched or damaged due to normal use 5 Damage due to operating Merlin Plus with equipment not supplied by Enhanced Vision 6 Light bulbs that are not covered under warranty 7 The Merlin Plus monitor is not included in the lifetime warranty and it is covered for three years THERE ARE NO OTHER EXPRESSED OR IMPLIED WARRANTIES FOR THIS PRODUCT Service Process We...

Страница 53: ......

Страница 54: ......

Страница 55: ......

Страница 56: ... impairment Merlin Plus is not designed to restore vision correct eye conditions or halt degenerative vision loss An eyecare professional can best determine the suitability of Merlin Plus for a patient s specific condition For more information please visit www enhancedvision com www enhancedvision com 800 440 9476 714 465 3400 MANMP200AMT MARCH 2006 Copyright 2004 by Enhanced Vision All rights res...

Отзывы: