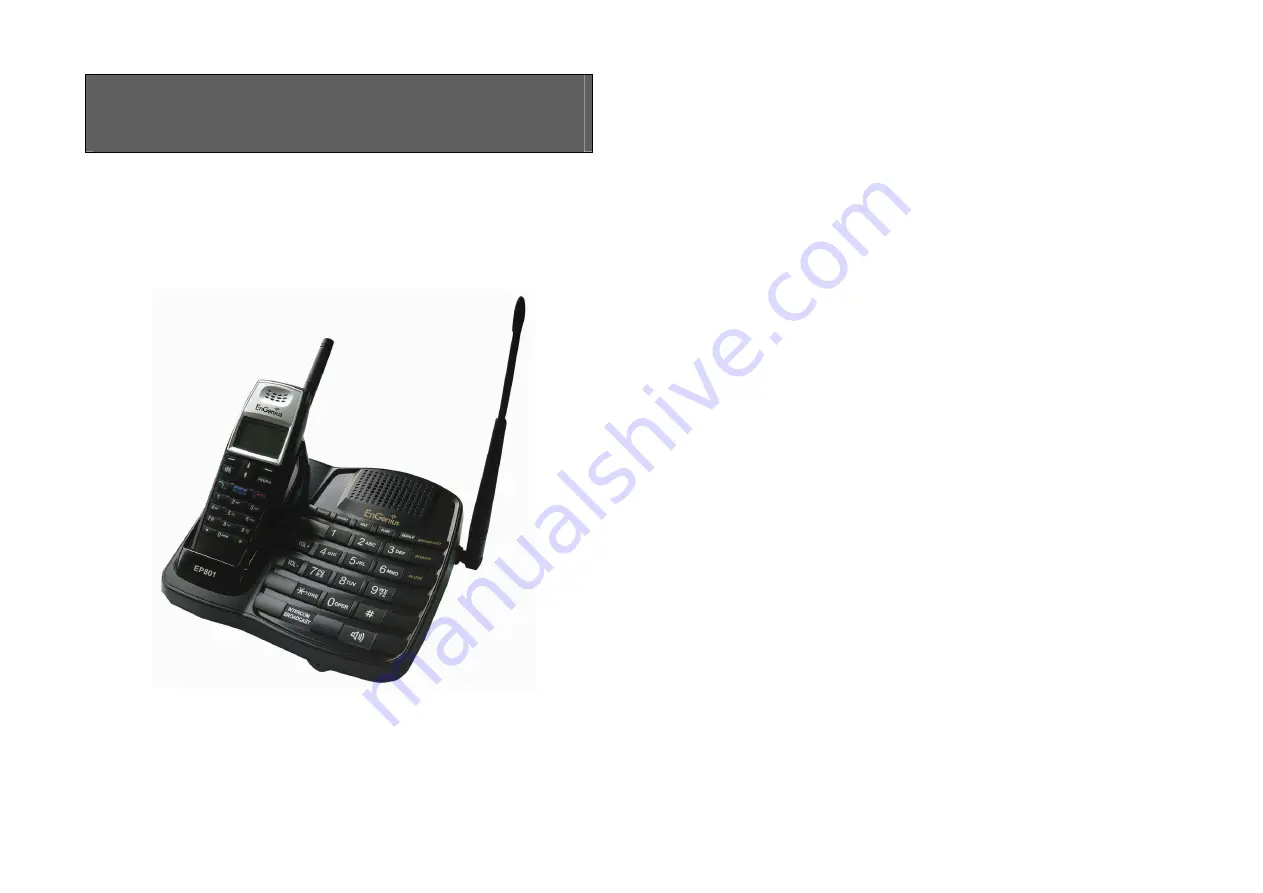
background image


User Manual 


EP801 

Digital Long Range Cordless Phone 


EnGenius Customer Service 

Singapore: 65-62271088 


~2~ 

Table of Contents 


Safety Instructions ...................................................................4


General Safety Instructions ..................................................4


Product Safety Instructions ..................................................4


Battery Safety Instructions ...................................................6


Regulatory Information ............................................................7


Equipment Checklist ................................................................8


Handset Illustration ..................................................................9


Handset Features ..................................................................10


Basic Handset Features .....................................................10


Additional Handset Features ..............................................12


Base Illustration .....................................................................17


Base Features .......................................................................18


Basic Base Station Features ..............................................18


Charger Illustration ................................................................20


Charger Features...................................................................21


Getting Started ......................................................................22


Base Station Installation.....................................................22


Handset and Charger Installation.......................................23


Basic Operations ...................................................................24


Operation Modes................................................................24


A. Base Operation Modes ..............................................24


B. Handset Operation Modes .........................................24


Making a Telephone Call ...................................................26


Making an 2-Way/ Intercom Call ........................................27


A. Handset to Handset Calls...........................................27


B. Intercom/2-Way from Base to Handset ......................27


C. Intercom/2-Way from Handset to Base ......................28


Making a Broadcast ...........................................................28


A. Handset to Handset Calls...........................................28


B. Broadcasting from Base to Handset...........................29


C. Broadcasting from Handset to Base ..........................29


Redial .................................................................................30


Receiving a Telephone Call ...............................................30


Receiving an Intercom Call ................................................31


Summary of Contents for EP801

Page 1: ...ic Base Station Features 18 Charger Illustration 20 Charger Features 21 Getting Started 22 Base Station Installation 22 Handset and Charger Installation 23 Basic Operations 24 Operation Modes 24 A Base Operation Modes 24 B Handset Operation Modes 24 Making a Telephone Call 26 Making an 2 Way Intercom Call 27 A Handset to Handset Calls 27 B Intercom 2 Way from Base to Handset 27 C Intercom 2 Way fr...

Page 2: ...one call distract you from working safely 2 In an emergency a If an emergency occurs dial the emergency phone number Remember if you are in an area where your phone does not have a clear signal from the base it is highly probable that the call may not go through Locate the nearest landline telephone or other communications device to call for help b Emergency calls may not automatically provide eme...

Page 3: ... expose you to dangerous voltages electrical currents or other risks Incorrect reassembling of the product may cause electric shock when the product is subsequently used 13 Avoid using the product during a storm There may be a risk of electric shock from lightning 14 Do not place the product where persons can step trip or fall on it 6 15 Do not place conductive objects over or near the antenna 16 ...

Page 4: ... rules of the EN 301 357 2 RF EN 301 489 EMC EN 60950 Safety and EN 50371 RF safety These limits are designed to provide reasonable protection against harmful interference in a general public installation Operations of these devices may still encounter interference from to nearby TV s VCR s radios computers or other electronic devices To minimize or prevent such interference the telephone system s...

Page 5: ... Indicate the Handset ID which is making intercom with 3 Speech mode 3 1 Speaker Indicator Indicate if the speaker is active 3 2 Headset mode 4 Sound and Indication 4 1 Enable ringer 4 2 Disable ringer 4 3 Ringer and vibrate mode 4 4 Vibrate mode 4 5 Message waiting indicator 5 Disable PA Indicate if the speaker is disable 6 11 Two Digit Address Index Displays the 2 digit Handset ID 7 Battery Stre...

Page 6: ... when in the Standby mode 9 END On Off Key a Ends a call b Leaves current menu operation up one level 12 c Press for 3 seconds to off the power 10 CALLER ID Key a Review caller ID list b Including received and missed caller ID Additional Handset Features 1 Multiple handsets registration a Up to 9 handsets can be registered to a base station b ID 11 19 individual Handset IDs c ID 91 99 Group IDs Ha...

Page 7: ...phone book by pressing or scrolling key 15 Key tone a Four level key tone volume selections Off Low Medium High 14 b Four key tone type selections 16 Call Timers a Display call time duration for current call during and immediately after the call 17 Programmable Feature Call a Allow user to pre program the most frequently used Feature code into EP801 which is adjunct to the PBX system b Up to 10 en...

Page 8: ...instead c When entering the base setting PIN is required Default is 0000 28 Change PIN Allow changing the base PIN which requires to enter the Base Settings MENU 6 5 a Using registered handset to change PIN from MENU 6 5 b Default PIN is 0000 c When entering the base setting PIN is required Default is 0000 29 Auto Hang Up feature a Using registered handset from MENU 6 6 to turn on off the Auto han...

Page 9: ...event accidental system reset c All handsets including administrator and additional base s need to be re registered after a base station reset 4 Registration Button REG Enters registration mode along with handset assigns handset ID 11 19 5 Line Jack Standard RJ 11C CA 11A connector to plug in the telephone line 6 Telephone Jack Another RJ 11C to plug in the optional answering machine 7 Dialing Key...

Page 10: ...oice volume during talk mode 10 SPEAKERPHONE key a Press the key to get the dial tone followed by phone number to make outgoing call b Press the key again to hang up the call c When enable the speakerphone the backlight of the key will be turned on too 11 INTERCOM BROADCAST Key a Enter handset ID then press the key to enable the 2 way intercom feature b Enter handset ID then press and hold the key...

Page 11: ...utomatically when placing on the charging slot 4 However if you run drain the battery it will take around one minute for handset to auto power on 22 Getting Started Base Station Installation There are three possible base station setups Base station alone Base station plus telephone answering device Base station plus standard telephone For best performance maintain at least a distance of 1 meter ab...

Page 12: ... is the default mode The speakerphone intercom broadcast and volume keys are active in IDLE mode 2 TALK mode the base operates in this mode during phone call intercom and broadcast operation The dialing Transfer Memory Hold Flash and Redial P keys are operated in this mode The In Use Intercom and Broadcast LED will light up respectively 3 REGISTRATION mode the base enters this mode by pressing the...

Page 13: ... phone book Menu 2 a Press or scrolling key to enter the phone book b Press to dial out the number 4 To abort dialing press key Notes 1 If the line is occupied the LCD shows No Line Available and handset returns to standby mode 2 If a link cannot be established the LCD will show No Base after a 12 second time out 3 A call duration timer will start displaying the length of the call after link is es...

Page 14: ... However once a handset answers the base and the answering handset both can end the call 28 C Intercom 2 Way from Handset to Base 1 Press key followed by the left softkey BASE 2 The base will ring until press the key to connect the intercom call with the handset Making a Broadcast A Handset to Handset Calls 1 Broadcasting all handsets a Press key left side of handset from one handset b Hear bi bi ...

Page 15: ...se station a Enter the Base ID 10 and then press key b Hear bi bi beep while the initiating handset broadcast the base stations c Start to speak the message to be broadcasted once you hear the beep sound the speakerphone of the base will be opened up 30 d Press the key to end the broadcasting Redial A From Handset 1 Press REDIAL Left softkey 2 The LCD shows the last phone number dialed To dial thi...

Page 16: ...tercom Call from Base 1 When an intercom call arrives called from Base the ringer will ring or vibrate unless the ringer has been turned off Press to answer the intercom call 2 If the handset is on the charger cradle ringer will be temporarily switched to Ring if it has been set to Vibrate lift the handset and start conversation 32 Ending a Call A from Handset To end a telephone or intercom call p...

Page 17: ...ff Press SELECT Left to confirm your choice This will turn off the ringer until it is turn on again from the menu Re When setting the ringer Off the standby screen 34 will show Ringer off 2 For temporary silencing the ringer when an incoming call arrives press SILENT Left soft key Key Guard 1 To prevent accidental dialing you can press MENU Right soft key then press to select KeyGuard option The h...

Page 18: ...and LEDs lighting up and flashing e Press the handset number key 2 this completes the de registration process Upon successful de registration the handset will show Please 36 register Notes 1 The base has a 30 second registration timeout starting from pressing the REG button The handset has a 12 second registration timeout starting from the registration or de registration option has been selected T...

Page 19: ...dset or Base the original handset will go back to standby mode automatically 38 Direct transfer from base 1 Press base key to put the call on hold Re When call on hold the base In Use speakerphone LED will be flashing 2 Enter the destination handset ID followed by key the destination handset will ring press or key of destination handset to pick up the call After the call pick up by destination han...

Page 20: ...t of the cursor or delete the character above the cursor or left of the cursor if cursor is on the right of the last character 3 By default all letters are entered in the upper case Use the key to toggle between upper and lower cases 4 A Pause entry represents a 1 second delay in dialing the following digits which is useful when calling a sequence of segmented numbers e g access code credit card n...

Page 21: ... soft key then start entering the call barring code After the number entered press SAVE Left soft key to save it 1 Up to 5 digits can be edit to be call barring code For example if you want to block all call dialing to Manhanttan NY area you can enter 1212 as the call barring code 2 If you base station is adjuct to a PBX system please also include that specific number to retrieve the PSTN tone b P...

Page 22: ...ribe to this feature The phone system receives and displays Caller ID information transmitted by your local phone company This information may include the phone number date time This unit can store up to 50 calls 2 The display will show the date and time of call on the first line followed by the name on the second line and the phone number on the third line An unread record will have a NEW at the ...

Page 23: ... enter the telephone number 3 Press key followed by a 2 digit memory location base then will emit a two short tone Bi Bi to confirm the setting 46 Re The memory location is 00 19 4 When using the base speed dail press key followed by key then enter the 2 digit memory location 00 19 The base will dial the telephone number accordingly Base Ringer Setting 1 You can change the base ringer by following...

Page 24: ...be BS SELECT BACK 3 Press or key to select the desired base 1 4 press CHANGE Left soft key to set the Subscribe BS ON OFF 4 If set the Ssubscribe BS ON that means the handset is able to access the line of the desired base so the handset is able to make outgoing call or answer incoming call via the desired base On the contrary if set the Ssubscribe BS OFF then the handset can t access the line of t...

Page 25: ... call 2 Intercom Ring Ringer for intercom call Use the or to scroll through 8 ringers press SELECT Left soft key to save selection Default 1 c Press 3 to select Key Volume when a key is pressed Use or to scroll through 4 options Off Low Medium and High Press SELECT Left soft key to save selection Default Medium d Press 4 to select Key Tone Use the or to scroll through 4 options 1 2 3 and 4 Press S...

Page 26: ...hone company f Press 6 to set Language 1 Use or to scroll through option 1 3 1 English 2 Spanish 3 French Default is English 2 Press SAVE Left soft key to confirm selection g Press 7 to set Custom Name 1 Enter characters using the Character Table and method discussed in the Phonebook section 2 Use or to move the cursor backward or forward to insert to the left of the cursor or delete the character...

Page 27: ... 2 to set hiding un hiding of the Phone Settings menu 1 Use CHANGE Left soft key to select and confirm on or off c Press 3 to set hiding un hiding of the Base Settings menu 1 Use CHANGE Left soft key to select and confirm on or off d Press 4 to set hiding un hiding of the Multi base Settings menu 1 Use CHANGE Left soft key to select and confirm on or off Re Select On means the menu will be display...

Page 28: ...ndset Call 27 28 Hearing Aid 4 I IDLE Mode 24 K Key Guard 13 34 50 Key Tone 14 50 56 Key Volume 50 L Line Jack 18 Lithium Ion Li Ion 8 Line Reversal 53 Line Ring 50 M Making a Broadcast 28 Making a Telephone Call 26 Making an 2 Way Intercom Call 27 Memory 18 19 24 26 46 Menu Display 14 49 53 Menu Mode 24 50 Multiple Handsets Registration 12 Multi Base Setting 14 16 46 47 53 Mute 13 33 N Name Taggi...

Page 29: ...rame 2 2 Receiver Sensitivity 116dBm BER 10 2 116dBm BER 10 2 Antenna Gain 2 dBi Long 2 5 dBi Short 1 5 dBi Antenna Connector TNC Proprietary Telephone Interface RJ11 x 2 NA Channel Coding rateConvolutional CRC rateConvolutional CRC Transmission Data Rate 42 667kbps 42 667kbps Speech Coding 8 kbps G 729A 8 kbps G 729A User Data Rate 32kbps duplex 32kbps duplex Duplex Time Division Duplex TDD Time ...

Reviews: