background image

01/2022

110 CUP / 140 CUP GAS RICE

COOKER AND WARMER

USER MANUAL

MODELS: 

Please read and save these instructions for future reference. Indoor Use Only.

#478EGRC110LP • 22,000 BTU
#478EGRC110NG • 14,000 BTU

#478EGRC140LP • 24,000 BTU
#478EGRC140NG • 28,000 BTU

5010781

Conforms to ANSI

STD Z83.11-2016

RiceCookers_Manual.indd   1

1/3/22   8:10 AM

Summary of Contents for 478EGRC110LP

Page 1: ...L MODELS Please read and save these instructions for future reference Indoor Use Only 478EGRC110LP 22 000 BTU 478EGRC110NG 14 000 BTU 478EGRC140LP 24 000 BTU 478EGRC140NG 28 000 BTU 5010781 Conforms to ANSI STD Z83 11 2016 RiceCookers_Manual indd 1 1 3 22 8 10 AM ...

Page 2: ... pg 3 4 Specifications pg 5 Parts List pg 5 Safe Usage pg 6 Installation pg 7 8 Before Use pg 9 10 Operating Instructions pg 11 12 Maintenance Instructions pg 12 13 Troubleshooting pg 13 Warranty pg 14 RiceCookers_Manual indd 2 1 3 22 8 10 AM ...

Page 3: ...THE GAS SUPPLIER OR THE SUPPLIER OF THE COOKER DO NOT USE THE PHONE NEAR THE COOKER TYPE OF GAS 1 THIS COOKER CAN ONLY USE PROPANE GAS OR NATURAL GAS PLEASE MAKE SURE THE TYPE OF GAS YOUR GAS COMPANY PROVIDES IS MATCHING THE GAS TYPE ON THE PRODUCT LABEL 2 IF THE TYPE OF GAS YOUR GAS COMPANY PROVIDES IS NOT MATCHING THE GAS TYPE ON THE PRODUCT LABEL PLEASE DO NOT USE THIS COOKER FIRE PREVENTION 1 ...

Page 4: ...STED MAINTENANCE IN THE MANUAL 5 ANY MODIFICATION OR DISASSEMBLY OF THE UNIT WILL RESULT IN VOID OF FACTORY WARRANTY IMPORTANT SAFEGUARDS The inner pot is only used for the gas rice cooker and cannot be applied to other appliances This can lead to breakdown The bottom burner is only for the gas cooker and cannot be applied to other appliances Do not adjust the electrode igniter too wide or too nar...

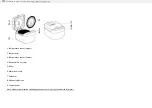
Page 5: ... 0 3 mm 0 2 mm 0 3 mm Orifice Size for Ignition Burner 0 4 mm 0 6 mm 0 4 mm 0 6 mm Gas Connection 1 2 NPT 1 2 NPT 1 2 NPT 1 2 NPT Power Type Liquid Propane Natural Gas Liquid Propane Natural Gas Pressure Regulator NO PART NAME 1 Water Pan 2 Flame Failure Device 3 Burner 4 Connector 5 Gas Switch 6 Cooking Knob 7 Warming Knob 8 Ignition Knob 9 Bottom Base 10 Warming Flame RiceCookers_Manual indd 5 1...

Page 6: ... Natural Gas T 1 Keep away from combustible substances 2 Place in an area with good ventilation 3 The side and back clearance must be more than 5 9 in 4 The above clearance must be more than 19 7 in 5 Place on a flat surface 6 Avoid placing in a humid location to extend the life of the unit PLACEMENT more than 19 7 more than 5 9 horizontal place RiceCookers_Manual indd 6 1 3 22 8 10 AM ...

Page 7: ...a free and clear from combustible materials gasoline and other flammable vapors and liquids 9 Locate the appliance in a well ventilated area Do not block or cover the opening between the shroud and pot Do not obstruct flow of combustion and ventilation of air 10 The unit must be installed with adequate clearance for servicing and proper operation 11 If the unit is connected to a flexible gas line ...

Page 8: ...ulator to be sure they are locked in place To prevent air leakage you can cover this joint with electrical tape if necessary Fig 4 To install the regulator for 478EGRC140NG and 478EGRC140NG 1 Fasten the gas regulator into the rear connector Be sure to follow the direction of the arrow Fig 1 2 Double check both the rear connector and the gas regulator to be sure they are locked in place To prevent ...

Page 9: ...e underneath the cooker NOTICE Failure will occur if the water pan wind shield and inner pot are placed improperly Confirm the following before using for best performance 1 Water pan is placed correctly underneath the bottom 2 Properly place the wind shield making sure it is aligned correctly GAS CONNECTION Improper placement would cause unsuccessful ignition or flame out NOTE Reversed placement o...

Page 10: ...s the WARMING button and exposes it It will stay down until pushed up to extinguish the pilot If the pilot has not lit repeat until the pilot lights 5 If the pilot fails to remain lit refer to Trouble Shooting on page 13 6 Replace the pot wind shield and base cover in their proper order With the pilot lit push the the click indicating that the sensor has reset With the pilot lit press the THEN COO...

Page 11: ...be taken out when first used This can help avoid injuries due to improper operation 2 Turn gas valve to ON position 3 Press down the IGNITION BUTTON until you hear a sound 4 Check to ensure WARM BUTTON is also at ON position 5 Press down COOK BUTTON COOK BUTTON goes up automatically when cooking is finished 6 Insert the inner pot 7 The cooker keeps warm after COOK BUTTON resumes OFF position 8 Pul...

Page 12: ... repeat please contact Emperor s Select for repair The recommended time for warming rice is one hour Pull the WARM button upwards when warming is not needed FLAMEOUT 1 The flame will go out after cooking COOK will return to starting position WARM will remain engaged for warming the rice 2 Do not open the lid after the flame is out Wait about 15 to 20 minutes to avoid possible injury AIR ADJUSTMENT...

Page 13: ... Broken down thermal expansive device 2 Improper assembly of inner pot outer pot of water pan 1 Thermal expansion device replacement 2 Assemble the parts test with the empty pot for 2 3 minutes Clean the inner pot with water or use neutral detergent when necessary Then wipe dry with a cloth Be careful when using metal cleaner this will cause scratches on metal surface especially for the thermostat...

Page 14: ...ally no claims can be made against this warranty for spoilage of products loss of sales or profits or any other consequential damages Normal wear type parts such as light bulbs and gaskets are not included in warranty coverage For Warranty Inquiries To obtain warranty information or make a claim against this warranty please contact the location where you purchased the product www WebstaurantStore ...

Reviews: