Emerson Research CKT9087, Owner'S Manual
The Emerson Research CKT9087 Owner's Manual is available for free download on our website. Get complete instructions and helpful guidelines on how to optimize the performance of your CKT9087 device. Visit manualshive.com to access the manual easily and conveniently.
Share
Download


Reviews:
No comments
Related manuals for CKT9087

CCWiFi
Brand: C. Crane Pages: 48

VHF 7200
Brand: Navman Pages: 60

RCD9038BT
Brand: F&U Pages: 10

aTUNE
Brand: KREAFUNK Pages: 44
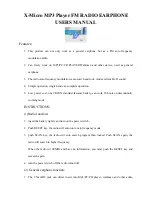
P3 Player FM RADIO EARPHONE
Brand: X-Micro Pages: 2

CR5WH
Brand: Blaupunkt Pages: 56

MARINE HH500
Brand: Cobra Pages: 48

1201178
Brand: Radio Shack Pages: 10

HX-116CR
Brand: Hannlomax Pages: 2

SureCross
Brand: Banner Pages: 2

31310T
Brand: SkyScan Pages: 7

JWM-120
Brand: Jensen Pages: 2

Heritage
Brand: Bush Pages: 16

MDS SD Series
Brand: GE Pages: 148

X-tra Talk LXT118 Series
Brand: Midland Pages: 12

VXD-R70
Brand: Vertex Standard Pages: 24

ICF-C320
Brand: Sony Pages: 2

ICF-C263
Brand: Sony Pages: 2


