Elsrod Black Eye Max-II, User Manual
Introducing the Elsrod Black Eye Max-II! Unlock the full potential of your device with our comprehensive User Manual. Discover step-by-step instructions, troubleshooting tips, and in-depth product knowledge, all available for free download at manualshive.com. Get the most out of your Black Eye Max-II and enhance your user experience today!
Share
Download


Reviews:
No comments
Related manuals for Black Eye Max-II

POWER series E1480W
Brand: GE Pages: 87

POWER series E1486TW
Brand: GE Pages: 93

POWER series E1486TW
Brand: GE Pages: 2

Power series E1410SW
Brand: GE Pages: 85

Power series E1410SW
Brand: GE Pages: 85

Power series E1410SW
Brand: GE Pages: 85

Power series E1410SW
Brand: GE Pages: 85

Power series E1410SW
Brand: GE Pages: 85

Power series E1410SW
Brand: GE Pages: 85

Power series E1410SW
Brand: GE Pages: 2

Power series E1410SW
Brand: GE Pages: 85

SMART A1255
Brand: GE Pages: 95

P1
Brand: EasyN Pages: 11

Horus
Brand: Lahoux Optics Pages: 24
EXPCMR-ALG-OZ-IC-1080P-1224 HD-TVI
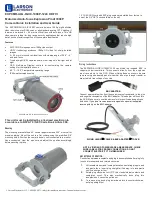
Brand: Larson Electronics Pages: 4

AV3125IRv1
Brand: Arecont Vision Pages: 2

KCM-5111
Brand: ACTi Pages: 16

MATRIX VISION GiGE VISION BVS CA-GX0-XAS2...
Brand: Balluff Pages: 94


