Electrolux EWK0462X, Instruction Manual
The Electrolux EWK0462X is a versatile kitchen appliance that requires a proper understanding of its functionalities for optimal usage. Unlock its immense potential by downloading the detailed Instruction Manual from manualshive.com. This essential manual is available for free download and will guide you through every feature and function of the EWK0462X for an exceptional cooking experience.
Share
Download


Reviews:
No comments
Related manuals for EWK0462X

ECS25.2Z
Brand: La Sommeliere Pages: 89

XLT 1600
Brand: WhisperKool Pages: 36

CBR1501SLD
Brand: EdgeStar Pages: 21

OW004
Brand: Cavanova Pages: 12

122
Brand: Cavist Pages: 110

PRO110
Brand: La Sommeliere Pages: 63

REF 48 B
Brand: Gallet Pages: 24

WineARM15
Brand: WINEMASTER Pages: 15
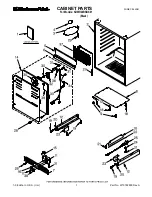
KUWO24RSBX01
Brand: KitchenAid Pages: 5

KUWL204ESB
Brand: KitchenAid Pages: 44

vcwb300
Brand: Viking Range Pages: 18

V20SGEBK
Brand: Vintec Pages: 16

V190SG2E-BK
Brand: Vintec Pages: 16

SWC-6GBLSHWO
Brand: Summit Appliance Pages: 8

HWC 25360 DL
Brand: Hoover Pages: 16

HWC 2335
Brand: Hoover Pages: 118

Reflections HN6
Brand: Husky Pages: 4

HN10 Reflections
Brand: Husky Pages: 10


