background image


Edge  ,

 Quick Installation Guide 


1. Description 

 
This installation guide provides detailed information and instructions for the 

Edge

 network DVR 

products. The 

Edge

 offers the remote live and playback function as a recording server. 
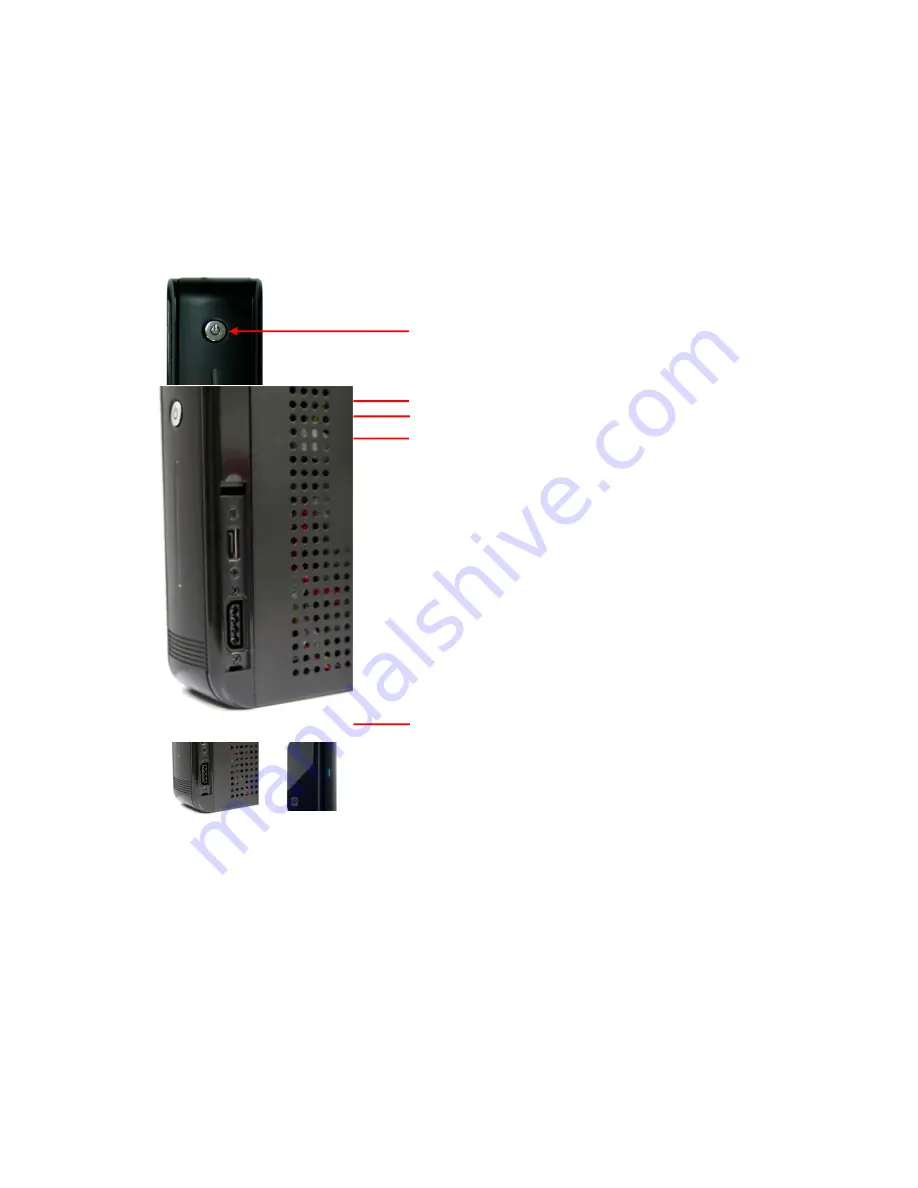


•   Front View 


•    Right Side View 


Power On/Standby button 

REC LED : Emitting during recording   

Power LED : See ** below 

Power On/Standby button 

Network LED : Emitting    when Ethernet cable connected 

Network LED : Emitting    when Ethernet cable connected 

Sata hard disc drive 

** Power status 

Red : Standby state 

Orange : In booting progress 

Green : Normal state   

Extra Sata connector : To expand hard disc drive             

adding to installed drive inside 

Summary of Contents for Network DVR

Page 1: ...g server Front View Right Side View Power On Standby button REC LED Emitting during recording Power LED See below Power On Standby button Network LED Emitting when Ethernet cable connected Network LED Emitting when Ethernet cable connected Sata hard disc drive Power status Red Standby state Orange In booting progress Green Normal state Extra Sata connector To expand hard disc drive adding to insta...

Page 2: ...tput NC NO Devices selectable TTL Level Input 8 Ports Sensor Input WiFi Antennas 2 4GHz and 5GHz wireless antennas Only available for Edge Gigabit Ethernet Port To connect to IP cameras and Client software RS232 Port To connect devices such as POS Reset Button To return all configurations to factory default values WPS Button To automatic detect and connect to wireless cameras Only working with wir...

Page 3: ... cameras The rear panel network port can be used for devices within the same network or in different networks as shown in the example diagram Connecting Alarms Alarm Input You can use external devices to signal the network camera to react on events Mechanical or electrical switches can be wired to the Alarm Input 1 8 and GND Ground connectors GND Ground Connect the ground side of the alarm input t...

Page 4: ...onnected through USB port Connecting External SATA The NVR supports an external SATA interface for connecting external storage devices one SATA port is located on the right side of body You can expand storage capacity by utilizing the internal HDDs and external SATA port An external SATA HDD can be connected to this SATA port This port is composed of signal and power connectors Connecting the Powe...

Page 5: ...ttings To reset the unit you will need to follow steps 1 Press the Factory Reset button more than 5 seconds while the NVR is operating 2 While the NVR is initializing the alarm LED will blink 3 After initializing the NVR will restart Caution When using the Factory Reset you will lose any settings you have saved Configuration 1 Standalone Configuration Case 1 Case 2 Internet Local Network Client PC...

Page 6: ...Edge Quick Installation Guide 6 2 Multi location Configuration Case 1 Case 2 Local Site 1 Local Site 2 Internet Internet Client PC Client PC Internet Internet ...

Page 7: ...D 1 Connect the NVR to the network and power up 2 Start SmartManager utility All programs SmartManager the main window will be displayed after a short while any network devices connected to the network will be displayed in the list 3 Select the NVR on the list and click right button of the mouse You can see the pop up menu as below 4 Select Assign IP You can see an assign IP window Enter the requi...

Page 8: ...s and executes the client software automatically after installing ActiveX 3 If the NVR has not been configured Setup Wizard will be shown This drastically reduces the time required for system installation Images from cameras are connected and recorded automatically to the NVR so that you can start monitoring and recording instantly Note Setup Wizard window will be shown only in factory default sta...

Page 9: ...tomatically Change the admin password or use the default password admin of cameras to be detected If you don t want to use Easy Install function inactivate checkbox In case that you activated Easy Installation you don t need to do Step3 Click the Next button to go to next page Note Easy Install is inactivated in factory default ...

Page 10: ...d click the Start Search button Note The NVR4 supports only for cameras which use the ONVIF Conformance protocol Search Mode Auto Search LAN Lists cameras in a LAN environment IP Search Single Allows you to enter the IP address of a device You can search more than one device at a time by entering a range of IP addresses Domain Name Search Allows you to enter the domain name registered on a DDNS se...

Page 11: ...d click the Register button to register The Login window appears and inquires ID and Password One camera selection Several camera selection Enter the user ID and password which you set in the camera and click the OK button in order to connect to that camera remotely In case of selecting several cameras and registering it takes several times You can see the result in the Already Registered column o...

Page 12: ...d camera list in the Camera Registration window When you select a camera channel in the list the basic information for that camera is displayed in Camera Information section Configure camera settings you want to change Click the Save button to save settings changed ...

Page 13: ... Wizard window You can configure camera settings about Profile Video Audio and Network Step4 The list of available hard disk drives is displayed with the information of the hard disk drives Select a hard disk drive from the list and click the Format button Caution You must format HDD to record video from camera after installing HDD at the first ...

Page 14: ...ard disk installed in the NVR supports S M A R T Self Monitoring Analysis and Reporting Technology monitoring program the status of the installed hard disk is displayed The current status of the Disk S M A R T will be displayed in the S M A R T column The S M A R T field displays Good if the Disk S M A R T is good and Bad if it is bad The Disk S M A R T status is monitored in real time Click the F...

Reviews: