Easypix DV 5311 HD, User Manual
The EasyPix DV 5311 HD provides high-definition video recording capabilities. Ensure a hassle-free setup with the included quick start manual. For detailed instructions and additional features, refer to the full manual available for free download at manualshive.com. Unlock the full potential of this product with the comprehensive user manual.
Share
Download


Reviews:
No comments
Related manuals for DV 5311 HD
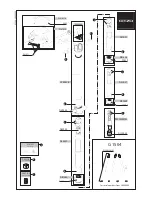
Classic Tele Studex Mk2 G1504 G1504
Brand: Gitzo Pages: 1

EVERIO GZ-RX110BE
Brand: JVC Pages: 96

Everio GZ-MS250
Brand: JVC Pages: 56

DCR-DVD200 - Dvd Handycam Camcorder
Brand: Sony Pages: 2

DCR VX2100 - Handycam Camcorder - 380 KP
Brand: Sony Pages: 2

DCR SR100 - Handycam Camcorder - 3.3 MP
Brand: Sony Pages: 2

DCR SR100 - Handycam Camcorder - 3.3 MP
Brand: Sony Pages: 2

DCR SR100 - Handycam Camcorder - 3.3 MP
Brand: Sony Pages: 27

DCR-DVD105 Nero Express 6
Brand: Sony Pages: 70

D8MM-01
Brand: Sony Pages: 44

DCR-DVD200 - Dvd Handycam Camcorder
Brand: Sony Pages: 93

DCR VX2100 - Handycam Camcorder - 380 KP
Brand: Sony Pages: 107

DCR SR100 - Handycam Camcorder - 3.3 MP
Brand: Sony Pages: 107

DCR HC62E - Mini DV Camcorder
Brand: Sony Pages: 100

DCR SC 100 E
Brand: Sony Pages: 116

DCR-DVD108BDL
Brand: Sony Pages: 139

DCR DVD7 - DVD Handycam Camcorder
Brand: Sony Pages: 112

DCR TRV480 - Digital8 Handycam Camcorder
Brand: Sony Pages: 156


