background image

EMH363CGB

EMH363GBNX

EMH363CGBW

EMH463GBNX

EMH461GBNX

EMH461CGB

MANUAL


COCINA DE GAS

GAS COOKER

www.easelectric.com

V.3

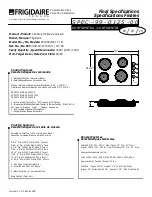
Summary of Contents for EMH363CGB
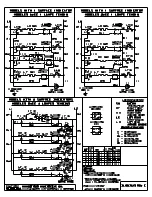
Page 1: ...EMH363CGB EMH363GBNX EMH363CGBW EMH463GBNX EMH461GBNX EMH461CGB MANUAL COCINA DE GAS GAS COOKER www easelectric com V 3 ...

Page 2: ...acte con nuestro centro de atención al cliente El fabricante no se hace responsable de cualquier daño en personas causadas por una incorrecta instalación o uso de este aparato El aparato tiene la certificación de uso de los países que están marcados en el aparato El fabricante reserva el derecho de hacer cualquier modificación que pueda ser considerada importante sin poner en peligro las principal...

Page 3: ...xión eléctrica Conversión de gas 23 Solución de problemas 24 Instrucciones de seguridad 3 Instalación 4 Seguridad infantil 6 Durante el uso 7 Mantenimiento y limpieza 10 Información ambiental 10 Instruccionesparausoymantenimiento Descripción del aparato 11 Cómo usar el aparato 13 15 16 Garantía comercial 25 Mantenimiento y limpieza Seguridad y consejos para ahorrar energía 22 ES 2 V 3 ...

Page 4: ... Este manual de instrucciones debe guardarlo para futuras referencias Si este aparato es transferido o vendido a otra persona asegúrese de entregar el manual de instrucciones El fabricante no se hace responsable si estas normas no son cumplidas Las siguientes notas son para entender más fácilmente que puede prevenir cualquier accidente causado y un uso mas conveniente Lea las siguientes instruccio...

Page 5: ...erre la válvula media 2 Abra la ventana para ventilar 3 Póngase en contacto con nuestro centro de servicio mediante el uso de otro teléfono ES 4 Instalación Advertencia Este aparato debe ser instalado de acuerdo con las reglas y ubicado en un ambiente con ventilación Antes de la instalación asegúrese de que el gas y el suministro eléctrico cumplen con el tipo especificado en la placa de caracterís...

Page 6: ... aparezcan llamas en el hornillo apáguelo y no vuelva a enchufarlo hasta que no haya pasado como mínimo 1 minuto El uso de una cocina de gas genera calor y humedad en la habitación donde se instala Asegúrese de que la cocina está bien ventilada mantenga abiertos los huecos de ventilación natural o instale un aparato de ventilación mecánico El uso intensivo y prolongado del electrodoméstico puede r...

Page 7: ...con este aparato Este aparato está diseñado para ser utilizado por adultos Los niños también pueden hacerse daño tocando las sartenes o las ollas de la cocina Este aparato no debe ser utilizado por personas con falta de experiencia y o falta de capacidades sin supervisión ES 6 V 3 ...

Page 8: ...xterno o sistema de control remoto El uso de la cocina de gas genera calor y humedad en la habitación donde se haya instalado Asegúrese que la cocina está bien ventilada guarde ventilación natural o instale un aparato de ventilación mecánica campana extractora No use este aparato si está en contacto con agua No ponga en funcionamiento el aparato con las manos húmedas ES 7 V 3 ...

Page 9: ...no deberían colocarse sobre la cocina ya que si se vuelcan o derraman puede producirse un accidente No use prendas grandes toallas o similares que puedan prender ES 8 Durante el uso No utilice materiales inflamables para limpiar el aparato A los alimentos perecederos los objetos de plástico y los aerosoles les afecta el calor por lo que no deben colocarse ni encima ni debajo de la unidad de cocina...

Page 10: ...en contacto con las superficies calientes del electrodoméstico No utilice un paño de cocina en lugar de un agarrador para las ollas Objetos tales como ropa pueden prender fuego muy rápidamente Cuando utilice utensilios de cocina de cristal asegúrese que son específicos para cocinar Si la superficie está fabricada con cristal endeble apague el aparato para evitar errores eléctricos Apague siempre e...

Page 11: ...s por separado para un tratamiento especial En base a la directiva europea 2012 19 UE de residuos de aparatos eléctricos y electrónicos RAEE los electrodomésticos no pueden ser arrojados en los contenedores municipales habituales tienen que ser recogidos selectivamente para optimizar la recuperación y reciclado de los componentes y materiales que los constituyan y reducir el impacto en la salud hu...

Page 12: ...e encendido Suministro eléctrico Características del quemador ΣQn Soporte Wok Dimensiones Conexión de gas Modelo Placa superior Dispositivo de encendido Suministro eléctrico Características del ΣQn Soporte de sartén Cerámica Acero Inoxidable Tipo de encendido continuo Hilo G1 2 2 Auxiliar 1 1 Semi rápido Wok Hierro colado Acero Inoxidable Tipo de encendido continuo G1 2 hilo ápido 2 Auxiliar 1 Wok...

Page 13: ...ctrico Características del quemador ΣQn Soporte Wok Dimensiones Conexión de gas Modelo Placa superior Dispositivo de encendido Suministro eléctrico Características del ΣQn Soporte de sartén Cerámica Tipo de encendido continuo Hilo G1 2 1 Auxiliar 1 1 Semi rápido Wok Hierro colado Tipo de encendido continuo G1 2 hilo ápido 2 Auxiliar 1 Wok 1 Semi r 6 05kW EMH363GBNX Acero Inoxidable EMH363CGB EMH36...

Page 14: ...en ser seleccionadas entre la posición máxima y la posición mínima El símbolo en el panel de control cerca de la ruleta de control indicará la operación del hornillo en cuestión Soporte 4 Esponja 4 Tornillo 4 Inyector 4 Manual de instrucciones 1 Curva de gas 1 Encendido automático con dispositivo de seguridad de fallo de llama El aparato está equipado con un dispositivo de seguridad de fallo en ca...

Page 15: ...o el mando durante 15 segundos después de que la llama aparezca Si después de 15 segundos el quemador no se ha encendido deje de hacer funcionar el dispositivo abra la puerta y o espere al menos 1 minuto antes de volver a intentar otro encendido Después de este intervalo de 15 segundos para regular la llama debería de seguir girando el mando en contra de las agujas del reloj hasta que la llama ten...

Page 16: ...nillo puede rozar los controles o cerrarlos y con ello incrementar la temperatura y puede causar daños Nunca coloque los utensilios directamente en la parte superior del quemador Coloque los utensilios de cocina en la parte superior del trípode No coloque ningun elemento entre los soportes de las sártenes porque puede provocar serios daños en el producto Sostenga el mango de la olla con cuidado cu...

Page 17: ...llos tan pronto como sea posible para evitar el riesgo de corrosión Las partes de acero inoxidable de el aparato pueden descolorarse Esto es normal por las altas temperaturas Cada vez que el aparato esté en uso estas partes deberían ser limpiadas con un producto adecuado para el acero inoxidable Ŷ La limpieza solo se puede llevar a cabo cuando el aparato esté completamente frío Ŷ El aparato debe s...

Page 18: ...ndo cuidado un estropajo de níquel bien impregnado en jabón Tras la limpieza asegúrese de secar con un paño suave Reensamble el hornillo auxiliar semi rápido rapido y el hornillo triple corona como sigue 1 Coloque el esparcidor de llama 4 en el quemador de cubeta 5 para que el equipo de arranque y el equipo de supervisión de llama se expandan hacia sus respectivos agujeros El esparcidor de llama d...

Page 19: ...no toquen ninguna parte del aparato la cuál pueda calentarse La tubería de gas no debería ser doblada o bloqueada por ningún objeto Compruebe las dimensiones del aparato al igual que las dimensiones del hueco a cortar en la unidad de cocina Los paneles sobre la superficie de trabajo directamente cerca del aparato deberían ser fabricadas de material no inflamable Ambos la superficie estratificada y...

Page 20: ...perficie horizontal sobre la que se encuentra 400mm entre la superficie de la placa siempre y cuando que la parte inferior de la superficie horizontal esté en linea con el otro borde de la placa Si la parte inferior es más baja que 400mm entonces debería de haber al menos 50mm en horizontal hasta el borde de la placa Espacios necesarios para colocar la encimera con una campana de cocina arriba 400...

Page 21: ...esta operación 2 Adhiera la esponja al borde sobre el perímetro inferior del aparato 3 No deje huecos sin esponja de sellado a lo largo de todo el perímetro Esponja 1 Coloque el soporte B alineándolo sobre los orificios del tornillo Hay un conjunto de orificios de tornillos en cada esquina de la placa H Apriete ligeramente un tornillo C hacia el soporte B para que el soporte se una a la placa así ...

Page 22: ...stalación y las regulaciones de uso o Asegúrese de estar en concordancia con la ley ya que es de su interés Junta G1 2 Acoplador Colector de gas Junta Colector de gas Ø11 5 Acoplador LPG NG NG LPG Suministro de gas y guías de instalación Este aparato debe ser instalado y conectado de acuerdo con las regulaciones concretas del país donde va a ser instalado ES 21 V 3 ...

Page 23: ...trica Tipo de gas y presión Potencia electrica Fase El cable de color verde y amarillo debe ser conectado con la letra E o por el símbolo de tierra 3 0kW 219g h 1 75kW 127g h 1 0kW 73g h 7 5kW 546g h G30 29mbar 0 85 0 65 0 50 G20 20mbar 1 30 0 97 0 72 3 3kW 241 g h 1 75kW 127g h 1 0kW 73g h 7 8kW 568g h G30 29mbar 0 93 0 65 0 50 G20 20mbar 1 28 0 97 0 72 220 240V NA 220 240V NA 220 240V 3 3kW 241g...

Page 24: ...ajuste el pequeño tornillo en el centro del eje de la llave El ajuste correcto es obtenido cuando la llama tiene una longitud aproximada de 3 4mm Para gas butano propano el ajuste del tornillo debe estar correctamente apretado Ponga la llave de nuevo en la perilla Asegúrese que la llama no se apague rápidamente cuando bajes del máximo al mínimo Repita este proceso para cada una de las llaves de ga...

Page 25: ... la llama El producto que se estaba cocinando se ha derramado Apague el hornillo Espere un minuto y reinicie la zona Llama amarilla Los orificios en el esparcidor de llama están obstruidos OHDQ WKH ÀDPH VSUHDGHU Se usa diferente gas Compruebe el gas que usa Llama inestable La tapa del quemador está mal ensamblada Ensamble la tapa del quemador correctamente Huele a gas Ŷ Si el problema no se soluci...

Page 26: ...ción 5 Averías producidas como consecuencia de uso anormal negligente o inadecuado del aparato o por cualquier tipo de origen externo 6 Responsabilidades civiles de cualquier naturaleza 7 Daños consecuenciales al aparato siempre que estos no hayan sido provocados por una avería interna de funcionamiento 8 Mantenimientos o conservación del aparato revisiones periódicas ajustes y engrases 9 Las aver...

Page 27: ... inundaciones fenómenos o movimientos sísmicos erupciones volcánicas huracanes tempestades hechos derivados de terrorismo motín alboroto o tumulto popular manifestaciones y huelgas legales o ilegales hechos de actuaciones de la Fuerzas Armadas o de los Cuerpos de Seguridad del Estado en tiempos de paz conflictos armados y actos de guerra declarada o no vicio o defecto propio de los bienes hechos c...

Page 28: ...turer shall not be responsible for any damages to persons or property caused by incorrect installation or use of the appliance The appliance has been certified for use in countries other than those marked on the appliance The manufacturer also reserves the right to make any modifications to the products as may be considered necessary or useful also in the interests of the user without jeopardising t...

Page 29: ...tions for use and maintenance Description of the appliance 11 How to Use the appliance Safety and Energy saving advice Cleaning and Maintenance Troubleshooting Technical instructions Using instructions Positioning Installing the appliance Gas Connection Electrical Connection Gas Conversion 6 10 19 23 24 Gas Specifition 20 13 15 16 18 24 25 26 Warranty 27 EN 2 V 3 ...

Page 30: ...ture reference If the appliance is sold or transferred to another person ensure the booklet is passed on to the new user The manufacturer declines any liability should these safety measures not be observed The following marks are made to be easily understood so that you can prevent any accident caused by misuse in advance and use the appliance more conveniently Read the following contents thorough...

Page 31: ...ntact our service centre by using a phone outside The fuel gas contains mercaptan so that you can smell the gas leak smell of rotten garlic or egg even where only 1 1000 of the gas is in the air DANGER EN 4 installation Warning This appliance shall be in stalled in accordance with regulations in force and only used in a well ventilated space Prior to installation ensure that the gas and electrical...

Page 32: ...tion Otherwise contact the dealer before installing the appliance The adjacent furniture and all materials used in the installation must be able to room it is located in whilst in use In the event of burner flames being accidentally extinguished turn off the burner control and do not attempt to re ignite the burner for at least one minute The use of a gas cooking appliance results in the production...

Page 33: ...liance is not intended for use by children or other perso ns whose physical sensory or mental capabilities or lack of experi ence and knowledge prevents them from using the appliance safety without supervision or instruction by a responsible person to ensure that they can use the appliance safety Warning Caution during use Only use the appliance for preparing food Warning Do not modify this applia...

Page 34: ...ing and cooking sur faces of the appliance become hot when they are in use take all due precautions Never leave the appliance unattended when cooking Do not use large cloths tea towels or similar as the ends could touch the flames and catch the fire Unstable or misshapen pan s should not be used on the appliance as they can cause an accident by tipping or spillage Do not use this appliance if it c...

Page 35: ... this appliance Do not spray aerosols in the vicinity of this appliance while it is in operation Perishable food plastic items and aerosols may be affected by heat and should not stored above or below the appliance Ensure the control knobs are in the position when not in use EN 8 V 3 ...

Page 36: ...iance surfaces of the cooking appliance If you have any mechanical parts eg an artifical heart in your body consult a doctor before using the appliance Do not use a tea towel or similar materials in plac e of a pot holder Such cloths can catch fire on a hot burner When using glass cookware make sure it is designed for top plat e cooking If the surface is made of glass cracked switch off the applianc...

Page 37: ...of such waste separately for special treatment is necessary The european directive 2012 19 UE on wasted electrical and electronic equipments WEEE requires that household electrical appliances must not be disposed of in the normal unsorted municipal waste stream appliances must be collected separately in order to optimize the recovery and recycling of the materials they contain and reduce the impac...

Page 38: ...Steel 510 90 u uous Ignition Typ 1 2 thread ac 50Hz 60Hz 0 6W T e riple Crown 1 Semi rapid 2 A Cast Iron uxiliary 1 7 8kW W Dim G Model Pan Support ok pan Support Top Plate Ignition device as Connection Electric supply Burner Feature ΣQn ension W D H 590 Contin G 220 240 V N A 510 90 u uous Ignition Typ 1 2 thread ac 50Hz 60Hz 0 6W T e riple Crown 1 Semi rapid 2 Auxiliary 1 7 8kW Enamel Glass EMH4...

Page 39: ... 2 thread ac 50Hz 60Hz 0 6W Triple Crown 1 Semi rapid 1 Auxiliary 1 6 05kW W Dim G Model Pan Support ok pan Support Top Plate Ignition device as Connection Electric supply Burner Feature ΣQn ension W D H 590 Contin G 220 240 V N A 515 90 u uous Ignition Typ 1 2 thread ac 50Hz 60Hz 0 6W T e riple Crown 1 Semi rapid 1 Auxiliary 1 6 05kW Enamel Enamel Glass EMH363CGB EMH363GBNX EMH363CGBW Stainless S...

Page 40: ...H FRQWURO SDQHO QH W WR WKH FRQWURO KDQGOH ZLOO LQGLFDWH ZKLFK EXUQHU LW RSHUDWHV Black circle gas off Large flame maximum setting Small flame minimum setting Automatic ignition with flame failure safety device The appliance is fitted with a flame failure safety device on each burner which is designed to stop the flow of gas to the burner head in the event of the flame going out Bracket 4 Sponge 4...

Page 41: ...o You should hold down the control knob for 15 seconds after the flame on the burner has lit If after 15s the burner has not lit stop operating the device and open the compartment door and or wait at least 1 min before attempting a further ignition of the burner o After this 15 second interval to regulate the flame you should continue turning the control knob anti clockwise until the flame is at a...

Page 42: ...LDPHWHU RQ WKH EXUQHUV QHDU WKH FRQWUROV ZKLFK ZKHQ SODFHG RQ WKH PLGGOH RI WKH EXUQHU PD WRXFK WKH FRQWUROV RU EH VR FORVH WR them that they increase the temperature in this area and may cause damage 1HYHU SODFH FRRNZDUH GLUHFWO RQ WRS RI WKH EXUQHU 3ODFH WKH FRRNZDUH RQ WRS RI the trivet R QRW SODFH DQ WKLQJ HJ ÀDPH WDPHU DVEHVWRV PDW EHWZHHQ SDQ DQG SDQ support as serious damage to the applianc...

Page 43: ... appliance may become discoloured over time This is normal because of the high temperatures Each time the appliance is used these parts should be cleaned with a product that is suitable for stainless steel 7RS SODWH 8VDEOH 8QXVDEOH Metal Brush GLEOH 2LO FLGLF ONDOL Detergent EUDVLYH 7KLQQHU HQ HQH 7K M UDVLYH Soft cloth Neutral Detergent Nylon Brush wrung out Ŷ OHDQLQJ RSHUDWLRQV PXVW RQO EH FDUUL...

Page 44: ...s and away from the top plate Soak them in hot water and a little After cleaning and washing them wipe and dry them carefully Make sure that the flame holes are clean and completely dry Wipe the fixed parts of the burner cup with a damp cloth and dry afterwards Gently wipe the gnition device and flame supervision device with a well wrung out cloth and wipe dry with a clean cloth Before placing the bu...

Page 45: ...WR WKH DSSOLDQFH Ŷ OO DSSOLDQFHV FRQWDLQLQJ DQ HOHFWULFDO FRPSRQHQWV PXVW EH H DUWKHG Ŷ QVXUH WKDW WKH JDV SLSH DQG HOHFWULFDO FDEOH DUH LQVWDOOHG LQ VX FK D ZD WKDW WKH GR QRW WRXFK DQ SDUWV RI WKH DSSOLDFQH ZKLFK may EHFRPH KRW Ŷ DV SLSH RU FRQQHFWRU VKRXOGQ W EH EHQW RU EORFNHG E DQ RWKHU DSSOLDQFHV Ŷ KHFN WKH GLPHQVLRQV RI WKH DSSOLDQFH DV ZHOO DV WKH GLPHQVLRQV RI WKH JDS WR EH FXW LQ WKH NLW...

Page 46: ... GRHV QRW SDVV WKURXJK DQ VSDFH VXVFHSWLEOH RI EHFRPLQJ FRQJHVWHG Grease cranes produced at the factory to meet the requirement of all life hob Ŷ EN 19 positioning 5 1 6 5 48 5 1 77 1 7 2 7 22 5 22 29 400mm 560mm 4 9 0 m m 400mm 700mm 0mm Min 6 0 m m 0mm 20 60 EMH363GBNX 600mm 700mm 400mm 400mm 6 0 m m in 0 0mm M 2 560mm 4 8 0 m m EMH363CGB EMH363CGBW EMH463GBNX EMH461GBNX EMH461CGB 5 1 6 5 48 5 1...

Page 47: ...f the underside of the horizontal surface is lower than 400 mm then it must be at least 50 mm away from the outer edges of the hob o 50 mm clearance around the appliance and between the hob surface and any combustible materials o You must have a gap of at least 25 mm and at most 74 mm between the underneath of the appliance and any surface that is below it installing the appliance 2 Apply the spon...

Page 48: ...n the hob back over and then gently lower it into the aperture hole that you have cut out 3 On the underneath of the hob adjust the brackets into a position that is suitable for your worktop Then fully tighten the screws C to secure the hob into position A SEALING STRIP C SCREW B BRACKET R QRW XVH D VLOLFRQ VHDODQW WR VHDO WKH DSSOLDQFH DJDLQVW WKH DSHUWXUH 7KLV ZLOO PDNH LW GLI FXOW WR UHPRYH WKH...

Page 49: ...e current edition of BS 6172 Failure to install the cooker correctly could invalidate the warranty liability claims and lead to prosecution seal G1 2 Female coupler The gas rail seal The gas rail Ø11 5 Female coupler LPG NG NG LPG Gas supply replacement and installation guidelines This appliance must be installed and connected in accordance with installation regulations in force in the country in ...

Page 50: ...0V 3 3kW 241g h 1 75kW 127g h 1 0kW 73g h 6 05kW 441g h G30 29mbar 0 93 0 65 0 50 G20 20mbar 1 0 97 0 72 NA electrical connection This appliance must be earthed This appliance is designed to be connected to a 50Hz 60Hz AC electricity supply The wires in the mains lead are coloured in accordance with the following code Green yellow Earth Blue Neutral Brown Live 7KH ZLUH ZKLFK LV FRORXUHG JUHHQ DQG ...

Page 51: ...HWWLQJ LQ UDWLQJ SODWH 5HPRYH WKH SUHYLRXV VHWWLQJ 9 PDUN Tu urn the taps down to minimum R Remove the knob from the tap and place a small turning does then remove the control knob and make further from maximum flow to minimum flow If it Adjustmen nt of minimum le evel of the flame e bladed screwdriver in the centre of the tap shaft The correct adjustment is obtained when the flame has a length of...

Page 52: ...YLFH LV FRQWDPLQDWHG ZLWK DOLHQ VXEVWDQFH OHDQ WKH ÀDPH VXSHUYLVLRQ device 3URGXFW EHLQJ FRRNHG KDV ERLOHG RYHU DQG H WLQJXLVKHG WKH ÀDPH 7XUQ RII EXUQHU NQRE DLW DQG UHLJQLWH RQH VWURQJ GUDXJKW PD KDYH EORZQ WKH ÀDPH RXW 3OHDVH WXUQ RII RQH DQG FKHFN cooking area for draught such as RSHQ ZLQGRZV DLW DQG UHLJQLWH RQH Yellow Flame 7KH KROHV LQ WKH ÀDPH VSUHDGHU DUH clogged OHDQ WKH ÀDPH VSUHDGHU Di...

Page 53: ...ge is not attributable to a manufacturing defect 5 Breakdowns caused by abnormal negligent or improper use of the appliance or by any type of external origin 6 Civil liabilities of any nature 7 Consequential damage to the device provided that this is not caused by an internal operating fault 8 Maintenance or conservation of the device periodic revisions adjustments and greasing 9 Damage to accesso...

Page 54: ...inary or catastrophic nature floods seismic phenomena or movements volcanic eruptions hurricanes storms events derived from terrorism riots popular uprisings or tumults legal or illegal demonstrations and strikes acts of the Armed Forces or the State Security Forces in times of peace armed conflicts and acts of war whether declared or not vice or defect of property acts qualified by the Government...

Page 55: ...V 3 ...

Page 56: ...V 3 ...

Reviews: