

EM PRO mini
Instruction Manual – P – Revision 1
E.E.P.D. GmbH | Gewerbering 3 | 85258 Weichs | Germany
Phone: +49 8136 2282 0 | Web:
https://www.eepd.de
Copyright © 2020 by E.E.P.D. GmbH. All rights reserved. | Rev.1.0
Intended Use
The EM PRO mini is a personal computer designed for office and workshop
environments.
Unpacking
Check the packaging for damage and inform us if it is not in order. Also
make sure that your shipment is complete and contains the items listed on
the delivery note. Check the device for possible damage before use.
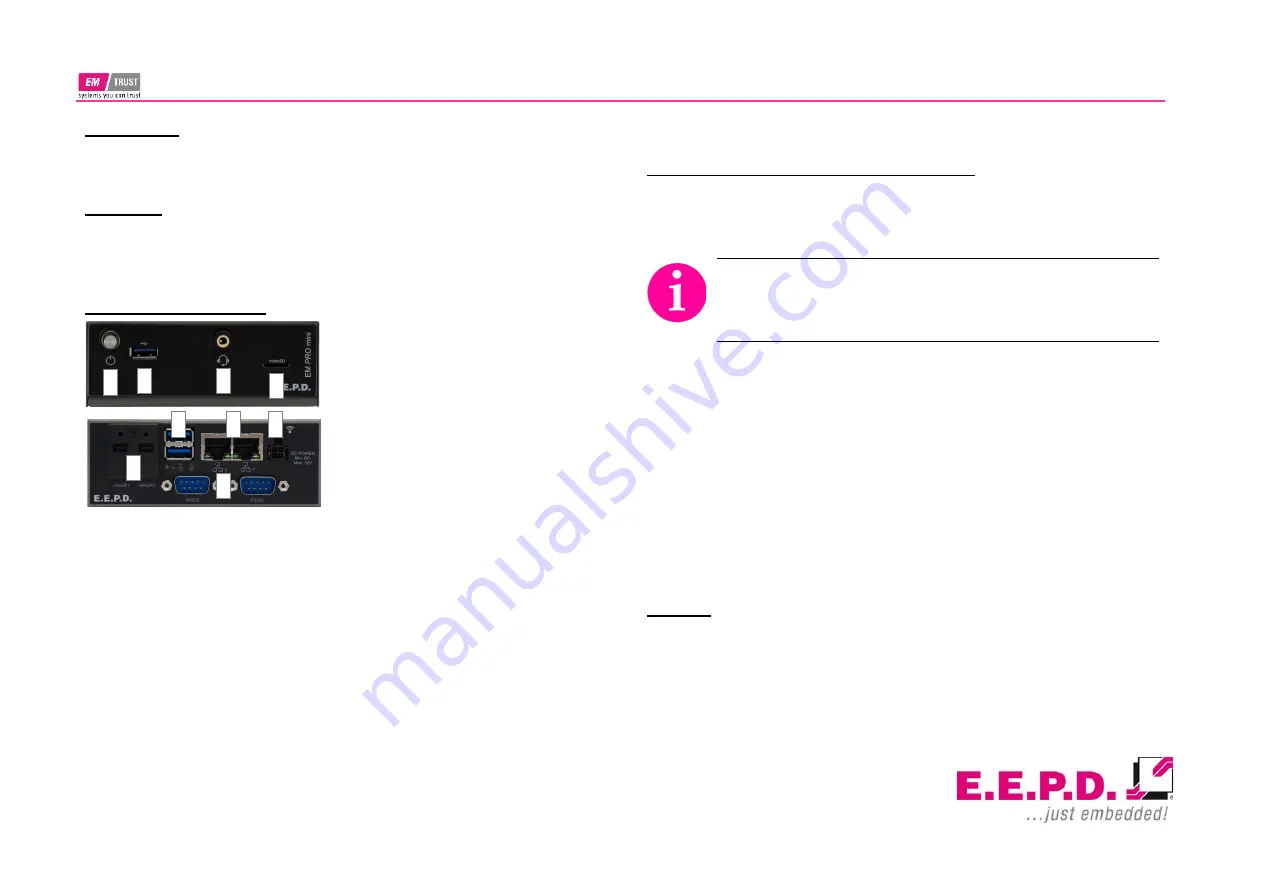
Switches and connectors
On/Off
(1)
- press the power button 1x
to turn the computer on or off. Press
and hold it for more than 4 seconds to
force a power off.
Attention: Data loss is possible.
USB-A 3.0
(2)(6)
- connection for USB-A
devices.
Audio
(3)
- 3.5 mm MIC in/headphone
output
MicroSD
(4)
- to lock the card, slide it
fully into the slot with the connector faces up until you hear a click. To re-
move it, push the card inward first.
Mini DisplayPort
(5
)
- transmits picture and sound to a monitor. With an
adapter cable (mDP to DP or mDP to HDMI) DisplayPort and HDMI monitors
can be used.
RJ45 LAN
(7)
- 10/100/1000 Mbit/s Ethernet for data exchange between de-
vices on a local area network.
Power
(8)
- power supply: Min. 8 V / Max. 32 V (DC).
Mating connector:
Nexus 2300 series, 3.00 mm Micro MF package with lock.
Order number: 2300P04XXX | Pin1/2 = Ground, Pin3 = DC+, Pin4= PVIN
detection. Pin 3 and Pin 4 must be always connected to the same power
supply! For operation a power supply with 90W or more is necessary.
RS232
(9)
- serial interface on a 9-pin standard D-sub connector.
Connect and power up the system / Operation
Connect the EM Pro mini personal computer to peripheral devices such as
monitor, mouse, keyboard and others. When all the necessary devices are
connected, please connect the power supply.
Before commissioning, we recommend connecting or plugging
the Monitor, USB keyboard and mouse, network cable (optional),
MicroSD card, DC power supply. Other plug & play devices can
be connected after commissioning.
Press the power button to switch on the system. If all voltages in the system
are correct, the power button and the power LED light up green.
If an operating system is installed, it will now be loaded. An operating sys-
tem installation can be done with all common installation media like USB
flash drive, USB DVD drive or remote network boot. The BIOS startup se-
quence must be adjusted accordingly. To enter the BIOS setup, press the
"Del" key immediately after switching on. To make the appropriate BIOS
settings, please refer to the EM PRO mini manual.
To switch off / shut down please read the manual of the operating system.
Software
Supported operating systems are: Microsoft® Windows® 10, Microsoft®
Windows® 10 IoT Enterprise and Linux Ubuntu 18.04 LTS.
1
5
2
3
4
9
6
7
8


