www.dymondusa.com
Manual for HiBiRD
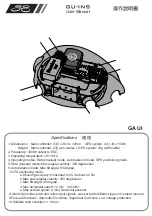
Features:
HIBIRD is a Mini Quadcopter can be controlled by 2.4GHz Spektrum/JR-DSM2 and JR-DMSS/FUTABA-FASST
The remote controller compatible with 2.4GHz/DSM2 is DX6i, DX7, DX8 ,JR-DSX7,JR-DSX9, JR-DSX11,JR-DSX12
The remote controller compatible with 2.4GHz/DMSS is JR-XG6 , JR-XG7 , JR-XG8 , JR-XG11
The remote controller compatible with 2.4GHz/FASST is all Futaba FASST Radios
Specification:
MEMS Sensor 3 Axis Gyro + 3 Acc with Gyro Balance System
System : 2.4GHz DSM2/DMSS (Optional)
Body Dimension WxLxH : 100x100x45mm.
Rotor to Rotor : 120mm
Quad Weight: 22g.
LiPO Battery Weight : 10g. Capacity 3.7V/350MA
Total Weight : 32g
Flight Time: about 10min
The Package Including
Redcon HiBiRD Main Frame x 1 Pcs.
DSM2 Board x 1 Pc. (Optional)
DMSS Board x 1 Pc. (Optional)
FASST Boardx1 Pc (Optional)
Propeller forward and reverse propeller 1 Pair/Each
Motor forward and reverse 2 pairs/each
Charger x 1 Pc.
LiPo x 1 Pc.
Radio Controller and REDCON HiBiRD Setting
1.
Connected the HiBiRD receiver board to main board by M2 receiver is for DSM2 radio system and MS receiver is
for DMSS radio system. Please corrected to connect pin between receiver and main board by receiver 4 pin to 4 pin
socket on main board and receiver 5 pin to 5 pin socket on main board
2.
Binding radio controller with HiBiRD , Connect battery to HiBiRD the orange LED on receiver board will flash
then press the bind button of radio and power on radio for start to binding. Then orange LED will slow flash and
solid that means binding to completed.
3.
Turn on Futaba Fasst Radio,Press the binding button of FASST board(Hibird Receiver) connect battery to HiBird
the Green LED flash then keep solid that means binding completed.
** Please repeat bind process, if you can’t make bind completely at first time
.
After binding, for second time use, just open the radio then connect battery to HiBiRD, Orange LED on receiver
board keep solid light, it’s ready to fly, no need to bind again.
Please note,
binding process maybe difference by radio model. Please to do binding follow by radio instruction
manual
4.
Setting Radio to Air-plane Model
5.
Setting Servo Direction for Spektrum set all channel to NORM / for JR set AIL/RUD channel to REV, Futaba set
channel 1,2,3,4 to REV.
6.
Setting Travel Adjust channel 1-4 (THRO/AILE/ELEV/RUDD) as to +110%
Note : for some radio model maybe