

Model
Total PoE Power Budget
Max Power per Port
DW-VP9-4P
76Watt
30Watt
DW-VP12-8P
150Watt
30Watt
DW-VP16-16P
150Watt
30Watt
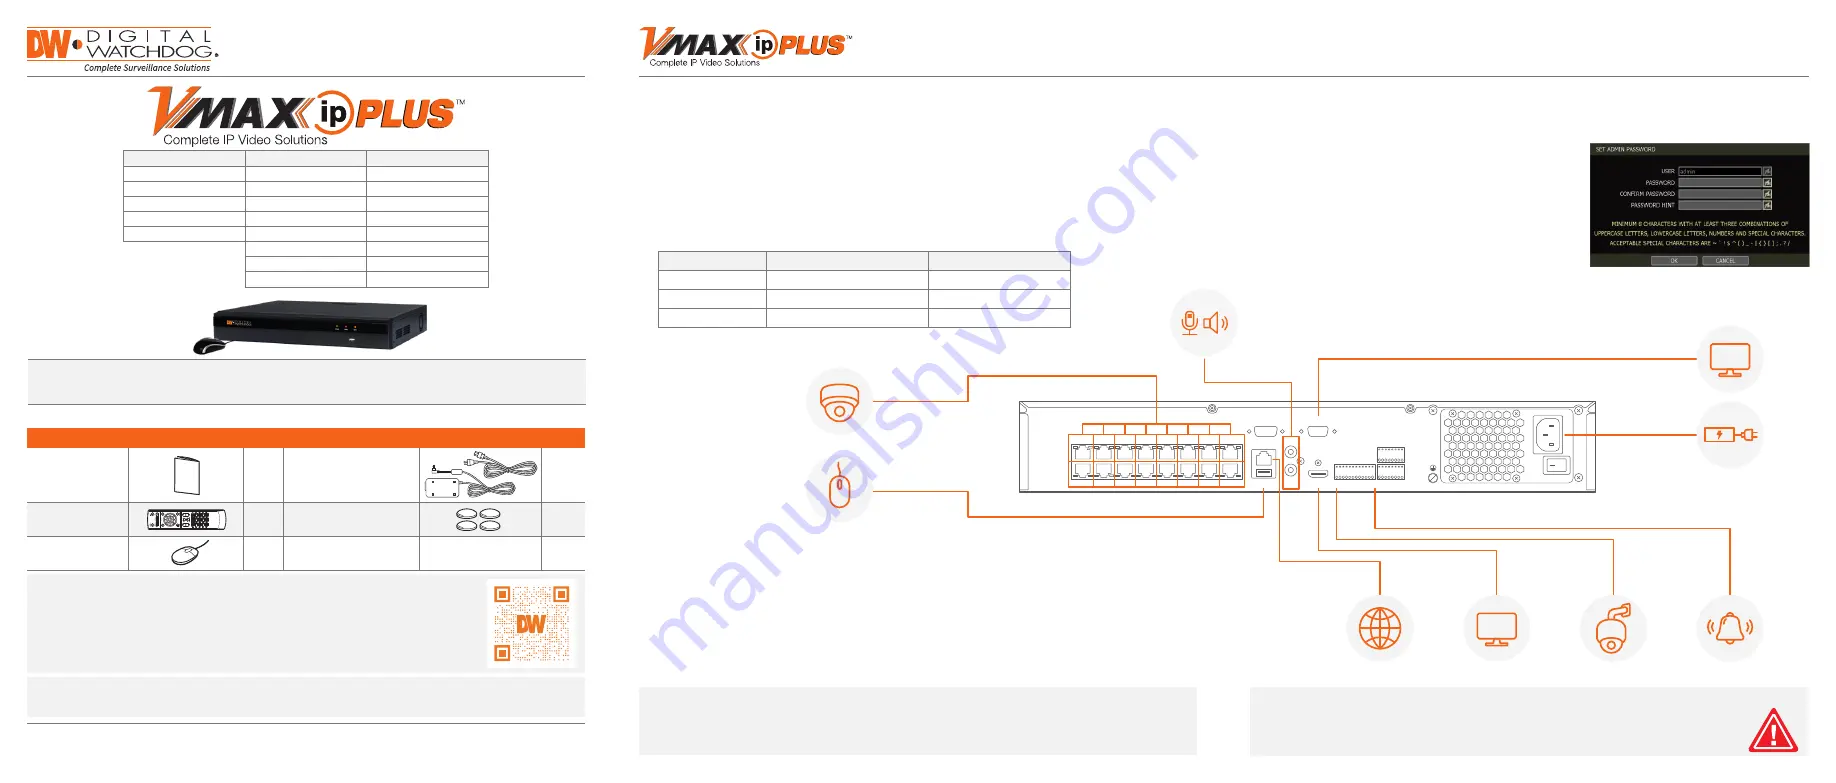
POE
1
2
3
4
5
6
7
8
RS-232
LAN
USB 3.0
HDMI
RS-485
ALARM IN
ALARM OUT
IN
OUT
AUDIO
VGA
9
10
11
12
13
14
15
16
POWER CABLE
IP CAMERA*
NETWORK CABLE
VGA MONITOR
USB MOUSE
PTZ CAMERA
ALARM / SENSOR
HD MONITOR
VGA
HD
AUDIO OUT
(INPUT DISABLED)
*The number of ports and position may
vary based on models.
Quick Start Guide
WHAT’S IN THE BOX
Quick setup and
download guides
1 set
48V D/C and power
cable (* DW-VP12xT8P
and DW-VP16xT16P
models come with power
cable only)
1 set
IR remote control
(optional. Sold
separately)
1
Rubber mounts – 4pcs
1 set
USB mouse
1
Tel: +1 (866) 446-3595 / (813) 888-9555
Technical Support Hours: 9:00AM – 8:00PM EST, Monday through Friday
digital-watchdog.com
Attention: This document is intended to serve as a quick reference for the initial setup. It is recommend-
ed that the user read the entire instruction manual for complete and proper installation and usage.
9ch w/4 PoE
12ch w/8 PoE
16ch w/16 PoE
DW-VP9P
DW-VP12P
DW-VP16P
DW-VP92T4P
DW-VP123T8P
DW-VP163T16P
DW-VP94T4P
DW-VP124T8P
DW-VP164T16P
DW-VP96T4P
DW-VP126T8P
DW-VP166T16P
DW-VP912T4P
DW-VP128T8P
DW-VP168T16P
DW-VP1212T8P
DW-VP1612T16P
DW-VP1218T8P
DW-VP1618T16P
DW-VP1224T8P
DW-VP1624T16P
Quick Start Guide
1. Mount and install all necessary IP cameras and external devices. Refer to their individual
manuals for additional information.
2. Place the NVR in its final position. See safety tips for proper installation below.
3. Connect all necessary cables and external devices to the NVR. Follow the back panel diagram
below.
4. Connect the NVR to an appropriate power supply. The NVR will boot up automatically.
When the NVR boots up, it will be in protective mode
and the password setup screen will appear.
1. You will be asked to setup a new password. The
password must be a minimum of eight (8)
characters with at least four (4) combinations of
upper-case letters, lower-case letters, numbers,
and special characters.
2. When the NVR boots up for the first time, you will
be guided through the startup wizard.
1. Make sure the cameras and the monitors are properly connected to the NVR.
2. The NVR should be placed in a dust and moisture-free environment. It must never be directly
exposed to sunlight. Server room temperature is highly recommended to reduce the chance of
overheating, which may cause the NVR to become unstable.
3. During the boot-up process, the NVR should not be interrupted by pressing any buttons on
the mouse. Do not unplug the power adapter or turn the NVR off during the boot-up process.
4. A UPS (Uninterrupted Power Supply) is highly recommended to prevent damage to the NVR
during a power outage.
STEP 1 – CONNECTING THE NVR
STEP 2 – POWERING UP THE NVR
SAFETY TIPS
NOTE:
1. True HD monitor output and VGA output cannot be used at the same time for dual monitoring.
2. The audio input port at the NVR is disabled. For audio recording, use audio input supported IP camera.
3. To connect additional IP cameras to the NVR, connect a PoE switch to the NVR’s network port.
To prevent the NVR from overheating, do not operate it in an area that exceeds the maximum
recommended ambient temperature of 104°F (40°C). To prevent airflow restriction, allow at least
3 inches (7.6 cm) of clearance around the ventilation openings.
NOTE:
Download all your support materials and tools in one place.
1. Go to:
http://www.digital-watchdog.com/resources
2. Search your product by entering the part number in the
‘Search by Product’
search bar.
Results will populate automatically based on the part number you enter.
3. Click
‘Search’
. All supported materials, including manuals and quick start guide (QSGs)
will appear in the results.
When logging into the NVR for the first time, you will be prompted to set up a new password. The new
password must include a minimum 8 characters with at least four combinations of uppercase and lowercase
letters, numbers, and special characters.


