background image

Sundance HD Edition Aerial Kit Contents List

Congratulations on your purchase of a DSLRPros


Sundance HD Edition Aerial Kit. 

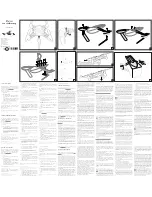
Inside your P2 Tough Case you will find the following items with numbers that 
correspond to the kit image on the following page.

1. DJI Phantom 2 With 3-Axis Gimbal Pre-Installed 
2. Assorted A/C Power Cables With International Plug Adaptors
3. A/C Power Cable For TXS-8 Pro LiPo Charger
4. DSLRPros TXS-8 Pro LiPo Charger with Balance Board and Necessary Cabling
5. 2 Sets Of 4 9" Propeller Blades (Carbon Fiber and Plastic Blades Are Not To 

Be Used Together)

6. Set of 4 Propeller Guards and Propeller Guard Screws
7. Futaba Transmitter
8. LiPo Battery For Futaba Transmitter
9. Deluxe DSLRPros Radio Tx Lanyard
10. LiPo Battery Capacity Checker
11. 3 DJI Smart Flight Batteries (1 Shown)
12. 1 DJI Charging for Smart Flight Battery 
13. 1 Additional Charging Block for DJI Smart Flight Battery
14. DJI Smartphone Mount
15. HDMI Cable For GoPro To DJI Lightbridge Air System
16. Set of 2 DJI Lightbridge Air System Paddle Antennas & Air System Antennas
17. Set of 2 Antennas For DJI Lightbridge Ground System
18. DJI Lightbridge Ground System
19. DJI Lightbridge Transmitter Mount
20. DSLRPros LiPo Battery Guard Bag
21. Assorted Cables For DJI Lightbridge System (Please Refer To Your Lightbridge

Manual For Detailed Explanations For Each Of These Cables)

22.

Assorted Power Cables and International Plug Adaptors (Please Refer 

To Your Lightbridge Manual For Detailed Explanations For Each Of These 
Power Cables)

Summary of Contents for Cannes HD Edition Aerial Kit

Page 1: ... LiPo Battery For Futaba Transmitter 9 Deluxe DSLRPros Radio Tx Lanyard 10 LiPo Battery Capacity Checker 11 3 DJI Smart Flight Batteries 1 Shown 12 1 DJI Charging for Smart Flight Battery 13 1 Additional Charging Block for DJI Smart Flight Battery 14 DJI Smartphone Mount 15 HDMI Cable For GoPro To DJI Lightbridge Air System 16 Set of 2 DJI Lightbridge Air System Paddle Antennas Air System Antennas...

Page 2: ......

Page 3: ...des 7 Futaba Controller Transmitter 8 Propeller Installation 9 Gimbal Installation Removal 10 Updating Your Software 11 Battery Safety 12 Using The DJI Lightbridge 13 Using The Zeiss Cinemizer OLED If Applicable WARNING DO NOT fly with zip ties attached to Phantom Zip ties are installed for shipping purposes only DO NOT use WiFi with the GoPro on the Phantom This will cause the pilot to lose contr...

Page 4: ...check mark will appear to the right of the status bar 3 Compass Calibration It is important to calibrate your compass outdoors every time you fly your craft This allows the Phantom 2 to track its own position from multiple satellites and ensures optimal performance Set the Phantom 2 on a flat surface With the throttle down and all switches in the uppermost position power up the transmitter and the...

Page 5: ...ings menu appears on the GoPro s screen Wrench Press the record button to enter the settings menu Press the power button until you reach the setup menu Two Gears Press the record button to enter the setup menu Press the power button until you see NTSC PAL Press the record button to enter the menu Press the power button to select the desired video system NTSC in the USA and PAL in Europe Press the ...

Page 6: ...onsibility to be certain that the propeller blades are attached properly and securely fastened before every flight All propeller blades are directional and can only be attached to one set of motors Installing a propeller blade on the wrong motor can result in damage to the craft If you are unsure about how to install your propeller blades contact DSLRPros before attempting to fly your craft It is ...

Page 7: ...ese provide enough tension to retain the gimbal during flight they can come loose if the craft is involved in a significant crash The grey black ribbon cable will be the only connection to the craft for power and video This cable can be disconnected and reconnected at will after the lower half is removed from the brackets To disconnect your gimbal pinch the rubber tension grommets and pull out of ...

Page 8: ...teries can result in damage to the battery or personal property Please adhere to all battery safety guidelines in the included manuals The estimated flight time for a Phantom 2 with H3 3D gimbal under ideal conditions is 11 minutes Only charge your batteries using the included charging units Failure to do so may result in fire Never charge batteries unattended If you notice that a battery is swell...

Page 9: ...button to start up the Lightbridge Attach the remote controller cable from the back of the ground system to the back of the Futaba transmitter When controlling your craft through the Lightbridge ground system turn off the RF function on your transmitter by holding down the RTN button on your Futaba while pressing up on the power button o Spin the touch wheel to select RF OFF on your Futaba and pre...

Page 10: ...Cinemizer OLED gives you HD video from the Lightbridge while still in flight A valuable feature of the Cinemizer OLED is the individual diopters Adjust the diopters by rotating the wheels on the inside of the OLED until the image is sharp When adjusting the diopters it is recommended to do this one eye at a time by closing the eye that you are not adjusting for To use the Cinemizer goggles with yo...

Page 11: ... RADIUS LARGE RADIUS These switches control the advanced Point of Interest flight profiles This function allows the operator to bank left or right using only the right joystick Using the SB Toggle will allow the pilot to fly an inside pivot around a central object Using the SC Toggle will enable you to fly an outside pivot These functions are reserved for advanced users and NOT enabled at default ...

Page 12: ...onnected to gimbal o Check that antennas are connected to FPV monitor o Check that propellers are securely fastened to motors o Place all switches on transmitter in their uppermost position with the throttle all the way down o Power on your transmitter o Power on your craft and wait for LED lights to stop flashing red indicating that your craft has achieved its GPS signal o Perform a compass calib...

Reviews: