background image

Dual Mini Sequencer Operating Instructions 


Playing Sequences 

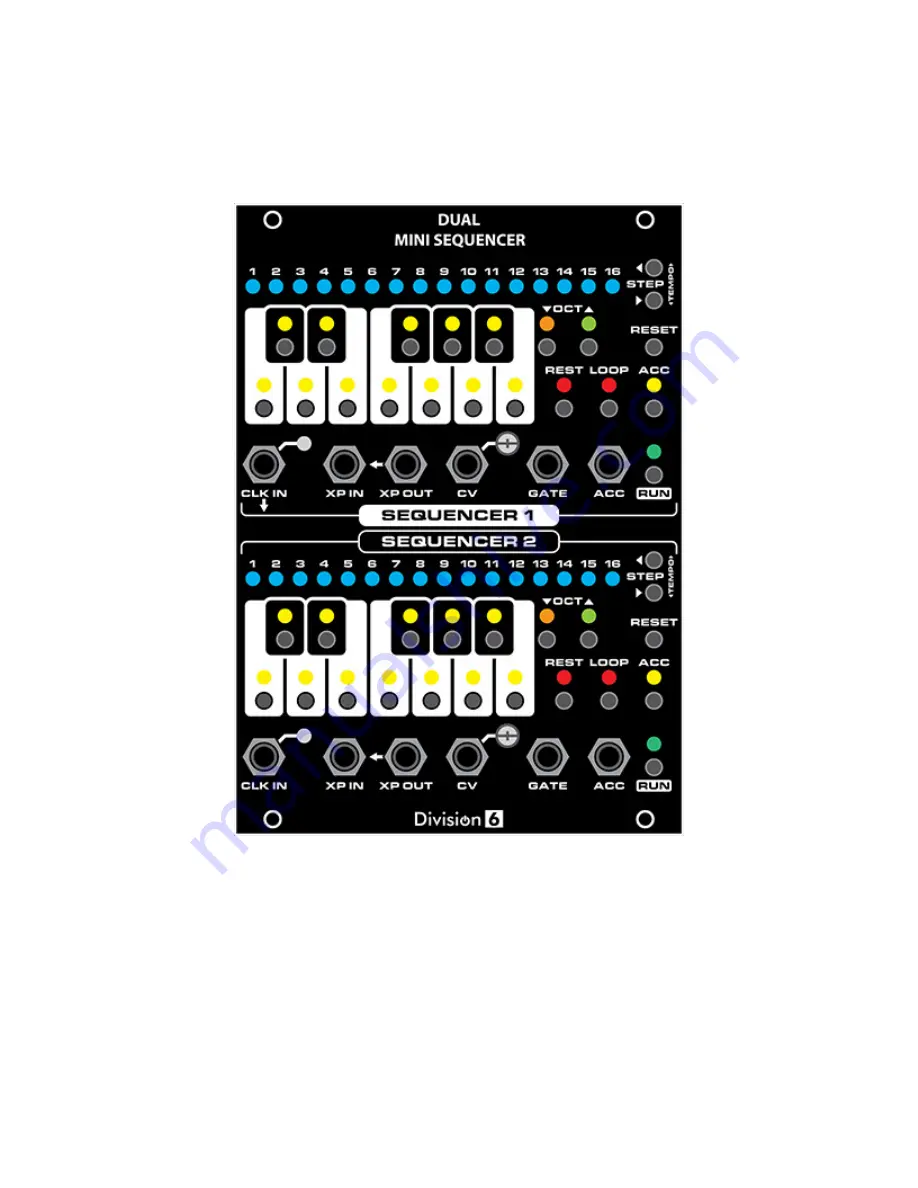
Push RUN to start playing a sequence. The RUN LED will light to tell you that you are in Run 
mode. Push it again to pause. The sequencer steps can be programmed while paused. 

Push RESET to stop the sequence, go to step 1, and enter Ready mode. The STEP LED will blink 
to let you know that you are in Ready mode. This means that when you press RUN again, the 
sequencer will play step 1 on the next clock pulse instead of skipping it and going to step 2. 

Summary of Contents for Dual Mini Sequencer

Page 1: ...n mode Push it again to pause The sequencer steps can be programmed while paused Push RESET to stop the sequence go to step 1 and enter Ready mode The STEP LED will blink to let you know that you are in Ready mode This means that when you press RUN again the sequencer will play step 1 on the next clock pulse instead of skipping it and going to step 2 ...

Page 2: ...eady Program Any notes you push will get saved in that step The sequencer covers 5 octaves so you can use the OCTAVE UP and OCTAVE DOWN buttons to transpose the keyboard up and down The OCTAVE UP and OCTAVE DOWN LEDs will tell you which octave the keyboard is currently set to Down Steady 2 Octaves 0V to 1V Down Flickery 1 Octave 1V to 2V Both Off Middle Octave 2V to 3V Up Flickery 1 Octave 3V to 4...

Page 3: ...ate pulse into this jack resets the sequencer to step 1 It also puts it in run mode if it s not already XP OUT Sends a gate pulse when a running sequence drops off the end goes past 16 or hits a Loop step The switch contact in the XP IN jack is normalled to the XP OUT signal so with nothing plugged into either jack each sequencer will loop by itself once it goes past the last step of a sequence Th...

Page 4: ...o calibrate Press RESET to make sure the sequencer is in Ready or Program mode either will work Press the OCTAVE UP button a few times to set the keyboard to the highest octave OCTAVE UP LED on steady Press the NOTE C button Adjust the trim pot until the meter reads as close to 4 000V as you can get it Check the C notes on the lower octaves by pressing the OCTAVE DOWN then NOTE C buttons Each one ...

Page 5: ...0 000V The outputs of the sequencer are buffered so they should maintain their voltages even when loaded down by another module You may find however that the standard calibration doesn t work with certain modules In this case you can use the trim pot to adjust the calibration so that it is correct for your module ...

Page 6: ...g a Sequence If the entire row of white keys is lit while displaying SONG SEQUENCE SELECT you are in SEQUENCE mode The selected sequence will play to the end then loop back to the beginning The sequencer has 7 sequence memories available for you to choose from The steady LED indicates the currently selected sequence To select a different sequence press the white note key corresponding to the seque...

Page 7: ...of all the sequences in the current song or on the next clock see CHANGE ON CLOCK mode then it will switch to the new song Another way to select a song even while the display is in another mode is to hold down the PROG RESET button then press the desired song button The display will automatically change to SONG SEQUENCE SELECT mode Programming a Sequence Programming a sequence hasn t changed much ...

Page 8: ...ruple ratchet All the gate timing modes besides 1 work by dividing up the incoming clock signal then calculating the needed timings This works best with steady clocks If you are wanting to make drastic rapid changes to the incoming clock rate then you will probably get the best gate timing results from using mode 1 To choose one of the above gate timings while programming a step press the desired ...

Page 9: ...nds to the sequence you want to store in the current song step The white key LED corresponding to the selected step will light Press the STEP UP to advance to the next song step or STEP DOWN to go back and select the desired sequence for that step Continue to program sequences into steps until they re all programmed If you don t want to use all 16 steps in your song you can use the LOOP button to ...

Page 10: ...teps to sequence 1 To do this first make sure the keyboard display is in SONG SEQUENCE SELECT mode Press and hold the song or sequence you want to clear then press and hold the RESET button Hold the buttons for about 1 second the note LEDs will flash to let you know that the song or sequence has been cleared Internal Clock The internal clock works pretty much like before see v1 section but more sp...

Page 11: ... making initial programming of a sequence easier Note Gate timing selection SLURs and ACC mode selection are not available in AUTO ADVANCE mode You can enter in the basic structure of your sequence then go back in normal PROGRAM mode and tweak the timings etc To enable or disable AUTO ADVANCE mode hold down the PROG RESET button and tap the STEP DOWN AUTO ADV button The STEP 16 LED will blink twic...

Page 12: ...eps the key you pressed is above the root key For example if the root key is the F in the middle of the keyboard and you press the G key then your sequence will be temporarily transposed up 1 step 2 semitones The LED corresponding to the key you selected will blink to let you know at a glance how much you are transposing and in which direction All the LEDs in between the root key and your selected...

Page 13: ...unning pressing a NOTE button will program that note into the current step You can also program a REST or a LOOP during live editing Note the changes you make using LIVE EDIT don t actually get written to the sequencer s non volatile memory until you pause stop the sequencer Don t disconnect power while it s running or you ll lose your changes This does not apply to using the normal PROGRAM mode c...

Page 14: ...eaches the end of a sequence since XP OUT is cascaded to XP IN the XP pulse will just trigger a reset CLOCK OUT You can set the sequencer to send the internal clock out the ACC jack Press and hold PROG RESET then ACC then hold the button combination for 1 second The ACC LED will blink twice to let you know that CLOCK OUT is enabled and will flicker dimly when it has been disabled ACC will no longe...

Reviews: