background image


User Manual 

Rev. 19.09 


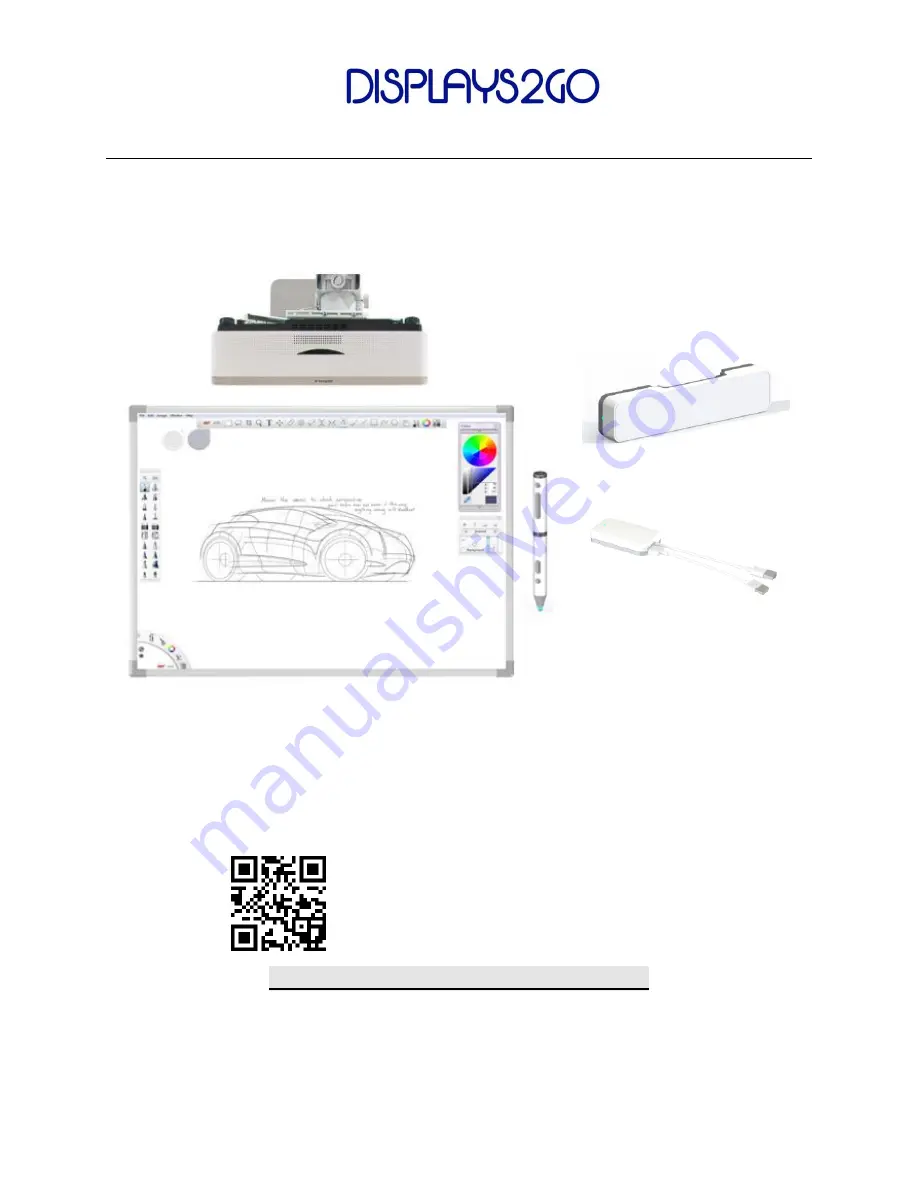
INTERACTIVE WHITEBOARD 

– WIRELESS 


MODEL: INTWHITWRLS 


Scan QR code to visit the product page: 


Operating Instructions for Whiteboard


Note: Before using the product, please read the instructions thoroughly. 

If you have any questions regarding our products, please visit us at www.displays2go.com or 
contact D2G customer service at 844-221-3393. 


Projector not included. 

Summary of Contents for INTWHITWRLS

Page 1: ...isit the product page Operating Instructions for Whiteboard Note Before using the product please read the instructions thoroughly If you have any questions regarding our products please visit us at ww...

Page 2: ...ion 3 2 Set up the Whiteboard 4 2 1 Wall Mounting 4 2 2 Floor Standing 6 3 Connection 7 3 1 Wireless Hub 7 3 2 Wireless Stick 9 3 3 Wired Connection 10 4 Calibration 11 4 1 Install the Calibration Sof...

Page 3: ...ers can also act as a computer mouse Features Writing users can write and draw on the whiteboard with included eMark Pen or a stylus during a lecture or presentation Annotation users can easily operat...

Page 4: ...h Hardware a Mounting Bracket Top b Metal Bracket Bottom c M8 Expansion Wall Anchor d M4 Screw QTY 2 pcs 1 pc 5 pcs 2 pcs Step 1 Assemble the Metal Bracket b to the bottom back side of the white board...

Page 5: ...against the wall See below Step 4 Insert a screwdriver or other metal rod into the anchor sleeve Hit the other end of the tool with a hammer to fix the anchors in the wall Step 5 Align 2 mounting brac...

Page 6: ...he whiteboard Step 8 Use the removed M8 hex screw to secure the bracket at bottom to the wall The installation is completed CAUTION For your safety the whiteboard must be mounted to solid wall ONLY Pl...

Page 7: ...e mounted on top of the whiteboard HDMI Output SM16B GHDS A TF USB Ports RS232 Serial Port Power Supply Optical Touch Modules Internally Connected NOTE The 9 pin RS232 port is for OEM use ONLY Indicat...

Page 8: ...ard in the room Do not cover or place other objects on the wireless hub so the connection is not interrupted For better reception position the wireless stick within the range below Dimensions 149 4 34...

Page 9: ...s Quick flash of green light Connected but no video signal input Slower flash of green light Connected with video transmission Stable red light slower flash red light Wait to be connected Stable blue...

Page 10: ...elow 3 3 Wired Connection The Whiteboard also has the option to connect with your computer thru USB ports without using the Hub and the stick Simply connect all the device as shown below Dimensions 83...

Page 11: ...m the supplied USB flash drive onto your PC Then Find and open the Optical Touch Device Control Panel on your Windows desktop 4 2 16 or 9 point calibration NOTE For accurate calibration please connect...

Page 12: ...DISPLAYS2GO Interactive Whiteboard 12 Choose 16 points in calibration section then click Apply and OK to confirm the selection Next click Calibrate to enter the calibration window...

Page 13: ...SPLAYS2GO Interactive Whiteboard 13 Follow the instructions on the screen press and hold the blue dot It will turn green after long press After 16 dots all turn to green the calibration is done Press...

Page 14: ...ve Touch Area 72 91x45 59 in 1852x1158 mm Dimension 75 94x48 62x1 34 in 1929x1235x34 mm Interface USB2 0 Full Speed Power Requirements DC5V 5 500mA Power Consumption Average power consumption 2 5W 5V...

Page 15: ...Temperature 32 F 131 F Storage Temperature 13 F 167 F Operating Humidity 10 to 90 RH non condensing Storage Humidity 10 to 90 RH non condensing Drift No drift in operating temperature range ESD Per E...

Reviews: