background image

Important Notes :

  1. Before operating the unit, please read these instructions carefully.

  2. Retain this manual for future reference.

  3. Do not remove any WARNING stickers on the unit.

  4. You are advised to follow the instructions carefully when operating the unit.

  5. Do not use any chemical solvent, cleaning agent or corrosive detergent to clean 

      away dirt on the surface of the screen. By doing so, you may cause irreversible

      damage to the surface of the TFT screen. To clean off dirt or fingerprints, we

      recommend the use of a soft damp lens cleaning cloth.

  6. Using spare parts from another manufacturer may caused permanent damage to 

      the unit.

  7. Place the unit on a flat, hard and stable surface.

  8. Avoid installing the monitor screen in a position that is under direct sunlight and 

      place unit away from hot air vent.

  9. Install unit in a dry location away from condensation.

10. Obstacles may impead smooth running of the loadingmechanism and may cause 

      electrical shorts-circuit.

11. Keep ventalation areas clear to allow unit to cool properly.

12. Ensure the plugs are properly plugged in before operating the unit.

13. Should the LCD panel be broken, do avoid all human contact with the broken

      glass or fluid leaking out from the enclosure. If you come into contact, do flush 

      and clean affected areas with plenty of water. Seek medical attention immediately.

14. When operating the display unit, do avoid touching or pressing on the LCD glass 

      panel. Excessive force may cause irreparable damage to the LCD screen.
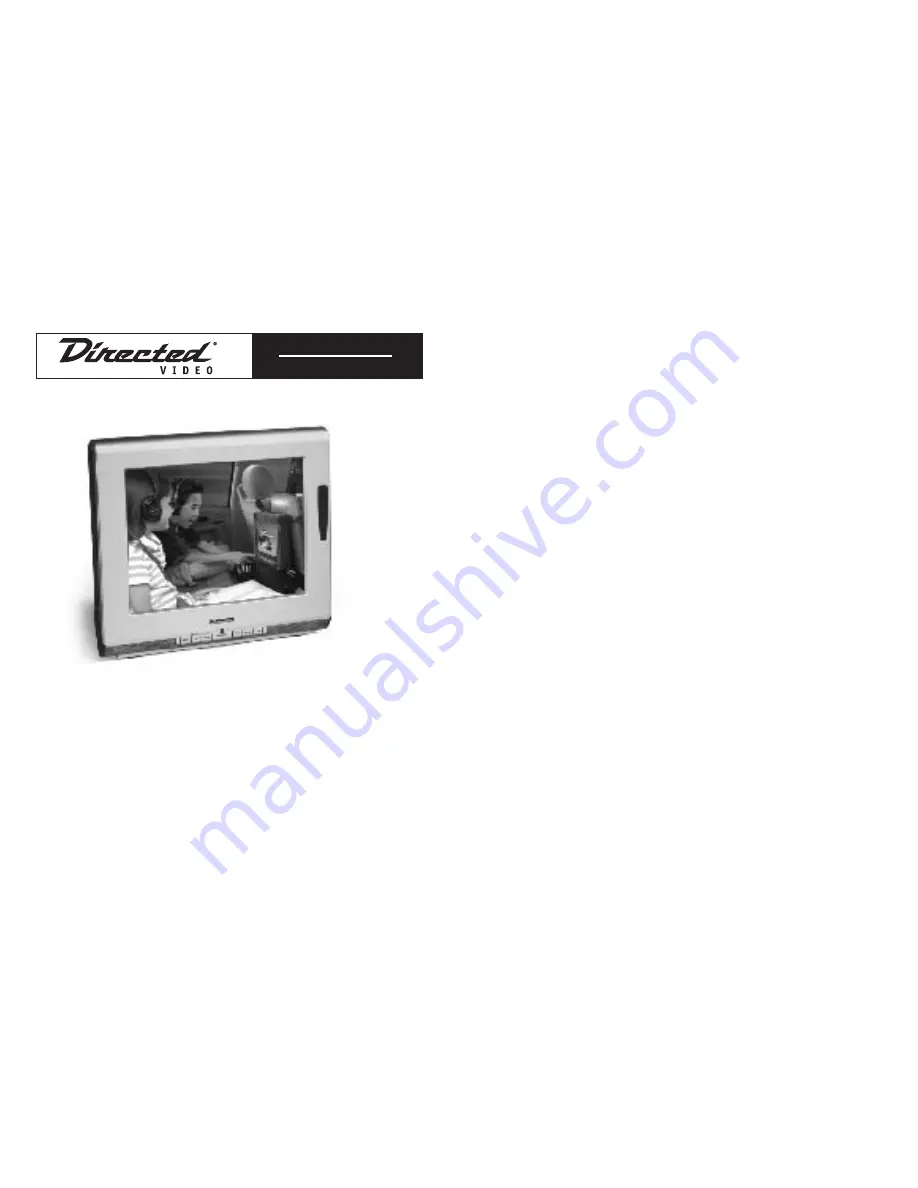
10.4” Go Anywhere

DVD & TV System

MODEL PB1040

O W N E R ’ S G U I D E

INSTALLATION GUIDE

© 2004 Directed Electronics, Inc. N90104  04-04

Summary of Contents for PB1040

Page 1: ...monitor screen in a position that is under direct sunlight and place unit away from hot air vent 9 Install unit in a dry location away from condensation 10 Obstacles may impead smooth running of the loadingmechanism and may cause electrical shorts circuit 11 Keep ventalation areas clear to allow unit to cool properly 12 Ensure the plugs are properly plugged in before operating the unit 13 Should t...

Page 2: ... Do not plug in too many appliances together with this unit to prevent overloading the power supply 5 Use parts only manufactured by the unit manufacturers 6 Request a repair report from the technician service personnel In case of the following emergencies remove plug from the main socket immediately 1 Plug or cables are damaged 2 Any form of foreign objects dropped inside the enclosure 3 Unit is ...

Page 3: ... PLAY PAUSE 7 4 DVD MP3 CD STOP 7 5 DVD MP3 CD SEARCH 7 6 DVD MP3 CD PlayING Functions 7 6 1 DVD MP3 CD REPEAT FUNCTION 7 6 2 DVD ANGLE 7 6 3 DVD MTS 7 6 4 DVD SUBTITLE 7 6 5 DVD MENU 7 6 6 DVD TITLE 7 6 7 DVD MP3 CD DVD DISP 7 6 8 DVD SETUP 14 14 15 15 16 16 17 17 18 18 19 19 20 21 21 22 22 22 23 23 24 24 24 25 25 26 CONTENTS 7 6 9 GENERAL SETUP 7 7 Regional Setting 8 ANNEX A LCD Maintenance 9 AN...

Page 4: ...you a safe relaxing and environmental friendly NEW visual enjoyment The unit comes with built in screen display controls when used with the remote control allowing you to make changes to the settings It even supports the use of wireless headphones therefore you do not need to worry that the volume coming out from the monitor will disturb other people Product Specification 1 10 4 LCD Panel 2 Panel ...

Page 5: ...Off button 10 TV channel up button DVD Eject Button 11 TV channel down button DVD Play Pause Button 12 OSD menu button 13 Power Stand by LED 14 Earphone jack 15 Stand 03 04 1 INPUT OUTPUT 16 Audio L Output 17 Audio R Output 18 Video 19 DC In 12V or AC Adaptor 20 Audio L Input 21 Audio R Input 22 Video 23 TV ANT Wireless Headphone x 2 DC Adaptor AC Cable DC Power Plug AV Cable Battery x 4 2 3 4 20 ...

Page 6: ...DE When Connecting to a TV Cable 1 Plug the cable to the input socket on the unit TV AVTENNA CATV CABLE 05 06 1 2 3 4 5 6 7 8 9 10 11 12 13 19 20 21 22 23 24 25 26 27 28 29 30 31 32 33 34 35 14 15 16 17 18 POWER Power On Off MUTE Turn Off Volume MODE Signal Button Up Up Button SYS MENU System Main Menu Selection Button SAVE ENTER Enter Button Left Left Button Down Down Button EJECT DVD Eject Butto...

Page 7: ...nt Output the AV Signal using the unit AV output socket B A Connect Power Connect to the power source using the power cable and adapter provided ATTENTION Ensure the power supply is connected to the unit When not using unit for a long period of time remove power adapter socket from the main power point Using in Vehicle ATTENTION Plug the cigarette power 12V by using the DC Power plug wire with the...

Page 8: ...he mode setting status will change each time the Mode button is pressed AV1 CH DVD AV1 CH DVD RED LIGHT GREEN LIGHT VOLUME SETTING Press the VOL button on front control panel or VOLUME on remote to adjust the volume level MUTE 1 Press the Mute button on the remote control to mute speakers 2 Press the Mute button again or the Volume Up Down button to return the sound back to the speakers CHANNEL SE...

Page 9: ... the Mode button on the remote control or MENU button on front control panel to select DVD mode 2 Press the Eject button on the remote or on the front control panel CH to eject the DVD from the player TV Station Memory Mode 1 Under TV mode select channel by using CH SET on remote eg CH01 2 Press ENTER button on remote main menu option will display on the screen as below 3 Use button on remote to s...

Page 10: ...ess Save Enter buttonon remote or MENU button on front control panel the text of the selected option will be highlighted in RED 6 Press Left Right button on remote or VOL VOL button on front control panel to adjust the Sharpness Level 7 Press Save Enter button on remote or MENU button on front control panel to save the setting 8 Press Sys Menu button on the remote control to exit main menu VIDEO A...

Page 11: ...e or MENU button on front control panel to save the setting 6 Press Sys Menu button on the remote control to exit main menu 1 8 3 5 7 2 4 6 1 8 3 5 7 2 4 6 VIDEO ADJUST SHARPENESS BRIGHTNESS CONTRAST TINT PRESET EXIT 4 7 4 7 VIDEO ADJUST SHARPENESS BRIGHTNESS CONTRAST TINT PRESET EXIT CONTRAST 4 7 4 7 BRIGHTNESS SATURATION 8 SATURATION 8 Brightness 1 Press Sys Menu button on remote or MENU button ...

Page 12: ......

Page 13: ...n on remote or VOL VOL button on front control panel to select ON or OFF option 7 Press Save Enter button on remote or MENU button on front control panel to save the setting 8 Press Sys Menu button on the remote control to exit main menu OTHERS CHANNEL SCAN TV SOURCE DIMMER SPEAKER RETURN CABLE ON ON 1 8 3 5 7 2 4 6 Speaker Setting 1 In TV mode Press Sys Menu button on remote or MENU button on fro...

Page 14: ...e b This function will jump to the next track or chapter under DVD mode 2 During play press the PREV TRK button on the remote control a The screen will display PREV TRK text in MP3 Audio CD Mode b This function will jump to the previous track or chapter under DVD mode 7 3 DVD MP3 CD Play Pause a During play presses the Play Pause button on the remote control to stop play temporary b Press Play Pau...

Page 15: ...e display in various languages a Press Subtitle button during playback the following will be display on the TV screen b In the Subtitle On mode press Subtitle to display subtitle x y on the TV screen X represent current subtitle Y represent the other available subtitles c Press Subtitle button repeatedly to select the desired subtitle This function can ONLY be used on DVD disc that comes with Mult...

Page 16: ... button in MP3 mode the following will be displayed on the TV Screen SINGLE ELAPSED 00 00 15 SINGLE REMAIN 00 02 37 c Press DVD DISP button in DVD mode the following will be displayed on the TV Screen TITLE XX XX CHAPTER XXX XXX HH mm SS TITLE REMAIN HH mm SS SINGLE ELAPSED HH mm SS SINGLE REMAIN HH mm SS 7 6 8 DVD Setup Press the Setup button to modify the DVD setting When the COM DVD player is i...

Page 17: ...L MONO STEREO L MONO R MONO MIX MONO i 2 DYNAMIC FULL 6 8 4 8 2 8 OFF i 3 MAIN PAGE j KARAOKE SETUP j 1 KARAOKE OFF KARAOKE j 2 MAIN PAGE k PREFERENCES PAGE k 1 TV TYPE 1 MULTI 2 NTSC 3 PAL k 2 AUDIO 1 ENGLISH 2 FRENCH 3 SPANISH 4 CHINESE 5 JAPANESE k 3 SUBTITLE 1 ENGLISH 2 FRENCH 3 SPANISH 4 CHINESE 5 JAPANESE 6 OFF ...

Page 18: ... Press Enter unit will request for password key in 1234 1 G 2 3 PG 4 PG 13 5 6 PG R 7 NC 17 8 ADULT NO PARENTAL 7 7 REGIONAL SETTING This DVD playing system is designed with regional restrictions Before playing a disc ensure the region code indicated on the disc is the same code as specified on the unit Below is the list of Regional Code used 1 CANADA USA US TERRITORIES 2 JAPAN EUROPE SOUTH AFRICA...

Page 19: ...e a Check that the power cord is plugged into the main socket and the power supply is turned on b Check the contrast and brightness setting c Check the Antenna connection to see if it is properly connected to the LCD TV Input Terminal d Be sure you have selected the correct source mode 2 DVD Player Not Working Properly a Ensure disc is correctly inserted into the player b Ensure disc is not damage...

Page 20: ...hen installing this unit please check that you are in compliance with your local traffic rules and regulations This product incorporates copy right protection technology that is protected by method claims of certain U S patents and other intellectual property rights owned by Macrovision Corporation and other rights owners Use of this copyright protection technology must be authorized by Macrovisio...

Page 21: ...s been damaged by accident or unreasonable use negligence acts of God neglect improper service or other causes not arising out of defect in materials or construction This war ranty does not cover the elimination of externally generated static or noise or the correction of antenna problems or weak television reception damage to tapes video games software camcorders discs speakers accessories or veh...

Reviews: