

Th
ple
Vi
Fro
N
Vi
Ple
Po
Ple
use
Eq
is Quick Gu
ease refer to
deo Serve
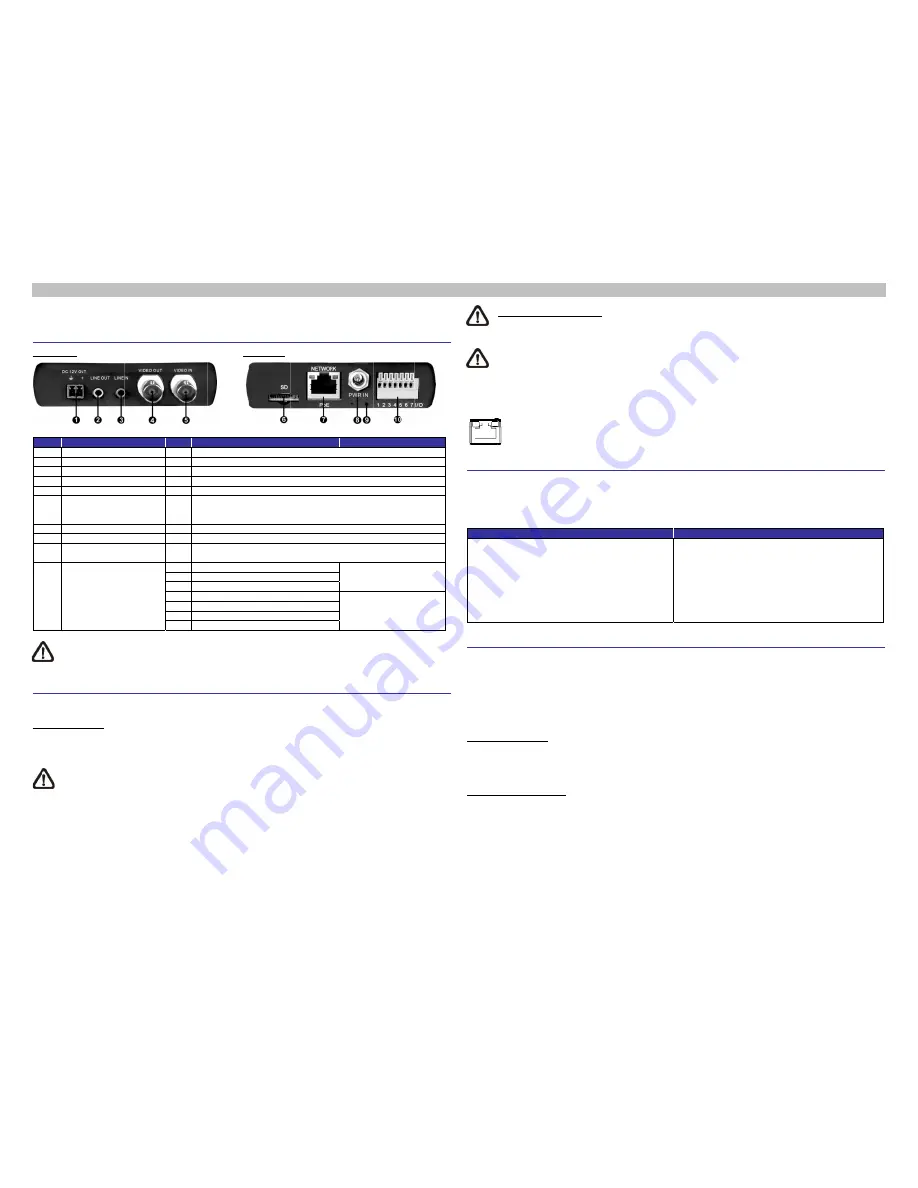
ont Panel
No.
1 Powe
2 Line
3 Line
4 BNC
5 BNC
6 SD
C
7 RJ-45
8 Powe
9 Defa
10 RS-4
NOTE
suppo
inform
deo Serve
ease follow t
ower Conne
ease use a
ers can use
quipment (PS
NOTE
uide is for q
o the Video S
er’s Conne
Connect
er Out
Out
In
Output
Input
Card Slot
5
er In
ult Button
485 & Alarm
:
It is not rec
rt long term
ation regard
er Cabling
the instructio
ection
DC 12V / A
e an Etherne
SE) switch.
E:
If PoE is u
quick installi
Server’s Use
ectors
tor
m I/O
commended
m continuou
ding the relia
g
ons below fo
AC 24V pow
et cable and
used, make s
ng and con
er’s Manual
Pin
- For
- Aud
- Aud
- For
- For
-
Inse
sna
pow
- For
- For
-
Pre
the
1 D
+
2 D
-
3 GN
4 Ala
5 Ala
6 Ala
7 Ala
d to record w
s data read
ability and th
or cable con
wer adaptor
d connect it
sure PSE is
nnecting the
in the supp
R
D
r DC 12V po
dio Out
dio In
r analog vide
r analog vide
ert the mic
apshots. Do
wered on.
r network an
r DC 12V~48
ess this butto
system.
+
D
rm In-
rm In+
rm Out -
rm Out +
with the mic
d/write. Plea
he life expec
nnections.
and plug it
to the RJ-4
s in used in t
DIGITUS D
lied CD.
Rear Panel
Definition
ower output
eo output
eo input
croSD card
not remov
d PoE conn
8V / AC 24V
on with a pro
roSD card fo
ase contact
ctancy.
to the Video
45 connecto
the network.
DN-16100-1
into the ca
ve the micro
nections
V power inpu
oper tool for
or 24/7 cont
the manuf
o Server an
r of the Vide
Video Serv
ard slot to
oSD card w
ut
r at least 20
RS-485 c
Alarm co
tinuously, as
facturer of t
nd the powe
eo Server a
Video
ver. For mo
Remarks
store video
when the se
seconds to
connection
onnection
s it may not
the microSD
er outlet. Alt
and a Power
o Server
re details,
os and
erver is
restore
be able to
D card for
ernatively,
r Sourcing
r Quick
of th
N
t
NOTE:
C
LAN con
Before
A client
Camera,
plug-ins
Manual.
A
Step 1:
Step 2:
Step 3:
Step 4:
Camera
The cam
camera c
detected
the came
IP Addre
Subnet M
Login ID
Key in
Enter
is case
Install th
After c
below
Right
Guide
Ethernet C
Connect on
he cable to
NOTE:
In so
to the PC.
Check the s
nnection.
Green L
Orange A
Login to t
program wi
, please ens
or setting I
ActiveX Con
:
Start the I
:
Select <T
browser. T
:
Click on
“Internet”,
change Ac
:
Set “Activ
<Prompt>
a Login
mera is defa
can be foun
, then the ca
era under fix
ess: 192.168
Mask: 255.2
D & Passwo
n the Camer
the default
e sensitive.
he ActiveX
connecting
w the URL ba
click on the
able Conne
e end of the
the network
ome cases,
tatus of the
ink Light ind
Activity Ligh
the Camer
ll be autom
sure downlo
nternet’s se
ntrols and P
nternet Expl
Tools> from
Then Click <
the <Sec
and click
ctiveX setting
veX controls
or <Enable>
ault set as D
nd via UPnP
amera would
xed IP addre
8.0.100
255.255.0
ord
a’s IP addre
user name (
control
the Video S
ar.
information
ection
e CAT5 Ethe
k switch or P
Ethernet cro
link indicato
dicates good
ht flashes for
ra
matically inst
oading the
ecurity level
Plug-ins Se
lorer (IE).
the main
<Internet Op
curity> tab
on <Custo
gs.
s and plug-
>.
DHCP mode
P search or
d switch aut
ess, please s
ess in the UR
(
admin
) and
Server to th
bar, and cli
ernet cable t
PC.
ossover cab
or and the a
d network co
r network ac
talled on yo
ActiveX con
to default.
ettings
menu of th
tions>.
and selec
om level> t
ins” items t
e to obtain
please use
tomatically t
set the IP ad
RL bar of the
d password
e Camera,
ck on “Insta
to the RJ-45
le might be
activity indic
onnection.
ctivity indica
our PC whe
ntrol is allow
For further
he
ct
to
to
Step 1:
Step 2:
Step 3:
Step 4:
IP address
the search
to fixed IP a
ddress of the
e Web brow
(
admin
) in
the request
all ActiveX C
5 connector
needed whe
ator LEDs;
tion.
n connectin
wed by eith
details, plea
Inte
Start the IE
Select <To
browser. T
Click on
“Internet.”
Down the
<OK> to
browser w
accessing
from the D
tool from th
ddress unde
e PC as: 19
wser window
the prompt
t for installin
ontrol…” to
of the Video
en connectin
if the LEDs
ng to the Ca
her changing
ase refer to
ernet Secur
E.
Tools> from
Then click on
the <Sec
page, click
confirm t
window, and
the Camera
DHCP serve
he CD. How
er
192.168.0
92.168.0.XXX
and click on
request dial
ng the Activ
permit Activ
o Server, an
ng the Video
are unlit, pl
amera. Befo
g the Active
the Video
rity Level
the main
n <Internet O
curity> tab
on <Defau
the setting
open a new
a
r. Under DH
wever if no D
0.250
. There
X; for examp
n <Enter>.
ogue. Note
veX control
veX control i
nd the other
o Server dire
lease check
ore login to
eX controls
Server’s Us
menu of t
Options>.
and sele
ult Level> a
g. Close t
w one later f
HCP mode,
DHCP serve
efore, to acc
ple:
that user na
will appear
nstallation.
end
ectly
k the
the
and
ser’s
he
ect
nd
he
for
the
er is
cess
ame
just


