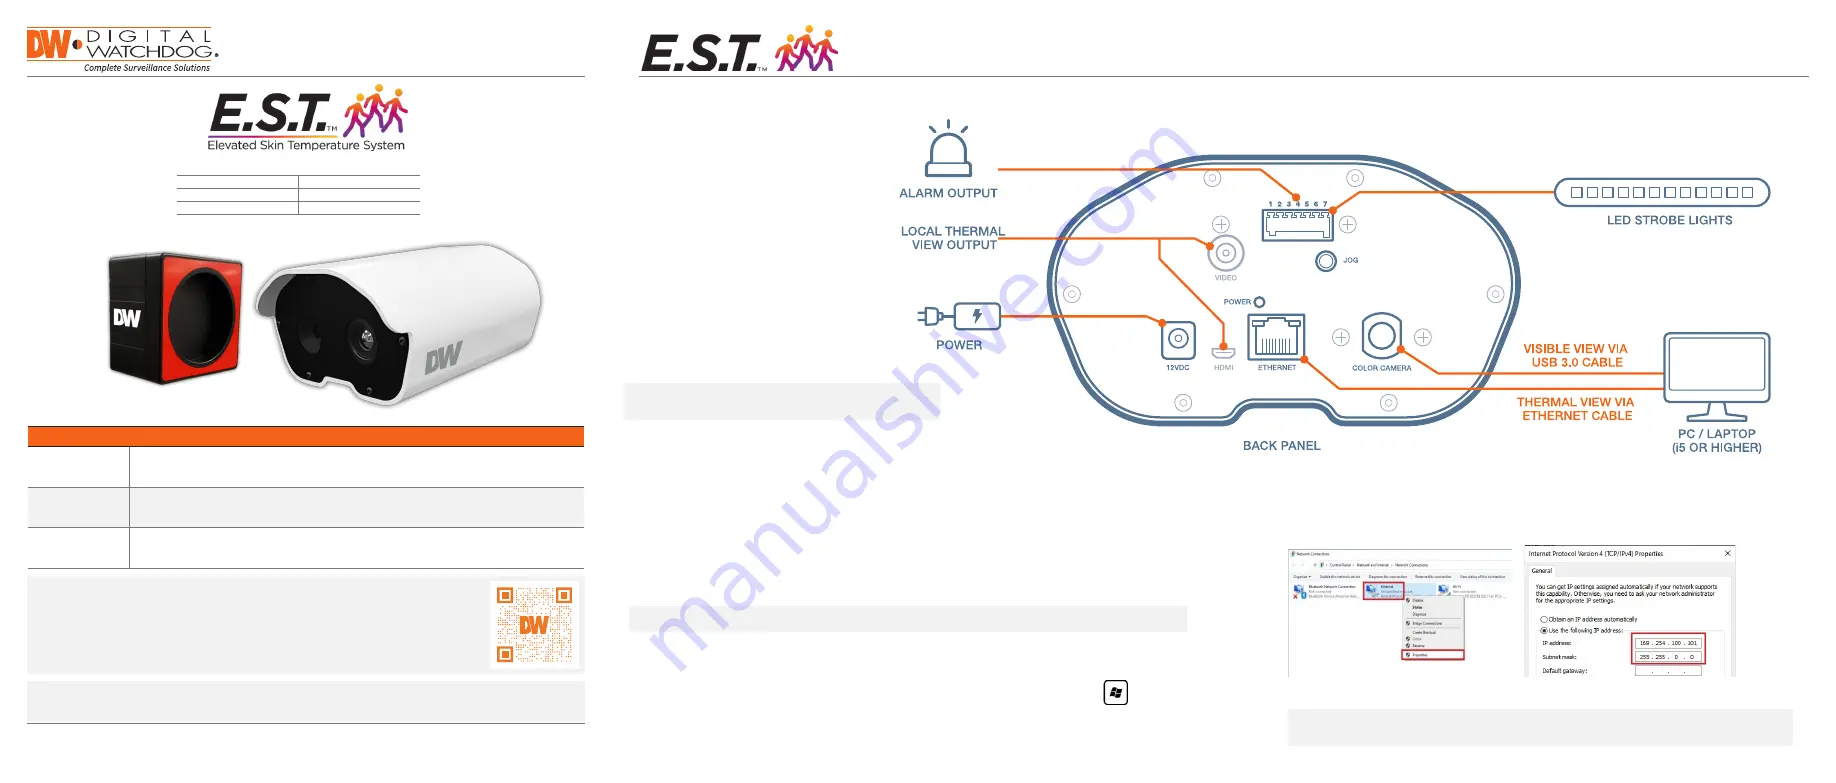
4. Right-click on ‘Ethernet’ and select ‘Properties’ from the drop-down options.
5. Double-click on ‘Internet Protocol version 4 (TCP/IPv4)’ in the Properties window.
6. Enter the IP and subnet mask as shown below and click the OK button.
7. Click the OK button in the Ethernet Properties window to close the window.
Quick Start Guide
NOTE:
Download all your support materials and tools in one place.
1. Go to:
http://www.digital-watchdog.com/support-download/
2. Search for your product by entering the part number in the
“Search by Product”
search bar. Results for applicable part numbers will populate automatically based
on the part number you enter.
3. Click
“Search”
. All supporting materials, including manuals, Quick Start Guides
(QSG), software and firmware will appear in the results.
Tel: +1 (866) 446-3595 / (813) 888-9555
Technical Support Hours: 9:00 AM – 8:00 PM EST, Monday through Friday
digital-watchdog.com
Attention: This document is intended to serve as a quick reference for the initial setup. It is recommended
that the user read the entire instruction manual for complete and proper installation and usage.
DW-ESTS
Complete Kit
DW-ESTCAM
Camera Only
DW-ESTBLKB
Blackbody Only
Quick Start Guide
Follow the diagram below to connect the
camera to all applicable external devices.
1.
Install the
Elevated Skin Temperature System
software, available on Digital Watchdog’s website.
a. Go to http://www.digital-watchdog.com
b. Search for ‘EST software’ on the search bar at the top of the page.
c. The latest software will appear in the search results. Click on the link to download the file to
your computer and run the installation file.
2. When the camera connects directly to the PC, the following is assigned to the camera by default:
•
Camera IP address: 169.254.100.100.
•
Subnet mask: 255.255.0.0.
3. Open the execution window on the monitoring PC by pressing the “Window (
)+R” buttons.
Enter ‘ncpa.cpl’ and press ‘enter’.
STEP 1 – CAMERA CONNECTION
STEP 2 – SOFTWARE INSTALLATION
NOTE:
The software is available for Windows® 10 OS only.
WHAT’S IN THE BOX
DW-ESTS
Camera, Blackbody, LED strobe, 2x tripods, 2x power supplies, LAN cable, quick setup guide.
DW-ESTCAM
Camera, LED strobe, power supply, quick setup guide
DW-ESTBLKB
Blackbody, power supply, quick setup guide
NOTE:
Make sure the PC’s IP address is not overlapping with the camera’s IP address. The PC’s
IP setting ranges arbitrarily from 169.254.100.1 ~ 169.254.100.254. Make sure to set the
subnet mask to 255.255.0.0.
NOTE:
Install the Blackbody facing the camera, 9.8~14.7ft
from the camera (10ft is recommended) and
connect it to an adequate power supply.