


1
www.digiop.com
BLK-IPS101_CQ
5/27/11
Attach peripheral devices to the terminal blocks as needed. For detailed interface specifications, refer to the
user manual.
Step 2. Connect the camera to the LAN
Attach the network LAN cable to the Ethernet connector on the camera backpanel.
Your camera can be powered locally with a 12 V DC adapter, or across the LAN (PoE). If using the power
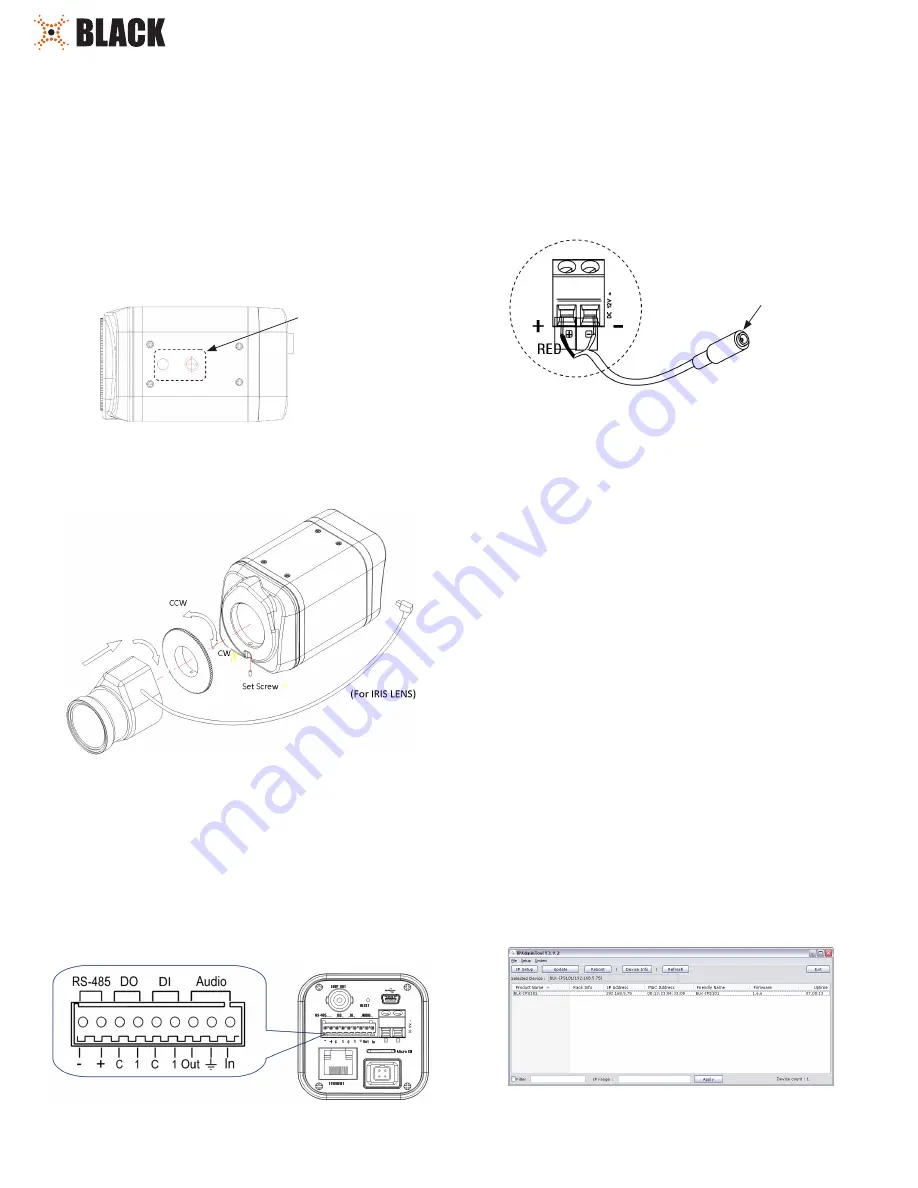
adapter, attach the DC jack adapter cable to the DC 12V power adapter terminals on the back of the camera.
Connect the red wire of the adapter cable to the + terminal, and the black (or white) wire to the
-
terminal.
DO NOT apply power
to the camera at this time.
DC Jack
Adapter
Cable
Step 3. Install IPAdmin Tool
The IPAdminTool is a utility for configuring the network settings of your Digiop Black cameras and installing
new firmware. It can be loaded on a Microsoft Windows XP, Vista or Windows 7 operating system. At a
computer on the same LAN (subnet) where your cameras will be installed, do the following:
1.
Insert the CD mini disk provided with your camera into your computer’s CD ROM drive and open the
CD in a Windows Explorer window.
2.
Find the IPAdminTool directory on the CD.
3.
Copy the IPAdminTool directory with its contents to your computer hard drive.
Step 4. Configure the network settings of you camera
When your IP camera is attached to a network and initially powered on, it attempts acquire compatible
network settings from a DHCP server. If it cannot find a DHCP server, it configures itself with the following
static (fixed) settings, which may or may not be compatible with other devices on the network.
IP address:
192.168.0.100
Subnet mask:
255.255.255.0
Gateway:
192.168.0.1
Your camera must be configured with static network settings that are compatible with the LAN. If your
LAN has a DHCP server, use the following sub-step. Otherwise, use the sub-step procedure below for
LANs
without DHCP
.
Installing cameras on LANs with DHCP
1.
Connect your camera to the LAN, then power on the camera.
2.
Open the IPAdminTool directory on your computer, then double click the file
IPAdminTool.exe
to
start the application. When the IPAdmin Tool starts, it will discover all the IP devices it supports that
exist on the network. The discovery process may take a few minutes.
H.264 Network IP Camera
Quick Installation Guide
This document guides you through the basic steps to install and configure your Digiop® Black BLK-IPS101 IP
camera. For detailed instructions, refer to the User Manual.
Find the camera’s
MAC address
on the product label and enter it here: __________________
Step 1. Install the camera
Install the camera mounting bracket using the instructions provided with the bracket.
Attach the adapter for mounting the camera to side with the label or to the opposite side with the four
screws provided.
Mounting
adapter
Remove the protective cap covering the camera CCD.
Attach the lens assembly to the camera by screwing it clockwise onto the camera until it is fully seated. The
lens may require a mounting ring adapter to fit onto the camera.
Tighten the lens set screw with the hex wrench provided.
If the lens assembly has an Auto Iris feature, attach the lens cable to the 4-pin connector on the back of the
camera.
Attach the camera to the mounting bracket.
CONNECTIONS
Connections to the camera for audio in and out (microphone and speaker), D/I sensor, alarm, and RS-485
control are made through the 9-pin terminal block. Plug the terminal block into the mating connector on
the camera.


