background image

Helvar

 | Data is subject to change without notice.

www.helvar.com   

LCD TouchPanel (924)

Installation and User Guide

Product description

Thank you for choosing a Helvar product, and welcome 

to our growing family of customers around the world. 

By choosing Helvar, you have invested in great value 

technology that we hope you will enjoy using for many 

years. This guide is designed to help you get the most from 

your TouchPanel. Here you will learn about its features, 

its operation and maintenance. To learn about TouchPanel 

installation and wiring, see the installation leaflet 

(document 7860140, supplied with this product).

TouchPanel requires some configuration 

before it can be used for the first time. To 

learn more, see section 3.

To learn about your lighting system, and how 

TouchPanel works with it, see section 21. 

This is highly recommended if you intend to 

customize TouchPanel’s operation.
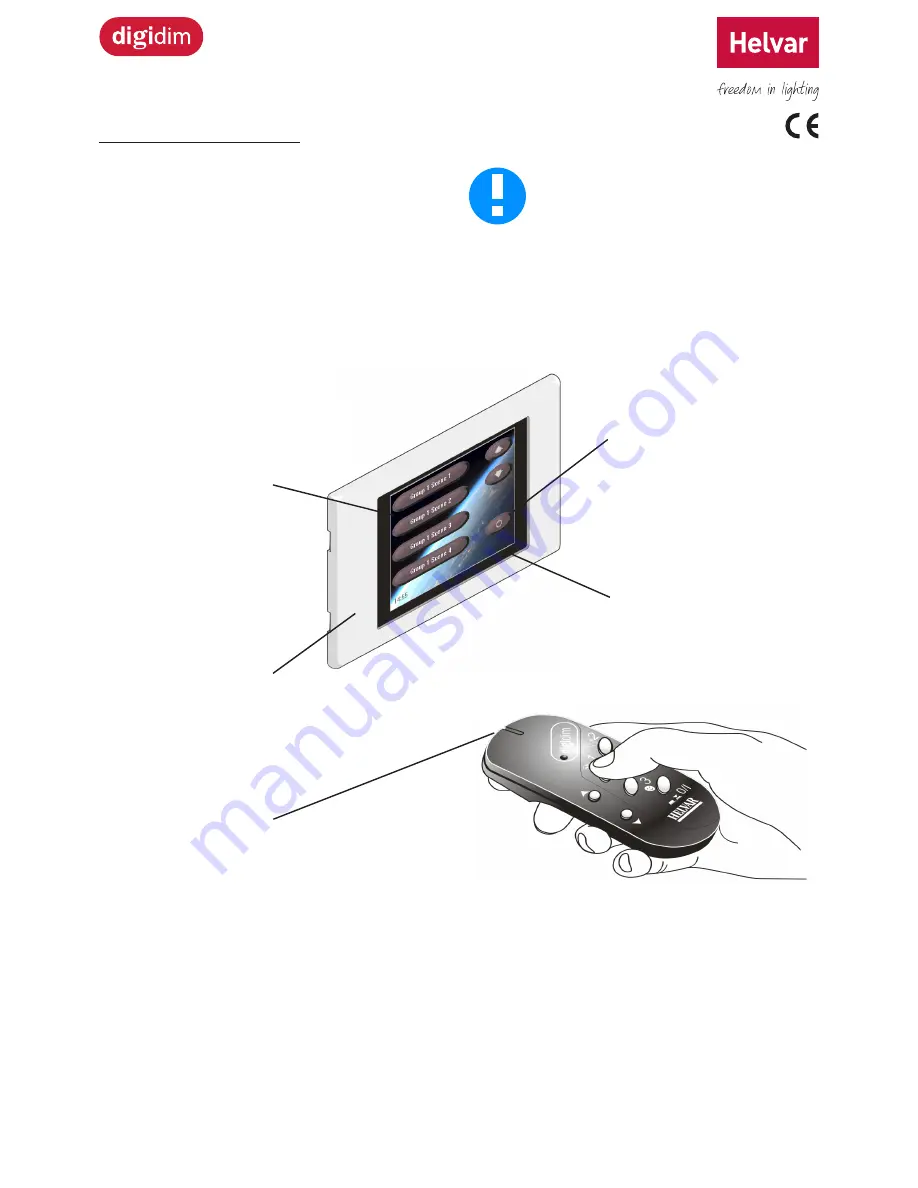
Menus and controls

To learn how to use the on-screen 

menus and controls, see section 2.
To learn how to change screen 

content, see section 8.

Bezel

To learn about care and 

cleaning the bezel and 

screen, see section 18.

Touch-sensitive screen

To learn how to use the touch 

screen, see section 1.1

Backlight

To learn about using and 

configuring the backlight, see 

section 17.

Remote control

To learn how to configure 

TouchPanel for use with a 

remote control, see section 11.

Summary of Contents for Helvar 924

Page 1: ...ment 7860140 supplied with this product TouchPanel requires some configuration before it can be used for the first time To learn more see section 3 To learn about your lighting system and how TouchPanel works with it see section 21 This is highly recommended if you intend to customize TouchPanel s operation Menus and controls To learn how to use the on screen menus and controls see section 2 To le...

Page 2: ...DIGIDIM Controls 17 8 Setting Up Screens 23 9 Automating the TouchPanel 31 10 Automating TouchPanel with Sequences and Cycles 33 11 Configuring a Remote Control 37 12 Backing Up And Restoring 39 13 Refreshing and discovering devices 43 14 Resetting to Factory Defaults 44 15 Password Protection 45 16 Setting the Time Date Location and Language 46 17 Setting the Backlight 48 18 Cleaning 49 19 Calibr...

Page 3: ...de the heading applies to TouchPanel in Workshop Slave mode Designer Slave A section with this symbol beside the heading applies to TouchPanel in Designer Slave mode Sections with no symbol beside them apply to all TouchPanel modes of operation To learn about modes of operation see section 3 2 Tip An item with this symbol beside it provides extra information to help you get more from TouchPanel Al...

Page 4: ...ld impacts but it may be damaged if struck too hard You need only press the screen gently to select an item As a simple rule if the picture becomes distorted when you press the screen then you are pressing it too hard For ease of use we recommend using a stylus if you are Configuring TouchPanel extensively Do not press the screen with hard or sharp objects or with a writing tool such as a pen as t...

Page 5: ... be customized To learn how to create and modify Screens see section 8 Title This shows the name of the Screen To learn how to change the title see section 8 Buttons These are used to select scenes fade the lights control devices or select other Screens To learn how to configure buttons see section 8 5 to 8 10 Clock A clock can be included on any Screen To learn how to add a clock see section 8 5 ...

Page 6: ...commands Menu content varies according to mode of operation For a list of all icons and their purpose see the back cover of this guide To learn about modes of operation see section 3 2 List A collection of related items such as Loads Scenes or Screens Back button Click this button or anywhere in the Title and advice area to return to the previous menu Pop up menu A row of icons at the bottom of th...

Page 7: ... do not return to the Configuration menus within 20 seconds After this time if you want to access the Configuration menus you must enter the password again This ensures that TouchPanel s Configuration menus are protected automatically from accidental or unauthorized access 2 4 Exiting from Configuration menus Press The Main Menu will appear repeatedly until the required screen or menu appears You ...

Page 8: ...command you can continue to select and delete items until you quit from that command The following example shows the delete command in use 1 Press to select the delete command This screen shows a list of Loads which in this case are SCR Dimmer channels The last is a missing load and is shown in GREY If only one Pop up menu icon is visible you may be in a command already Press that icon to quit fro...

Page 9: ...ppear 3 Select a language 4 to accept the language 7 If not previously set the Set Date And Time menu will appear 8 and to set the date and time 9 to accept the date and time 10 The Default Screen will appear TouchPanel is now ready for use 5 The Select Mode menu will appear Press Master Panel Toolbox Slave Workshop Slave or Designer Slave to set the mode of operation To learn more about each mode...

Page 10: ...gured Editing TouchPanel Schedules Sequences and Cycles is also possible Other device configuration must be done via Toolbox or in MP mode Workshop Slave mode In Workshop Slave mode TouchPanel only functions as a scene recall panel Lighting system configuration is not possible Screens and objects can be added and configured Editing TouchPanel Schedules Sequences and Cycles is also possible Other d...

Page 11: ...section 5 6 3 Edit Scenes Yes No No No Edit each scene as required To learn more see section 6 1 4 Edit Digidim Controls Yes No No Yes Assign all Controls to relevant Groups and functions to buttons To learn more see section 7 5 Define Screens Yes Yes Yes No Define Screens to provide all required user controls To learn more see section 8 6 Define Key Mappings No No No Yes Define Key mappings to pr...

Page 12: ...ds in other Groups will ignore commands for this Group You are not restricted by this structure though You can configure each TouchPanel button to control loads in a particular Group or send commands to the entire lighting system by using Broadcast commands To learn more about Broadcast see section 21 2 Example TouchPanel Kitchen Group 1 Diner Group 2 L1 L2 L3 L4 Loads Groups L1 Group 1 L2 Group 1...

Page 13: ...en in Master Panel mode TouchPanel can work with up to 64 Imagine channels and or 63 DALI Digidim channels DALI and Digidim loads are addressed automatically so you do not need to set these addresses When using Imagine loads the addresses must be in the range 1 to 64 To learn how to set the address of an Imagine load see the documentation accompanying it 5 4 Identifying a Load 1 From Main Menu sel...

Page 14: ...iscovered Loads 3 to view the Pop up Menu 4 to add a load 5 to edit the Load name 6 to select the Groups to which the load will belong 7 to select Load type 8 to select the address for the Load 9 to select the number of channels of this load type to add 10 to save the changes 5 5 Renaming a Load It can be useful to rename each load to indicate its purpose or location and to make it easier to ident...

Page 15: ...bout Broadcast see section 21 2 9 to select Load type 10 to save the changes 5 8 Changing a Load Level manually Levels are normally set by calling a scene that sets the required levels but you can also set the level for individual loads manually 1 From Main Menu select the following 2 to display a list of discovered Loads 3 and to raise or lower a load level or press within the load to set its app...

Page 16: ...quired levels but you can also set the level for individual loads manually 1 From Main Menu select the following 2 to display a list of discovered Loads 3 to display the Pop Up Menu 4 and then from the list choose the load you want to delete The load level will change to RED 5 Press to confirm the deletion 6 Delete other loads if required and then press to leave Delete mode ...

Page 17: ...up 1 Scene 1 G1S1 the levels of L1 and L2 can be set in this example to 75 and 65 respectively independently of L3 and L4 By editing Group 2 Scene 1 the levels of L3 and L4 can be set in this example to 80 and Ignore respectively independently of L1 and L2 As mentioned earlier setting L4 to Ignore in Scene 1 causes the level for L4 to remain unchanged whenever Scene 1 is recalled Starting with all...

Page 18: ...Groups see section 5 1 From Main Menu select the following 2 to display the Edit Scenes menu 3 Select the Group containing the loads you want to edit 4 Select the scene to edit it 5 Set the level for each load in the Scene by pressing in the loads bar using or or pressing the level value box to toggle it between 100 and Off 6 Select or to set a load to Enabled or Ignore 7 to save the changes ...

Page 19: ...2 Identifying a Digidim Control 1 From Main Menu select the following 2 to display the Controls menu 3 to display the Pop Up Menu 4 to enter Identify mode 5 Select the Control to identify An LED on the physical Control will flash until you select a different Control or you exit Identify mode 6 Repeat step 5 to identify more Loads or to exit Identify mode 7 3 Editing Digidim Control Properties 1 Fr...

Page 20: ...enable or disable infrared 9 or and then select the type for each input for input units only You may change an input type from Switch Edge Switch Button Analogue Edge or Analogue Slider depending on the input unit selected 10 and then select a PIR mode for Multisensor 312 only 11 to enable or disable the Constant Light feature for Multisensor 312 only When enabled constant light scenes become avai...

Page 21: ... the Scene Store Delay time then the current levels for the loads controlled by the button input will be stored as the selected scene To learn more about Scene Store Delay see section 7 3 12 select a level with modifier If the button is pressed briefly then the selected level will be recalled If the button is pressed for longer then the current levels for the loads controlled by the button input w...

Page 22: ...m TouchPanel a remote control another control or by adjusting the curtains blinds in the room Once the desired light level has been achieved perform a scene store for example by holding the relevant scene button in for more than the default scene store time Once stored recalling this scene will cause the lights to be adjusted automatically as the daylight varies thus maintaining the stored light l...

Page 23: ...save the changes 5 and then one of the following PIR modes to set the On Timeout to set the Minimum Hold Timeout to set the Exit Delay time 6 to change the button function Choose one of the following settings to allow the button to call a scene then choose a scene to call to allow the button to fade up the channels in a particular Group Choose a Group containing the channels you want this button t...

Page 24: ...e 7 8 Digidim Control symbols 100 Rotary Switch 110 Single Slider Panel 111 Dual Slider Panel 121 Panel 122 Fader Panel 124 Panel 125 Panel 126 Panel 170 Infrared Receiver 312 Multisensor 942 Analogue Input Unit 440 Input Unit 444 Mini Input Unit 924 TouchPanel 930 Panel 935 Panel 939 Panel A control that is not recognised or yet supported by TouchPanel This icon appears beside an item that is no ...

Page 25: ...Screens When TouchPanel is switched on and configured it always displays the Default Screen section 3 1 It makes sense therefore for this Screen to include the most commonly used options 8 1 Designing a Screen Hierarchy A large space such as a nightclub may be divided into several areas that require separate lighting control One way to make control easier is by using a separate Screen for each are...

Page 26: ...see section 8 3 8 2 Adding a Screen 1 From Main Menu select the following 2 to display the Screens menu 3 then to add a new Screen The properties for this screen will be displayed 4 to display the Layout Menu These settings allow you decide what buttons will be on the Screen when it is created 5 Choose the number of Scene Buttons to include Decide whether there will be Modifier Buttons an Off Butt...

Page 27: ...isplay or hide the Screen Title to enable password protection for this Screen or to disable it When a password has been set and protection has been enabled this Screen can only be displayed if the correct password is entered This is a useful way to limit access to TouchPanel in public access or sensitive locations to choose a background picture or solid colour or to change the change the picture T...

Page 28: ...e Screen and labels can be used to provide additional information 1 From Main Menu select the following 2 to display the Screens menu 3 Select the screen to be edited 4 to display the Pop Up menu 5 to enter Add mode A menu of control types will appear 6 to add a button to add a clock to add a shape or to add a label The properties for the button clock shape or label will be displayed 7 Edit the pr...

Page 29: ...ode if this is available for the type of control being moved 9 saves the changes 8 7 Resizing Buttons and Shapes The controls on a Screen can be arranged to suit your needs For example it is usual to arrange scene buttons into one or more columns arrange the modifier buttons to one side of the screen one above the other and to position the Off button near the bottom right of the screen 1 From Main...

Page 30: ...sen scene is being used in a Sequence or Cycle then pressing this button will cause the Sequence or Cycle to execute To learn about Sequences and Cycles see section 9 to allow the button to fade up the channels in a particular Group Channel or Scene Block to allow the button to fade down the channels in a particular Group Channel or Scene Block to allow the button to link to a Screen to choose oth...

Page 31: ...how the time and or date in various formats 13 to choose the clock colour digital clock or date only 14 to choose the clock hands colour analogue clock only 15 to choose the clock face colour analogue clock only Label 16 to edit the text of the label 17 to set the colour of the label text 18 to save the changes 8 9 Deleting a Control 1 From Main Menu select the following 2 to display the Screens m...

Page 32: ...set the address once for all TouchPanel buttons See 8 3 for further information To map the addresses 1 From Main Menu select the following 2 to select Screens Menu 3 to display Pop Up Menu 4 to enter Properties mode Select the screen for which you want to view information 5 to select Group Address block 6 to select your chosen address 7 to save the changes All TouchPanel buttons will now have the ...

Page 33: ...c times to give the impression that you are at home Switching to a different Screen at a specific day and time If there is a different Screen for day and night you can create a Scheduled Event so that TouchPanel switches from the daytime Screen to the night time Screen at a convenient time every evening and switches back to the daytime Screen every morning Specifying days of the week you can have ...

Page 34: ...6 to edit the Scheduled Event name Giving the Scheduled Event a new name makes it easier to identify among other Scheduled Events If you clear the name completely and save the change theScheduled Event will return to its default name 7 to choose a Group or Scene Block Not available for Change Screen function 8 to change the Scheduled Event function Choose one of the following settings to allow the...

Page 35: ...d at any time by selecting a scene that is not part of it but within the same Scene Block To start a Sequence or Cycle automatically use a Scheduled Event to recall any scene used in the Sequence or Cycle To stop a Sequence or Cycle automatically use a Scheduled Event that recalls a scene not included in the Sequence or Cycle The Sequence or Cycle will begin with the called scene skipping the prec...

Page 36: ...y do this when a Sequence or Cycle is first added 7 to select a scene within the selected Group 8 You may edit the other properties of the Sequence or Cycle now or later To learn about the properties and how to edit them see section 10 3 9 to toggle between adding another Link after this one or completing the Sequence or Cycle 10 to save the link If adding is complete then you will be returned to ...

Page 37: ...equence 7 to save the changes When you create a Link Fade Time defaults to Link Duration This means that if Link Duration is 5 seconds then Fade Time will also be 5 seconds You can make these values different if you wish The example below shows the relationship between Fade Time and Link Duration in a Link between Scene 1 and Scene 2 in a given Group In this example the levels start at 50 and Scen...

Page 38: ...or Cycle you want to add a Link to 3 Select the Link that you want to be executed before the Link you are about to add The existing Link will be opened for editing 4 then to add a new link 5 to select a Scene for this new link 6 You may edit the properties now or later To learn about the properties and how to edit them see section 10 3 7 to save the link If adding is complete then you will be retu...

Page 39: ...anel has been configured Currently only the Helvar remote Control Handset or a learning remote control can be used 4 Choose the remote control for which you want to edit the settings A list of buttons will be displayed Each button in the list corresponds to a button on the remote control The first four buttons are scene buttons 1 to 4 the fifth button is the Off button the sixth and seventh button...

Page 40: ... rename 6 and then type in a new name for the remote control 7 to save the changes 11 3 Grouping the buttons of a remote control 1 From Main Menu select the following 2 to display the Options menu 3 to display the Remote Control menu 4 to display the Pop up menu 5 and then from the list choose the remote control whose buttons you want to place in a Group or Scene Block 6 to display the Select Grou...

Page 41: ...h TouchPanel Backup Software 1 Install the software from the CD supplied with your TouchPanel 2 Before connecting the USB cable between the computer and TouchPanel If the computer is a laptop or notebook it must be removed from any docking station Remove any USB port expanders Remove the computer from any attached network connection 3 Power up the TouchPanel and wait for the start screen to be rep...

Page 42: ...n and then press the OK button 5 Press the Backup button to start the backup Section 10 4 shows the meaning of the status graphics during backup and restore 6 Press the Abort button at any time to stop the backup process Before connecting the USB cable between the computer and TouchPanel If the computer is a laptop or notebook it must be removed from any docking station Remove any USB port expande...

Page 43: ...establish communication with TouchPanel 4 Press the Restore button 5 Choose a folder to restore and then press the OK button 6 Press the Restore button to start the restore 7 TouchPanels Flash memory will be erased to make room for the restored content 8 TouchPanel content will now be restored When completed TouchPanel will display the default screen To learn about the default screen see section 8...

Page 44: ...nd TouchPanel but TouchPanel Backup has not yet established communication with TouchPanel The USB cable has been connected between the computer and TouchPanel and TouchPanel Backup has established communication with TouchPanel TouchPanel Backup is backing up picture files to the computer TouchPanel Backup is backing up a settings file to the computer TouchPanel Backup is erasing the flash memory i...

Page 45: ... the Loads menu or with in the Controls menu These can be deleted if required To learn how to delete a device see section 5 8 loads or 7 9 controls 13 1 Refresh devices manually 1 From Main Menu select the following 2 to display the Options menu 3 to display the More Options menu 4 to display the Device Refresh screen 5 to start the device refresh 6 A summary is displayed when Device Refresh compl...

Page 46: ...e 6 to continue 7 TouchPanel will reset and behave as if it is being switched on for the first time To learn how to configure TouchPanel from this point see section 3 This procedure will cause all settings stored in TouchPanel to be lost including Screens Groups Scenes Scheduled Events Sequences and Cycles However DALI devices store their own scene levels and Group information so that information ...

Page 47: ...d When you have entered a valid password features protected by the password can be used until the password expires The password expires if you return to a Screen and do not return to the Configuration menus for more than 20 seconds After this time if you want to access the Configuration menus you must enter the password again This ensures that TouchPanel s Configuration menus are protected automat...

Page 48: ...Region list 6 Select a region of the world To set a time zone that does not relate to a specific region select Worldwide 7 to save the changes 8 to display the Locale list 9 Select the city nearest to your current location 10 to save the changes 11 Use and to set the longitude and latitude of your current location These values default to the current locale but you can adjust them so that they refe...

Page 49: ...l when it calculates dawn and dusk times for Scheduled Events To learn more about Scheduled Events see section 9 In the event of power supply failure TouchPanel s clock will continue to keep time for approximately two days using its internal power reserve When power is restored if the clock is no longer keeping time you will be prompted to set the date and time 16 2 Setting the Date and Time 1 Fro...

Page 50: ...chPanel s controls when you need them when the backlight has dimmed touch the screen once to brighten the backlight When dimmed TouchPanel s backlight will also brighten when it receives a command from the remote control 17 1 Setting the Backlight Timeout 1 From Main Menu select the following 2 to display the Options menu 3 to display the More Options menu 4 to display the Backlight Settings menu ...

Page 51: ... corners and recesses of the screen Dampen only with water or isopropyl alcohol Before cleaning TouchPanel you should first select Cleaning Mode Do not allow TouchPanel to become wet as electric shock may result Isopropyl alcohol is a flammable liquid Do not use an abrasive cloth or scourer Do not apply liquid directly to TouchPanel Do not apply other detergent polish cleaning agent solvent causti...

Page 52: ...taff about how to enter cleaning mode and about how to clean TouchPanel 18 3 Leaving Cleaning Mode TouchPanel remains in Cleaning Mode for 20 seconds You cannot leave Cleaning Mode manually 19 Calibrating the Screen TouchPanel is supplied with the screen already calibrated However you may re calibrate the screen manually if necessary 19 1 Re calibrating The Screen 1 From Main Menu select the follo...

Page 53: ...librated To learn how to calibrate the screen see section 19 Scheduled Events happen at the wrong time Check that TouchPanel s clock is set to the correct date and time To learn more see section 16 I have forgotten the TouchPanel password You may still be using the default password To find the default password see section 15 Screen contrast is poor This may happen if the ambient temperature is abo...

Page 54: ...contract or request basis Final commissioning and configurating of your new lighting system Bench service for those occasions things cannot be repaired on site How to contact the Service Department Post Helvar Merca Limited Hawley Mill Hawley Road Dartford Kent DA2 7SY UK Telephone Main 44 0 1322 222211 Telephone Service 44 0 1322 282265 Fax 44 0 1322 282216 Email service helvar com 20 2 Finding i...

Page 55: ...ighting Router system see the online help provided with Workshop software available separately or contact Helvar Customer Support for details of training courses 21 1 About Lighting Circuits A lighting circuit is a collection of one or more lights that are connected together and therefore work together A typical room may include one or more circuits each one controlled by an on off switch or dimme...

Page 56: ...enes are actually collections of light levels for a collection of loads The example below shows four scenes each one comprising four loads Note that each scene could comprise many more loads In this case each scene has been assigned to a Scene Button on a typical Screen The loads in each scene have been set to specific levels Notice that the loads do not have to be set to the same level as other l...

Page 57: ...ft or change value Text justify right Date and time Refresh devices loads Move right or change value Theme for screen Clock format Scene Move up or change value Layout for screen Loads Scene Block Stretch vertically Return screen Controls Group Stretch horizontally Return screen timeout Constant Light Ignore scene Shrink vertically Edit a name or caption Sequences and Cycles menu Selected item is ...

Page 58: ...y 14 VDC 50 VDC externally supplied Power Supply 401 or 402 or dimmer packs 91200 99300 99400 14 to 50 V DC 401 or 402 recommended Mechanical data Dimensions 146 mm 35 mm 88 mm Weight 350 g IP code IP30 Back box Requires double gang UK back box provided in the package Operating and storage conditions Ambient temperature 0 C to 35 C Relative humidity Max 90 non condensing Storage temperature 10 C t...

Reviews: