background image

Instruction Manual

Model NO.: TFD-2627MC

26” TV/DVD COMBO

Summary of Contents for TFD-2627MC

Page 1: ...Instruction Manual Model NO TFD 2627MC 26 TV DVD COMBO...

Page 2: ......

Page 3: ...Introduction Front View Rear View OSD Menu DVD OSD Menu 1 Video menu 2 Audio menu 3 TV menu 4 Setup menu 5 Time menu 6 Others menu Simple Troubleshooting 1 2 3 4 3 3 8 16 8 9 10 12 13 14 15 16 17 23...

Page 4: ...USA there are separate collection systems for used electrical and electronic products Please help us to conserve the environment we live in Caution The exclamation point within an equilateral triangle...

Page 5: ...plug out immediately and seek professional help if the mains plug or cable is damaged liquid is spilt onto the set or if it is accidentally exposed to water or moisture anything accidentally penetrat...

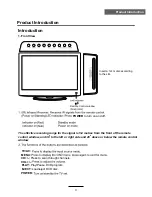
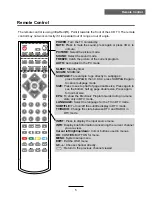
Page 6: ...channels VOL POWER The effective receiving range for the signal is 5 8 metres from the front of the remote control window and 300 to the left or right side and 200 above or below the remote control wi...

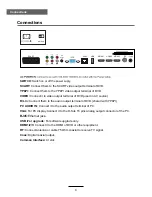
Page 7: ...ed with YPbPr PC AUDIO IN Connect it to the audio output terminal of PC VGA For PC display Connect it to the D Sub 15 pins analog output connector of the PC USB RJ45 SCART HDMI1 HDMI2 HDMI3 RF PC Audi...

Page 8: ...rning the current channel you are view Cursor left right up down Cursor buttons used in menus OK CONFIRM BUTTON for menu MENU System setup menu EXIT Exit the OSD menu 0 9 Choose channel directly Retur...

Page 9: ...display mode of the screen TV TXT Turn off on the Teletext display INDEX Go to index R VEAL Reveal any hidden text for example quiz answer HOLD Hold or carry on the current subpage Load eject DVD dis...

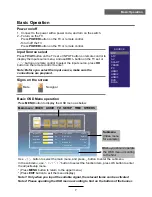
Page 10: ...n Main menu VIDEO AUDIO TV SETUP TIME OTHERS Submenu Video menu for example Hint you should operate Press MENU button to display the OSD menu as below Use button to select the main menu and press butt...

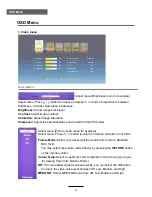
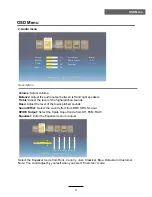
Page 11: ...ture Mode Color Temp NR MP Cinema Mode Low EG NR Standard Normal Low Low 50 50 50 50 Move OK Select EXIT Exit Select menu Press button to select and press OK button to confirm Picture Mode Select your...

Page 12: ...and right speakers Equalizer Enter the Equalizer menu to adjust Select the Equalizer mode from Rock Country Jazz Classical Blue Default and Customer Note You could adjust by yourself when you select C...

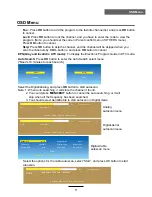
Page 13: ...osition by button Press OK button to confirm Delete Delete the program you select by GREEN button Swap Select the program you want to swap and press YELLOW button then select the other program you wan...

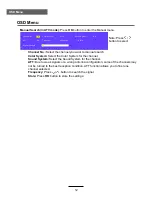
Page 14: ...hen auto searching it will store the channel it found 2 You could press MENU EXIT button to cancel the auto searching or it will stop when all the frequency has been searched 3 You should select Aeria...

Page 15: ...ound System Select the Sound System for the channel AFT Due to weak signals or a wrong antenna configuration some of the channels may not be turned to the best reception condition AFT function allows...

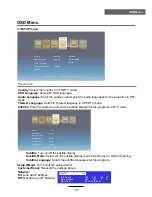
Page 16: ...ings above Setup Wizard Turn on off the setup wizard Subtitle Turn on off the subtitle display Subtitle Mode Select the the subtitle display mode from Normal or Hard of Hearing Subtitle Language Selec...

Page 17: ...and set the current time yourself WakeUp Timer Press OK button to enter the submenu and set the wakeup timer for the TV Operation for Time Press to select the position you want to edit and press butt...

Page 18: ...r the PIP window PIP Position Select the PIP Position on the screen PIP Function Parental Lock Turn on off the Parental Lock function Parental Rating Select the Parental Rating from 3 to 18 Change PIN...

Page 19: ...ase Adjust the phase of the picture Clock Adjust the clock of the picture Auto Adjust Auto adjust the PC VGA settings Auto Phase Auto adjust the phase of the picture Reset Reset the PC VGA settings to...

Page 20: ...age the serial number of playing language the amount of optional languages or Off Language Type Audio Type Subtitle the serial number of playing subtitle the amount of optional subtitles or Off Angle...

Page 21: ...DVD Basic Operation DVD Basic Operation 18...

Page 22: ...DVD System Setup DVD System Setup 19 OK...

Page 23: ...DVD System Setup DVD System Setup 20...

Page 24: ...DVD Basic Operation DVD Basic Operation 21...

Page 25: ...DVD Basic Operation DVD Basic Operation 22...

Page 26: ...Disc Care Disc Care 23...

Page 27: ...e quality Check the aerial connections Check that the channel is tuned in properly Adjust the picture settings brightness colour sharpness contrast hue Make sure that the TV is not located close to el...

Page 28: ...batteries should not be disposed of with other household waste but should be disposed of separately As the end user it is important that you submit your used batteries to the approriate and designated...

Reviews: