background image

TIXIT

AUTOMATIC ABOVE-GROUND  COVER   

TECHNICAL INSTRUCTIONS    

Installation / Use / Cleaning / Maintenance / Safety advice

Summary of Contents for TIXIT

Page 1: ...TIXIT AUTOMATIC ABOVE GROUND COVER TECHNICAL INSTRUCTIONS Installation Use Cleaning Maintenance Safety advice...

Page 2: ...ap and covers with removable steps on the side are not compliant with standard NF P 90 308 Unless otherwise specified by the manufacturer immersion alarms are not compatible with DEL automatic covers...

Page 3: ...is connected to the tube using white straps that are attached to the first slat of the cover There are fixture straps at the start and end of the cover used to fix the cover to the fastening kit fixed...

Page 4: ...x2 x1 x6 x8 x4 x6 x6 x2 x2 x2 x1 x1 M8 12x60 M8x80 M8 M6 2 5 3x16 x4 M6 x12 M4x10 x4 M8 M8x30 x2 DELIVERED PARTS or or OPTION CHLORINE INHIBITOR OPTION Automatic switch or D e s c r i p t i o n Option...

Page 5: ...17 T25 PACKING LIST e g for a 4 x 8 m pool 1 0 80 x 0 60 x 0 55 pallet 40kg 1 4 30 x 0 20 m pack 25 kg 4 5 x 0 25 x 0 20 m packs 150 kg Total weight 205 Kg TOOLS ASSEMBLY INSTRUCTIONS 3 hours D e s c...

Page 6: ...rme en vigeur 2 x 1 mm LED 2 x 1 5 mm 30 cm mini LED I n s t a l l a t i o n Remember to have a sheath fitted to connect the electric control box and the motor terminal D 6 cm see positioning rules 1...

Page 7: ...x2 7 x2 x2 x4 Vis THEF M8x30 crou M8 5 5 x1 x1 5 ASSEMBLY POSITIONING FIXTURE I n s t a l l a t i o n Assembly motor side...

Page 8: ...2 centre of the width With Straplock or Push lock With Quick lock Position 1 Depending on the pool corners and the fastener kits on the roller side Sharp corner Rounded corners or cut off corners Min...

Page 9: ...2 x2 13 M8 12x60 M8x80 M8 3x16 5 5 5 I n s t a l l a t i o n Fixture and adjustment 12 Fix the adjustment bar Before fixing check that there is an operating gap of 5 mm on each side motor side Levelli...

Page 10: ...10 10 M6 M6 x4 x4 x8 1 2 I n s t a l l a t i o n ASSEMBLING THE MOTOR Make small rotating movements with the motor to ease its fitting...

Page 11: ...11 x2 x2 M4x10 2 5 ASSEMBLING THE REAR GUARD I n s t a l l a t i o n...

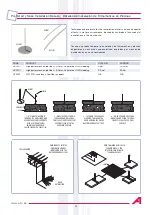
Page 12: ...12 2 1 3 4 F C O I n s t a l l a t i o n WIRING SOLAR VERSION WI KEY OPTION...

Page 13: ...n for advice or contact your electricity provider All our control boxes use a 230 Volt single phase 50Hz power supply The required power at the input terminals is 0 15 Kw Upstream from the control box...

Page 14: ...14 2 1 3 4 I n s t a l l a t i o n WIRING SOLAR VERSION OPTION...

Page 15: ...dvice or contact your electricity provider All our control boxes use a 230 Volt single phase 50Hz power supply The required power at the input terminals is 0 15 Kw Upstream from the control box a suit...

Page 16: ...does not run check the power supply polarity The support must be attached to a fixed support Closing Opening Stops the current action Keyboard lock red green flashing emitter locked Emitter unlocking...

Page 17: ...ck CLICK along the whole length of the slat Repeat the movement until all the slats are completely clipped together Make sure the slats are in the right direction Roller water I n s t a l l a t i o n...

Page 18: ...The skids are used to orient the cover at the start of closure The holes are drilled at the factory I n s t a l l a t i o n Assembly of the strap between the cover and the tube The surface to be glue...

Page 19: ...s direction of movement Turning in the direction will increase the extension of the cover Turning in the direction will reduce the extension of the cover ASSEMBLY OF THE FRONT CASING Checking the orde...

Page 20: ...E AUTOMATIC SWITCH Serial n O and C indicators Inputs Outputs version n Switchs PROG REGLAGE Test led TC1 Button Check the order logic Pilot Pilot I N D I C A T O R S Pool opening Pool closure If the...

Page 21: ...reduce the sensitivity level by selecting the setting for the next width up l pool width SWITCH PROG SWITCH REGLAGE Protected opening Non protected opening The automatic cover stops during the pool o...

Page 22: ...end of Roman steps Without steps With Roman steps kit at the end of the steps Roman 2 kits at max 50 cm from the edge kit at max 50 cm from the edge 1 kit centred if 1 m 1 kit at 50 cm from the edge...

Page 23: ...stop screwing this would deteriorate the fixture quality Concrete After reaching the resistance point make 3 more turns of the screwdriver to finish tightening Concrete block Plug Washer Washer 5 cm 8...

Page 24: ...g this would deteriorate the fixture quality Concrete After reaching the resistance point make 3 more turns of the screwdriver to finish tightening Washer Concrete block water level Acceptable limit o...

Page 25: ...g the resistance point make 3 more turns of the screwdriver to finish tightening Washer Concrete block 5 cm 5 cm 5 cm 8 water level Acceptable limit of level variation recommended water level Acceptab...

Page 26: ...ach surface Do not force the eyebolt into a drill hole of a smaller diameter than this Cruciform 4 x 25 Protective sheath single strap strap sheath staple loop Stretch the strap the cover must touch t...

Page 27: ...tools out of the reach of children Lock the WI Key command When closing the pool it is essential to KEEP THE CONTROL PRESSED FOR AT LEAST 3 SECONDS This is required to guarantee automatic obstacle de...

Page 28: ...28 U s e LOCKING AND RELEASING PUSH LOCK Locking Releasing...

Page 29: ...risk of re triggering with the tool check that the system has kicked in LOCKING AND RELEASING THE STRAPLOCK Pass the strap between the side and the straplock rod The strap must be tight and the cover...

Page 30: ...r and tear At the beginning of each season and in the event of an accident fall hail on the cover abnormal strain on the cover etc check that the slats have no visible signs of deterioration that coul...

Page 31: ...L Wikey emitter 3 EN 300220 1 50m in a free zone 25m through a concrete wall Two 1 5V AAA batteries IP54 Manufacturer Reference Category Range Power supply Protection index Pairing delivered pre paire...

Page 32: ...ildren Respect the water levels defined by the manufacturer Ensure that no foreign objects or swimmers are in the pool before and during operations with the cover Store the tools for manoeuvring the c...

Reviews: