
For all the US cities and Europe (London, Frankfurt and
Moscow), DF-560 automatically adjusts the time for
Daylight Saving Time on the following schedule:
Most of the United States:
Starts on the first Sunday of April.
Time reverts to standard time on the last Sunday of October.
In the European Union:
It starts at the last Sunday in March,
and ends the last Sunday in October.
Simply press the button of the city you want to know
the time. When the city button is pressed, the name of city
will be displayed on the dot matrix display area.
The time is displayed for 5 seconds then the display is
back to default city's time.
10. Calendar Function
1. Installing Main Batteries
AA (
UM-
3) 1
.5V
AA (
UM-
3) 1
.5V
AA (
UM-
3) 1
.5V
Step 1
. Open the battery cover located
on the bottom.
Step 2
. Use 3 AA Alkaline Batteries
and place them according to
the polarity
direction indicated.
Step 3
. Close Battery Cover.
5. Setting Home (Default) Time Zone
To select the other city as a default time zone:
Step 1
. Press and hold the key of desired city then display
will blink.
Step 2.
Release the key.
Step 3.
Press the same key again to confirm.
Operation Manual
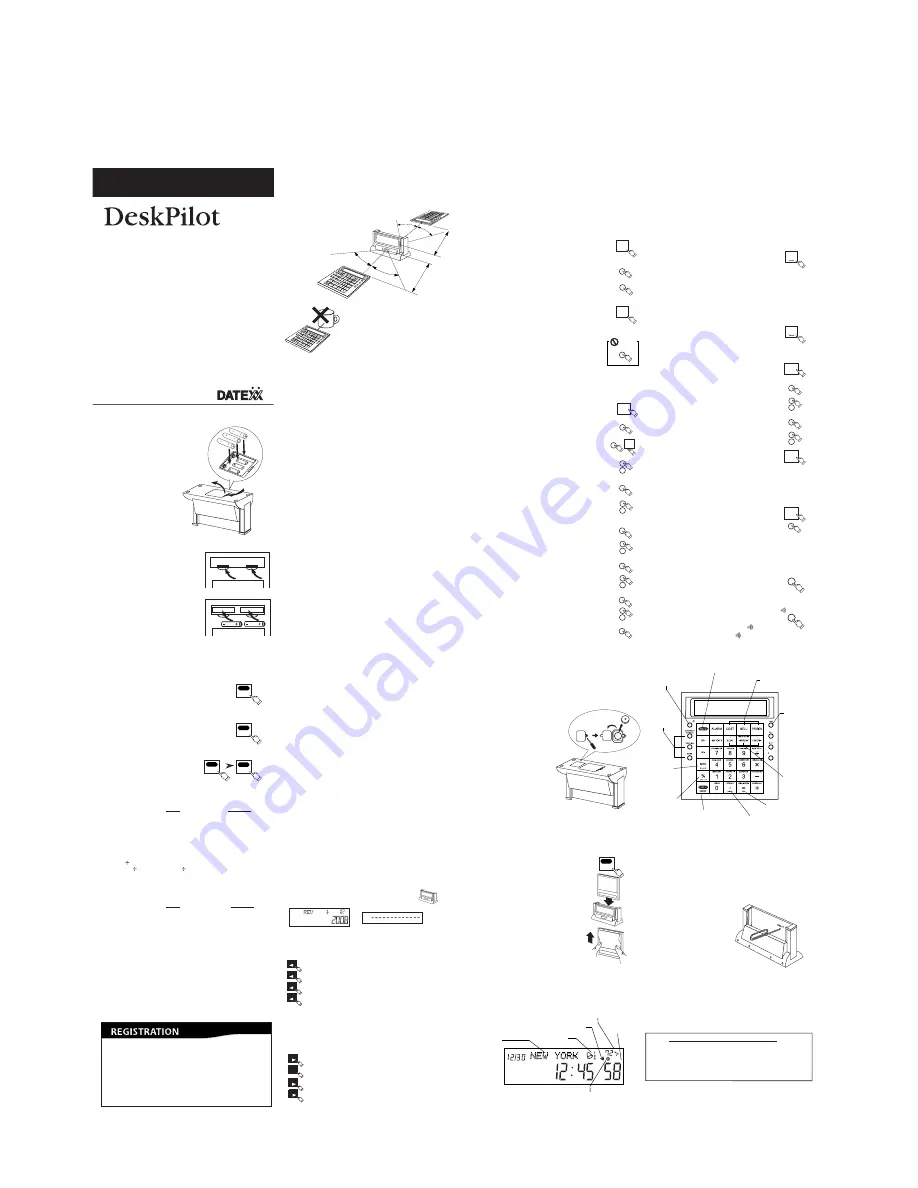
3. Using Infrared Remote keyboard
Point the keyboard toward the remote sensor
on the main unit. Infrared sonsor is also located
in the back for displaying a calculation result
to the other side.
8. Setting My City (Custom time zone set) Time
For the area where is out of preset 16-city time zones, or not
participating Day Light Saving Time (ex: Alaska, New Foundland
and areas in Arizona and Indianna)
The custom time zone can be set:
Step 1
. Press and hold the "MY CITY" key 3 seconds.
the display will blink.
Step 2.
Release the key.
Step 3.
Press the "SET" key right away. then "hour"
and "Minute" display will flash.
Step 4.
Press "DOWN" to adjust time, the time
starts at London time and you can adjust
time by increments of 30 minutes.
(To set European, Asian Time Zone - Press "UP")
Step 5.
Press the "MY CITY" key* to confirm
the setting.
*Caution!
DO NOT press "SET" to confirm My City setting.
By doing so, it will change other cities' time.
Auto DST feature does not apply on My City.
2. Installing Batteries On Remote Keyboard
Keyboard uses 2 AAA batteries
Step 1
. Find the battery cover on
the back side and open it.
Step 2
. Place 2 AAA Alkaline Batteries
according to the polarity
direction indicated.
Notes:
• Do not block the infrared.
• Keep the unit from strong light
such as direct sunlight which can
cause malfunctioning of remote
control.
6. Viewing World Time
7. Auto DST (Daylight Saving Time) Feature
9. Time Setting
DF-560 is set the time when shipping, so no need to set time but
in case of the system resetting, you can set time manually:
Step 1
. Press and hold the key of desired city then
display will blink.
(
Press the same key again to confirm)
* Time will be in Military Mode. See
CHANGING TO 24H TIME MODE
Step 2
. Press "SET" button.
The seconds segments (last 2 digits) will blink.
Step 3
. Press "SET" button again Then Press 12/24.
The hour segments (first 2 digits) will blink.
Step 4
. Press* "UP" or "DOWN" button to set hour.
Also use "AM/PM" button to set AM or PM.
(After changing From 12/24H Mode )
Step 5
. Press "SET" button.
The Minutes segments (middle 2 digits)
will blink.
Step 6
. Press* "UP" or "DOWN" button to set minute.
Step 7
. Press "SET" button.
The Year (Dot metrix display) will blink.
Step 8
. Press* "UP" or "DOWN" button to set year.
Step 9.
Press "SET" button.
The Month (Dot matrix display) will blink.
Step 10
. Press* "UP" or "DOWN" button to set month.
Step 11.
Press "SET" button.
The Date (Dot matrix display) will blink.
Step 12
. Press "UP" or "DOWN" button to set date.
Step 13.
Press "SET" button to confirm the time.
Calendar displays from the year of 1900 to 2099.
Thermometer Function
Total up to 3 alarm can be set.
Step 1
. Press "ALARM" - "A 1" (Alarm 1) will be
displayed.
Step 2
. Press "SET" button.
The hour segments (first 2 digits) will blink.
Step 3
. Press* "UP" or "DOWN" button to set hour.
Step 4
. Press "SET" button.
The Minutes segments (middle 2 digits)
will blink.
Step 5
. Press* "UP" or "DOWN" button to set minute.
Step 6
. Press "TIME" button. Alarm 1 is set
To set Alarm 2 and 3.
Step 1
. Press "ALARM" until "A 2" or "A 3" is displayed
Step 2
. Repeat Step 2 to Step 6 above.
To stop alarm buzzer
Press any key to stop the timer buzzer.
To cancel alarm set.
Press "ALARM" and press "UP" to delete the alarm
set to be canceled.
It can be turned on/off by pressing "TONE"
Hourly Chime reminds every hour with a chime.
It can be turned on/off by pressing " CHIME".
You can confirm the status with symbol in the display.
30˚
30˚
Up to
about 5 ft.
Up to
about 5 ft.
30˚
30˚
• MONTH/DATE (MM/DD or DD/MM ) DISPLAY MODE
Step
. Press "M<->D" to switch the position
of month and date.
• Displays time in16 major cities
• Shows month / year/ date
• Current time and temperature
• 3 different alarm settings
• Programed daylight savings time
• Calculator sends data 5 Feet via infrared
to remote display for business presentations
• 25-step memory trail
• Gross profit function keys
• Currency Converter
DF-560
CHANGING TO EUROPEAN SYSTEM (DATE/MONTH)
Step
. Press "C˚<->F˚" to switch from Fahrenheit (F˚)
to Celsius(C˚) and vice versa.
CHANGING TO CELSIUS(Cº) FROM FAHRENHEIT(Fº)
11. Alarm Function
12. Tone (Entry comfirmation click sound)
7
LOS ANGELES
%
C F
TONE
MY CITY
UP
DOWN
SET
SET
SET
SET
SET
SET
UP
DOWN
UP
DOWN
UP
DOWN
UP
DOWN
DOWN
SET
MY CITY
SET
Don't
Press
MRC
M D
ALARM
UP
DOWN
SET
UP
DOWN
SET
ALARM
UP
ALARM
13. Hourly Chime
CHIME
*(Hold "UP" for Fast Forward, "DOWN" for Rewind)
*(Hold "UP" for Fast Forward, "DOWN" for Rewind)
A Photo Frame Calculator with
Remote LCD/ World Time Desk Clock
SET
=
12 / 24
WELLINGTON
To switch to Calculation mode.
Press "CALC CE/AC"
Calculator Function
To delete incorrect entry without loosing pending calculation.
Press "CALC CE/AC" once.
To clear the entire calculation.
Press "CALC CE/AC" twice.
Press
Displayed
Addition (+)
Example: 6 + 7 = 13.
[6] + [7] =
13
Subtraction (–)
Example: 10 – 4 = 6.
[1] [0] – [4] =
6
Multiplication (x)
Example: 7 x 5 = 35.
[7] x [5] =
35
Division ( )
Example: 14
7 = 2.
[1] [4]
[7] =
2
Performing Calculations
Percentages (%)
Press
Displayed
Example:
Calculate 6% of 100.
[1] [0] [0] x [6] %
6
Example:
Add 6% tax to $20.
[2] [0] + [6] %
21.2
Example: Calculate a
20% discount from $150.
[1] [5] [0] – [2] [0] %
120
Memory Calculations
Example: (12 x 3) - (6
÷
2) = 33
Press
[CALC CE/AC] [CALC CE/AC]
[1] [2] [x] [3] [M+] [6] [
÷
] [2] [M–] [MRC]
[MRC] [CALC CE/AC]
33
0
Profit Calculations
Example: Cost is $19.95 and Selling Price is $39.90
What is profit margin (%)? .......50 (%)
Press
[1] [9] [.] [9] [5] [COST] [3] [9] [.] [9] [0] [SELL]
50
Example: Selling Price is $20 and Profit Margin needs to be 50 %
How much the cost shuold be? ......$10
Press
[2] [0] [SELL] [5] [0] [PROFIT%]
10
Example: Cost is $69.3 and Profit Margin needs to be 30 %
How much the selling shuold be? ......$99
Press
[6] [9] [.] [3] [COST] [3] [0] [PROFIT%]
99
Currency Exchange Calculations
Example: How much the US $100 would be in Euro?
Press
[1] [0] [0] [FOREGN]
111.11 (euro)
Setting the currency exchange rate
Example: (Exchange rate) 1 Euro = 0.9 US Dollar
Press and hold for 3 second.
Press
[EX RATE]
[0] [.] [9] [EX RATE]
Example: How much the 1 Euro would be in US$?
Press
[1] [HOME]
0.90 (US$)
Playback the Calculation Record (Displayed on stand )
You can playback the calculation record up to 25 steps
(Basic Calculation only).
Example: 1 + 2 + 3 + 4 = 10
Press
[1] [+] [2] [+] [3] [+] [4] [=]
10 (Item# 05)
[< REW]
4 (Item# 04)
[< REW]
3 (Item# 03)
[< REW]
2 (Item# 02)
[< REW]
1 (Item# 01)
Edit the Calculation Record
You can edit the calculation record up to 25 steps
Example: Change " 3 " (Item# 03) of the calculation above to " 5"
Press
[FWD >]
2 (Item# 02)
[FWD >]
3 (Item# 03)
[EDIT] [5] [EDIT]
5 (Item# 03)
[FWD >]
4 (Item# 04)
[FWD >]
12 (Item# 05)
DOWN
MONTH DATE
MEMORY
ERROR
CHIME
ALARM
Main Unit Display
DOT MATRIX
DISPLAY
TEMPERATURE
DST (Day Light
Saving Time)
TONE
ON/OFF
PROFIT CALCULATION
CURRENCY
EXCHANGE
HOURLY CHIME ON/OFF
CALCULATION
PLAYBACK
12/24 MODE
AM/PM
C˚ <-> F˚
M <-> D
(Month/
Date)
MODE
CALCULATOR ON
CE / ALL CLEAR
TIME MODE
www.datexx.com
Care And Maintenance
Keep the unit dry. If it gets wet, wipe it dry before use.
Do not use harsh solvents or detergents to clean.
TELEDEX Limited U.S.A. Warranty
TELEDEX INC. warrants these products to the original purchaser to
be free from defective material and workmanship. The product will
be repaired or replaced at our option, for up to one year when
returned with proof of purchase to the address below. Include a
check or money order for $5.00 to cover postage.
TELEDEX INC. 1 Atlas st. Kenilworth, NJ 07033
Warranty valid only in the U.S.A.
Printed in China 6/02
Keyboard
HOURLY CHIME
PM
(Afternoon)
Trouble Shooting
1. Nothing is displayed on the main LCD display:
Check the batteries are new and placed correctly.
2. Cannot control the display with keypad:
Clear the path of infrared, no obstacles.
Move keypad closer to main unit and try it again.
3. The unit is halt (Freeze):
Take out Main Batteries and
place them back in.
If that does not work:
Press reset hole located on
the rear case with a paper
clip and set the time
(refer to "Manual Time set")
4. The display is blinking:
If the "Seconds" segments are blinking,
it means that the "SET" key is pressed accidently,
Press "TIME" to resume clock mode.
Thank you for purchasing Datexx Product
In order to receive:
• Information on new products
• Special promotion on our web store
Please register on-line today at:
www.datexx.com
Back-up Battery Replacement
Step 1
. Make sure the main battery is
new and the unit is working
properly.
Step 2
. Use a screw driver
to loosen the screw on
the back up battery
cover and open the cover.
Step 3
. Replace a lithum battery (CR-2032)
Make sure the positive"+" is facing up.
Step 4
. Close the cover and tighten the screw.
The special preset time feature of DF-560 also
keeps current time setting even the main batteries
are getting low, to ensure this feature, please
replace back-up battery in every 1 to 2 years.
Power Saver Feature: To save the battery life
+
CALC
CE/AC
CALC
CE/AC
CALC
CE/AC
REW
REW
REW
REW
FWD
EDIT
REW
REW
FWD
FWD
PM
CALC
CE/AC
After using the remote keypad,
press [TIME] and place it back
on to the main unit.
It will save the battery power for
IR (Infrared) scanning.
Photo Frame
The photo frame window holds
3.5" x 5" photo, you may need to
trim the photo to fit.
To change the photo, just slide the plastic sheet
and remove it, then place the photo into the frame.
Replace the plastic sheet.
DISPLAY(Main unit)
DISPLAY (Remote )
TIME


