background image

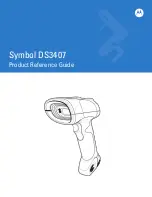
Setting up a Datamax E-4205e

1.  L


 oad the ticket stock


Unlock the printhead and lift it so it is 
vertical.

Push the stock to the left side.

Push the turquoise guide so it is 
guiding the stock and holding it 
against the left side of the paper path.
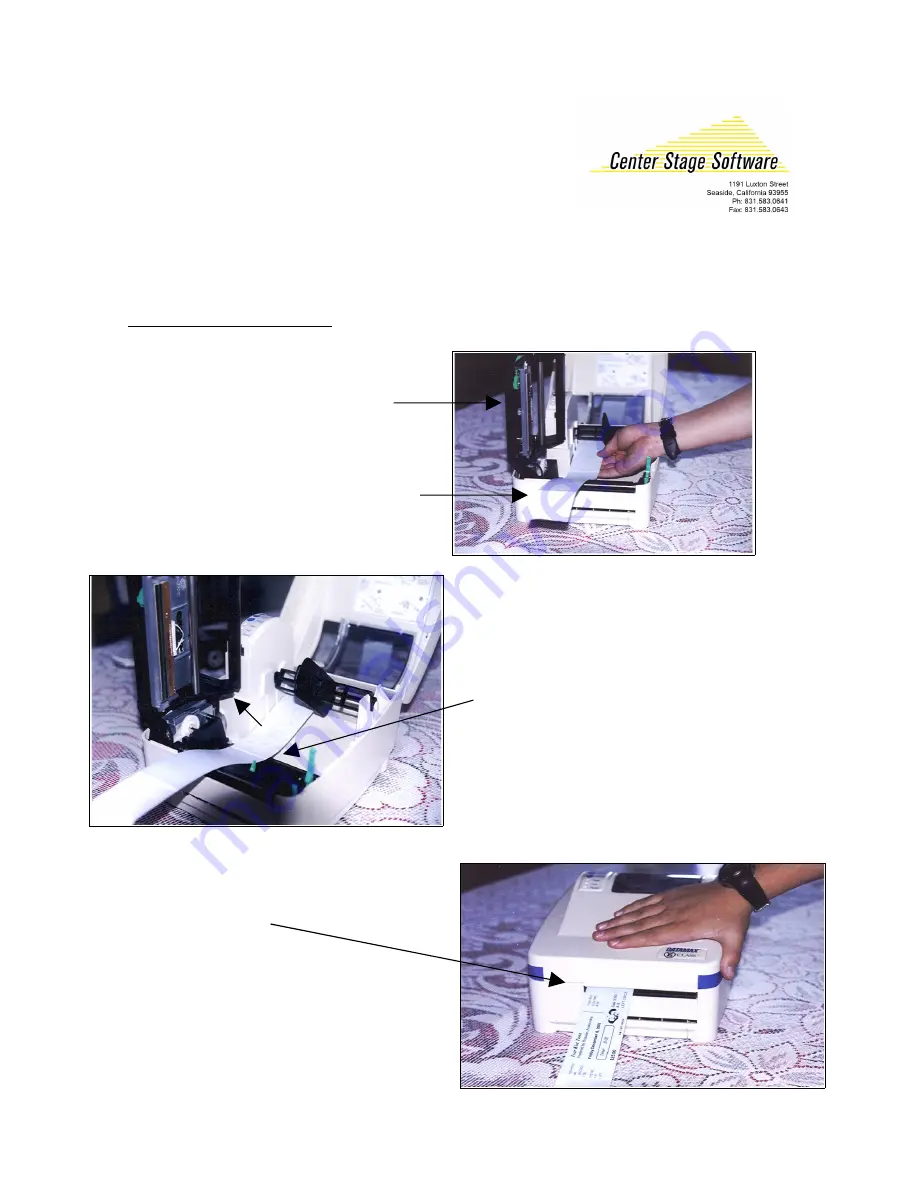
Close the printhead and push it 
down until the turquoise latch 
holds it down.

When you close the cover, here is how 
it should look.

Summary of Contents for E-4205e

Page 1: ... so it is vertical Push the stock to the left side Push the turquoise guide so it is guiding the stock and holding it against the left side of the paper path Close the printhead and push it down until the turquoise latch holds it down When you close the cover here is how it should look ...

Page 2: ... listed in the list of printers Click on the Have disk button Browse to the Datamax CD Windows XP Pro and Windows 7 Click on the file DATAMAX INF in the DRIVERS DPLWINNT subdirectory Click on Open Select the Datamax DMX E 4205e Accept all the defaults from here on and the printer will be installed ...

Page 3: ...3 Setup After you have installed the printer driver Right click on this icon and select Printing preferences Set the stock size to be Multipurpose 2 x 5 ...

Page 4: ...OP Emulation and Present Sensor SOP Emulation While in the Datamax driver do a right click under Properties Select Tools Configure Configure Printer System tab Under Under SOP Emulation choose Allegro Note this is usually defaulted as disabled ...

Page 5: ...Present Sensor Again while in the Datamax driver do a right click under Properties Select Features tab Check to make sure Present Sensor is enabled Note this is usually defaulted as disabled ...

Page 6: ...t the post print action to Tear and the tear offset to 0 00 This is one place where you may want to change things later Set the label sensor to be Label mark Set the top offset to be 1 40 This setting can be changed See Note With Datamax v 5 firmware Top offset 4 27 Tear offset 4 98 NOTE These settings are guidelines On Center Stage Software s setup we changed Top Offset to 0 00 ...

Page 7: ...comes out 5 If one edge of the tickets is printing lightly adjust the green thumbwheel on the right side of the printhead 6 Occasionally a printer will print fine under Tixsales but print blank tickets with Wintix If you have this happen you need to go to the Storage Memory tab and click on the Memory configuration button Change the RAM module allocation to 84K and the Scalable font cache to 64K 7...

Page 8: ...sales 4 9 1 1 A14 0050 0040 Here s what it means 4 Rotation 9 Font ID 1 Width multiplier 1 Height multiplier A14 Font size ID In this case the A14 specifies the smooth proportional font size 14 point If you had wanted a monospace font you would have entered a 005 see table C 3 in the EDPL pdf for examples 0050 Row position measured in inches 0050 corresponds to inch 0040 Column position More notes...

Page 9: ...the only way to get the printer working is with this method Windows 95 98 XP Pro and Windows 7 print driver installation Most things are the same with Windows 95 98 XP Pro and Windows 7 You still need to install the print driver You still need to set the paper size orientation label mark and black line offset In fact the only difference is that the screens look a little different Start the Add Pri...

Page 10: ...ay want to download and install the latest driver from http www SeagullScientific com In this case we have downloaded a new driver to C Seagull Click on the browse button and we will find the driver Driver name Location of the driver Select the hard drive here Windows is ready to copy the files necessary for the driver ...

Page 11: ... Select the model of printer The drivers get copied You need to know what printer port the printer gets connected to ...

Page 12: ... Give the printer a name that makes sense to you No you do not want the ticket printer to be the default printer The default printer needs to be your report printer Click on Finish and you are done ...

Page 13: ...t ticket Look at the printing Is it consistently dark across the ticket Occasionally the printer may be a thermal transfer type of E class You can identify this by the 2 rollers on top of the print head for the ribbon If this is the case the media type needs to be changed from transfer to direct Instructions 1 Power up while holding the F1 button until pause light goes off 2 Press F1 and release t...

Reviews: