Skorpio™ X3 Four Slot Dock
NOTE
Read this manual carefully before performing any type of
connection from the terminal to a host PC using the Four
Slot Dock.
The user is responsible for any damages caused by
incorrect use of the equipment or by inobservance of the
indication supplied in this manual.
The Four Slot Dock paired with a Skorpio X3 mobile computer builds a
reading system for the collection, decoding and transmission of barcode
data.
The Four Slot Dock can charge both the terminals and the spare batteries
at the same time. The spare batteries can be charged by inserting them
into the slots at the back of the cradle.
The Four Slot Dock comes in two different models, the Charger
(94A150032) and the Ethernet (94A150033).
The Ethernet model also provides Ethernet connection for data transfer
via local area networks.
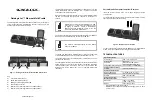
Figure 1 –Four Slot Dock
Key:
A)
Link LED for Ethernet Port 1,2,3,4
B)
Battery charger LED for Slot 1,2,3,4
C)
Power supply connector
D)
Ethernet Port 1 (with integrated Link and Speed LEDs)
E)
Ethernet Port 2 (with integrated Link and Speed LEDs)**
F)
Power on LED
822001261 (Rev. A)
Used in the Ethernet Four Slot Dock only
Available in the Ethernet Four Slot Dock only
MOBILE COMPUTER INSERTION/ REMOVAL
For correct insertion into the cradle, insert the mobile computer from the
top of the cradle and push it down until the clip of the cradle clicks
To remove the mobile computer from the cradle, simply pull it upwards
while holding the cradle firmly down.
.
Figure 2 - Mobile Computer Insertion
Power Supply
Each 4SD requires a power supply to be connected to mobile computers.
We recommend the power supply 94ACC1385.
-
+
Figure 3 - Power Supply Polarity
LED INDICATORS
Power LED Status Indicator (F)
Color Status
Green Cradle
powered
Battery Charging LED Status Indicators (B)
Color Status
Off Battery
absent
Red
Battery charge in progress
Green Charge
completed
Red Blinking
Error
USING THE SPARE BATTERY CHARGER
Correctly insert the battery pack into the slot and simply press it into the
slot until the battery latch is automatically closed; charging starts
automatically.
Figure 4 - Spare Battery Insertion
To remove the battery, release the latch on the battery pack.
Figure 5 - Spare Battery Removal
A
B
F
C
D
E