a
The adjustable
cylinder as it is
in the box
b
3. Adjust the new cylinder
Measure from
center of screwhole
Back part
=
Fits min. 35 mm
7 space piece
7
+7
=
Fits min. 40 mm
10
+10
=
10 space piece
Fits min. 45 mm
+15
=
15
15 space piece
Fits min. 50 mm
+22
22
=
22 space piece
Fits min. 55 mm
+25
25
=
25 space piece
Fits min. 60 mm
32 space piece
32
+32
=
Fits min. 65 mm
32
+7
7
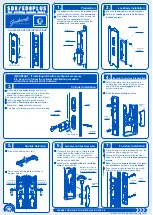
1. Remove the old door lock
Remove your current cylinder. Start
with removing the rosettes and the
screws on both sides of the door.
(
a
) Save the screw with the threaded
tube part for later use.
Remember to unscrew the lock-
screw in the mortise-plate on the
side of the door. (
b
)
Insert your key and turn it so the
cam lines up with the body of the
cylinder and pull it out.(c)
Measure the back part of
the old cylinder from the
middle of the screwhole
and away (see illustration).
In the Danalock box
you’ll find an adjustable
lock cylinder.
4. Just unscrew
the small screws
on both sides of
the part you want
to remove and pull
the cylinder apart.
5. Insert new brass
tube and spacer piece
6. Assemble the cylinder and
screw the tiny screws back in.
When you remove one or
more parts of the cylinder
you’ll have to exchange the
brass tube in the center with
another that fits the new
measurements.
here is the different
combinations.
7. Size guide
Remove too big
spacer piece
and brass tube
Please look at the size
guide to the right to find
the length for the spacer
piece and brass tube.
+32
32
cam
a
c
Tools needed
To mount the Danalock
you need a Philips
screwdriver and two
pliers or a wire cutter.
Parts involved on
your existing lock
Mortise plate
Lock screw
Rosette plate
Cylinder
Back plate
Adjustable
cylinder
Cylinder
brass tubes
Rosette spacers
Tailpiece
adapter
Breakable screws
Contents of the
Danalock box
you’ll need for
the easy install
Small screwdriver
Rosette screw
and treaded tube
Danalock V3 EURO Expert install for rosette doors
page 1/3