DAIICHI D1002ISOFIX, Manual
The DAIICHI D1002ISOFIX car seat comes with a user manual, providing detailed instructions for safe installation and use. You can easily download the manual for free from our website, ensuring you have all the necessary information to secure your little one during travels. Visit manualshive.com to access the downloadable manual.
Share
Download


Reviews:
No comments
Related manuals for D1002ISOFIX
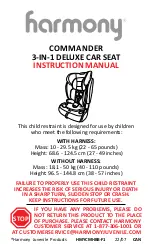
COMMANDER
Brand: Harmony Pages: 102

Alpha Elite 65
Brand: Safety 1st Pages: 32

FB58944
Brand: Baby Trend Pages: 48

BGBS011
Brand: Babyhug Pages: 4

BebeStars Monaco
Brand: Gilis Pages: 16

BebeStars Magic isofix 942
Brand: Gilis Pages: 20

Bebe Stars 007-110
Brand: Gilis Pages: 20

Bebe Stars LEVANTE 910
Brand: Gilis Pages: 32

400-279
Brand: Airaid Pages: 2

Ezy-combo
Brand: Baby Love Pages: 76

Zarauz Sin Deluxe DS02
Brand: Baby auto Pages: 28

Sit'n'Stroll
Brand: Safeline Pages: 32

LM214
Brand: Unitec Pages: 7

JK BRAWLER ROCKERS
Brand: Poison Spyder Pages: 5

Rapido Fix Car Seat
Brand: My Child Pages: 16

LU-BFL305
Brand: my baby Lou Pages: 26

LU-BFL105
Brand: my baby Lou Pages: 106

Magicline
Brand: interco Pages: 44


