Dacor DTT36M974L Series, User Manual
The "Dacor DTT36M974L Series" provides exceptional performance for your kitchen. Install it effortlessly with the included Installation Instructions Manual, ensuring a smooth setup process. This comprehensive manual is available for free download at manualshive.com, where you can access user-friendly instructions to maximize the potential of your Dacor DTT36M974L Series appliance.
Share
Download


Reviews:
No comments
Related manuals for DTT36M974L Series

B 30 2A
Brand: Bentone Pages: 44

3755219
Brand: Riello Pages: 40

FO4P
Brand: Bartscher Pages: 4

KU-HP1700-WH
Brand: Kudu Pages: 8

PLATINUM IGNITION
Brand: Warming Trends Pages: 22

BGN 40 LX-V
Brand: baltur Pages: 133

EAGLE ONE EG-1
Brand: Wayne Pages: 5

Multicalor 1500.1
Brand: Ecoflam Pages: 84

CRM 43
Brand: iFire Pages: 12

EM 6N ST-E
Brand: Lamborghini Caloreclima Pages: 120

Eclipse ImmersoJet
Brand: Honeywell Pages: 17

DVL GSR Insert
Brand: Travis Industries Pages: 52

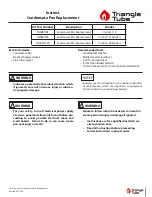
PSRKIT11
Brand: TriangleTube Pages: 4
INSRKIT100
Brand: TriangleTube Pages: 9

BY-EWB-2000-A01
Brand: Simply Brands Pages: 12

RS 100/E
Brand: Riello Pages: 8

RS 1000/EV BLU
Brand: Riello Pages: 48

RS 100 E
Brand: Riello Pages: 40


