background image

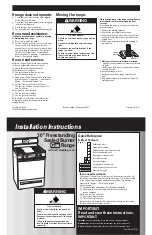
Installation Instructions

Discovery

®


 Range

Part No. 108106  Rev. C

THIS APPLIANCE HAS BEEN TESTED IN ACCORDANCE WITH THE LATEST 
EDITIONS OF ANSI Z21.1, UL858 AND UL60730-1, STANDARDS FOR HOUSEHOLD 
APPLIANCES.

Models:  DYRP36DC, DYRP36DS, DYRP36D-C-C, DYRP36D-C-S, 
 

DYRP48DC, DYRP48DS, DYRP48D-C-C, DYRP48D-C-S

Содержание Discovery DYRP36DC

Страница 1: ...No 108106 Rev C THIS APPLIANCE HAS BEEN TESTED IN ACCORDANCE WITH THE LATEST EDITIONS OF ANSI Z21 1 UL858 AND UL60730 1 STANDARDS FOR HOUSEHOLD APPLIANCES Models DYRP36DC DYRP36DS DYRP36D C C DYRP36D...

Страница 2: ...e Information If you have questions or problems with installation contact your Dacor dealer or the Dacor Customer Service Team For repairs to Dacor appliances under warranty call the Dacor Distinctive...

Страница 3: ...s appliance as a space heater to heat or warm the room Doing so may result in carbon monoxide poisoning and overheating of the appliance WARNING NEVER cover any slots holes or passages on the inside o...

Страница 4: ...other parts of the range Do not store items of interest to children on top of or above the range Children could be burned or injured while climbing on the appliance Do not attempt to use this applian...

Страница 5: ...on box or A 3 wire conduit where local code permits not for use with new branch circuit installations connected to a 3 wire junction box Suggested wiring color code Black white red and green Using an...

Страница 6: ...NFPA 54 Be certain that the appliance being installed is correct for the gas service provided natural gas or LP gas Also if operating the range at an altitude above 4000 ft 1219 m make sure it is equi...

Страница 7: ...vent top cap and range IMPORTANT Cabinet face must not stick out further than back of control panel Back of control panel ERV36 ER or ERV48 ER downdraft vent DYRP36DS or DYRP48DS Range 3 8 min 1 0 cm...

Страница 8: ...box when the range is in place The gas supply piping and shut off valve and the electrical junction box receptacle must be located so they do not interfere with the range when it is installed The junc...

Страница 9: ...range itself Installing a Backguard Optional Install the backguard before making the range gas and electrical connections Install it according the installation instructions included with the backguar...

Страница 10: ...od slab for wood is 3 8 1 cm and 5 8 1 6 cm for concrete See SCREW SIZE TABLE to select the correct screw size Attaching the bracket to a concrete floor Drill four 4 3 8 diameter countersink holes thr...

Страница 11: ...imensions on page 5 and the actual cabinet cutout dimensions used for the installation Determine and mark the required position of the anti tip bracket based on the diagram above Push the bracket up a...

Страница 12: ...over unless instructed to do so Make sure that the conduit or appliance cord is long enough to allow the range to be pulled out for service without disconnecting it from power For safety replace the e...

Страница 13: ...elief not included 4 Slide the wires and the end of the strain relief into the hole on the bottom of the range electrical box 5 Before connecting the wires slide the strain relief nut over the wires a...

Страница 14: ...ire in the junction box 3 Connect the black wire from the appliance to the black L1 power supply wire in the junction box 4 Connect the red wire from the appliance to the red L2 power supply wire in t...

Страница 15: ...clamp tightly on pipe Wire nut 4 places Bare metal Metal water pipe Clamps Junction box 4 Wire Conduit Connection to Junction Box with External Ground Insulated Pipe Jumper Connection to appliance Pa...

Страница 16: ...5 Slide the end of the appliance cord into the strain relief from the bottom of the box 6 Connect the white neutral wire to the neutral terminal in the box 7 Connect the L1 wire to the L1 power supply...

Страница 17: ...as pressure regulator is pre set at the factory for the type of gas intended for use with the appliance To verify that the appliance is compatible with the type of gas available check the range rating...

Страница 18: ...ch on the bottom of each hinge rests on top of the lower lip of each hinge receptacle before attempting to open the oven door Rotate the hinge locks toward the front of the range immediately after ins...

Страница 19: ...with the range The knobs for the center burners are marked with the maximum griddle settings NOTE When installing the knobs align the D shaped opening on the back of the knob with the end of the valv...

Страница 20: ...pieces are properly seated Gently set the grates on top of the spill tray Put the legs of each grate inside the corresponding dimples SimmerSear Burner Installation Standard Burner Installation STEP 1...

Страница 21: ...burner ignition test 4 If the appliance still does not work contact Dacor Distinctive Service at 800 793 0093 ex 2822 Do not attempt to repair the appliance yourself Have the model and serial numbers...

Страница 22: ...Dacor 14425 Clark Avenue City of Industry CA 91745 Phone 800 793 0093 Fax 626 403 3130 www dacor com...

Отзывы: