D-Link DCS-3420, User Manual
The D-Link DCS-3420 is a high-quality surveillance camera that offers advanced features for home or office security. Enhance your setup quickly with the included Quick Install Manual. Easily download the comprehensive user manual for free from manualshive.com, providing you with detailed instructions and maximizing the camera's capabilities.
Share
Download


Reviews:
No comments
Related manuals for DCS-3420

G
Brand: GE Pages: 115

Z Series
Brand: I-G3N Pages: 28

ZEUS
Brand: AAT Pages: 6

BC 50
Brand: Garmin Pages: 8

VIRB Elite
Brand: Garmin Pages: 6

F521E
Brand: Zavio Pages: 10

F3100
Brand: Zavio Pages: 12

D510E
Brand: Zavio Pages: 10

B7210
Brand: Zavio Pages: 32

P6210
Brand: Zavio Pages: 16

S760 - Digital Camera - Compact
Brand: Samsung Pages: 94

MLA2DN25IR
Brand: Aigis Mechtronics Pages: 20

WV-12F-360M-AI
Brand: WavestoreUSA Pages: 15

DCC-508DV
Brand: D-MAX Pages: 8
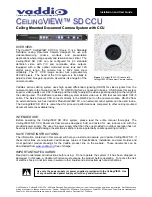
CeilingVIEW SD CCU
Brand: VADDIO Pages: 16

GHDVR350
Brand: Gator Pages: 13

VD-21IRVF
Brand: Comtrend Corporation Pages: 64

NAC-HD-226V-W
Brand: Navaio Pages: 2


