background image

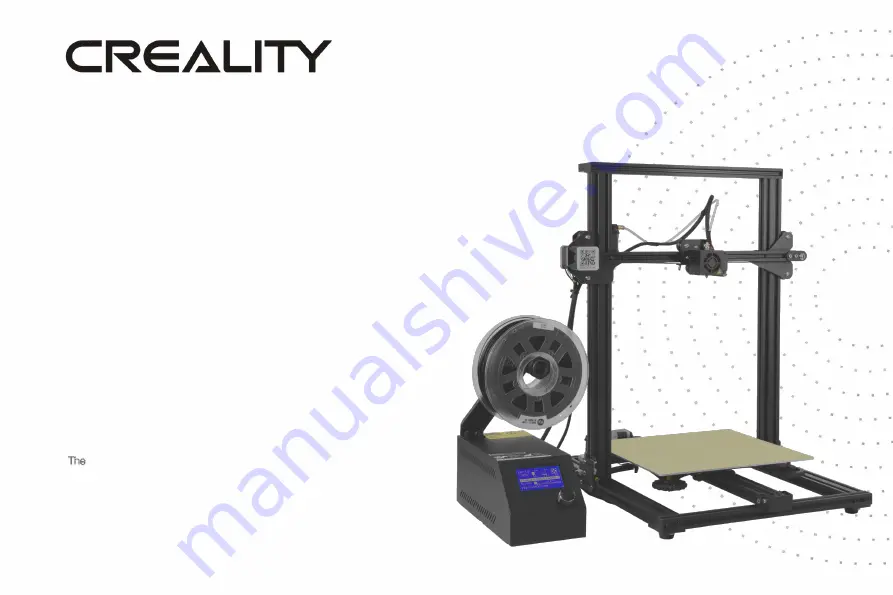
CR-10mini Series 3D Printer User 

Manual

User Manual is for the CR-10 Series of 3D printers. It is also 

applicable for the CR-10S/CR-10 S4/CR-10 S5. 
But CR-10 mini without T-Bracket (Right) &  Decoration Strip.
Due to the different types of devices ,Hardware and software upgrade. the 

devices have little different, it is normal phenomenon. Subject to actual 

device received.
Detailed instructions for using are available in the TF card.

V.6.0

Summary of Contents for CR-10

Page 1: ...for the CR 10S CR 10 S4 CR 10 S5 But CR 10 mini without T Bracket Right Decoration Strip Due to the different types of devices Hardware and software upgrade the devices have little different it is normal phenomenon Subject to actual device received Detailed instructions for using are available in the TF card V 6 0 ...

Page 2: ...mm PLA File Format STL OBJ AMF Working Mode Online or TF card offline Slice Software Creality Slicer Cura Repetier Host Simplify3D Power Supply Input AC 115V 230V 50 60Hz Output DC 12V Total Power 270W 270W 250W 270W 270W Bed Temp 100 100 60 60 100 Nozzle Temp 250 Resume Print NO Yes Yes Yes Yes Filament Detector NO Yes Yes Yes NO Daul Z Axis NO Yes Yes Yes NO language Selection NO EN CN Operating...

Page 3: ...Printer For a better experience in using our product you may learn how to use the Printer in the following ways View the accompanied instructions and videos in the TF card Visit our official website www creality3d cn You will find relevant software hardware information contact details and operation and maintenance instructions on the website Introduction 1 General List 2 Device Installion 3 Cable ...

Page 4: ...r printing surface during operation as they may be hot Keep hands away from machine while in use to avoid burns or personal injury 7 Do not wear gloves or loose clothing when operating the printer Such cloths may become tangled in the printers moving parts leading to burns possible bodily injury or printer damage 8 When cleaning debris from the printer hotend always use the provided tools Do not t...

Page 5: ...orm Connection Power Cable Connection Extruder E Stepper X Limit Switch X Stepper Z Limit Switch Z Stepper Y Limit Switch Y Stepper Nozzle Kit TF Slot and USB Port Display Screen Control Knob Voltage Selection Platform Base Frame Z Gantry Frame A Introduction 1 ...

Page 6: ...TF Card Card Reader 1set 9 PTFE Tubing spare part 1 15 Hex keys Wrench Screwdriver 1set 4 T Bracket Right 1 10 Nozzle Cleaner 1 16 Spare Parts 1set 5 T Bracket Z Limit Switch Left 1 11 Filament 200g 1 17 Decorative Strip 1 6 M5X25 Bolt Lock Washer 4 sets 12 Diagonal Pliers 1 18 Thumb Screw 3 Base Frame Gantry Frame CR 10 mini without T Bracket Right Decoration Strip B General List 2 ...

Page 7: ...at the nut for profile has been turned by 90 before fastening the T shaped fixing block M5X25 4pcs CR 10 mini without T Bracket right u Install the Gantry Frame u Install the T shaped fixing block C Device Installtion 3 ...

Page 8: ...h the Decorative Trim to all parts needing to be decorated Attach the Bracket with two thumb screws Attach Spool Holder with included Nuts Finished Install the Rack Install decoration strip CR 10mini without Decoration Strip The decoration Strip is available in various colors The pictures above are for reference only 4 ...

Page 9: ...responding pins Connect the Stepper Motors according to the yellow labels on the 6pin 4 wire side Connect the Limit Switches according to the yellow labels on the 3pin 2 wire side Select the correct input voltage to match your local mains 230V or 115V Damage can occur if voltage is set incorrectly Make sure the power cable is connected D Introduction 5 ...

Page 10: ...zzle Set Temperature of the Hot Bed Current Temperature of the Hot Bed Part Cooling Fan Speed Current Location of the nozzle Print Time Print Progress Prompt Message Print Speed Device Model Push OK Enter Sub Menu Turn Change Option Value E Screen Information 6 ...

Page 11: ... hole of the extruder Continue feeding until you see filament come out the nozzle Tip How to Replace the Filament 1 Cutting filament near the Extruder and slowly feed new filament until they are fed into the new filament 2 Preheating the nozzle and withdraw the filament quickly and feed the new filament 7 F Loading Filament 7 ...

Page 12: ...r paper to assist with the adjustment making sure that the nozzle lightly scratches the paper 3 Complete the adjustment of the screw on all 4 corners 4 Repeat above steps 1 2 times if necessary 1 2 3 4 1111111 11111 The nozzle is too far away from the platform so the consumables can not adhere to the platform Filament are extruded evenly just sticking on the platform The nozzle is too close to the...

Page 13: ...1 Double click to install the software 3 Select language Next Select your machine Next Finish 2 Double click to open the software H Software Installation 9 ...

Page 14: ...1 Slicing 2 Printing Insert the TF card Print Select the file to be printed Open the software Load Select the file Wait for slicing to finish and save the gcode file to TF card I First Printing 10 ...

Page 15: ...e original factory maintenance the users need to bear the return shipping and maintenance costs 5 Not included in warranty coverage 1 It is not possible to provide an effective after sales service card or serial number 2 The whole machine and components exceed the warranty period 3 Equipment failure or damage caused by unauthorized modification of the equipment private modification includes 1 modi...

Page 16: ...LTD 11F Room 1201 Block 3 JinChengYuan Tongsheng Community Dal ang Longhua District Shenzhen China 518109 Official Website www creality3d cn Tel 86 755 2105 9455 E mail info creality3d cn cs creality3d cn The revision date April 24 2019 ...

Reviews: