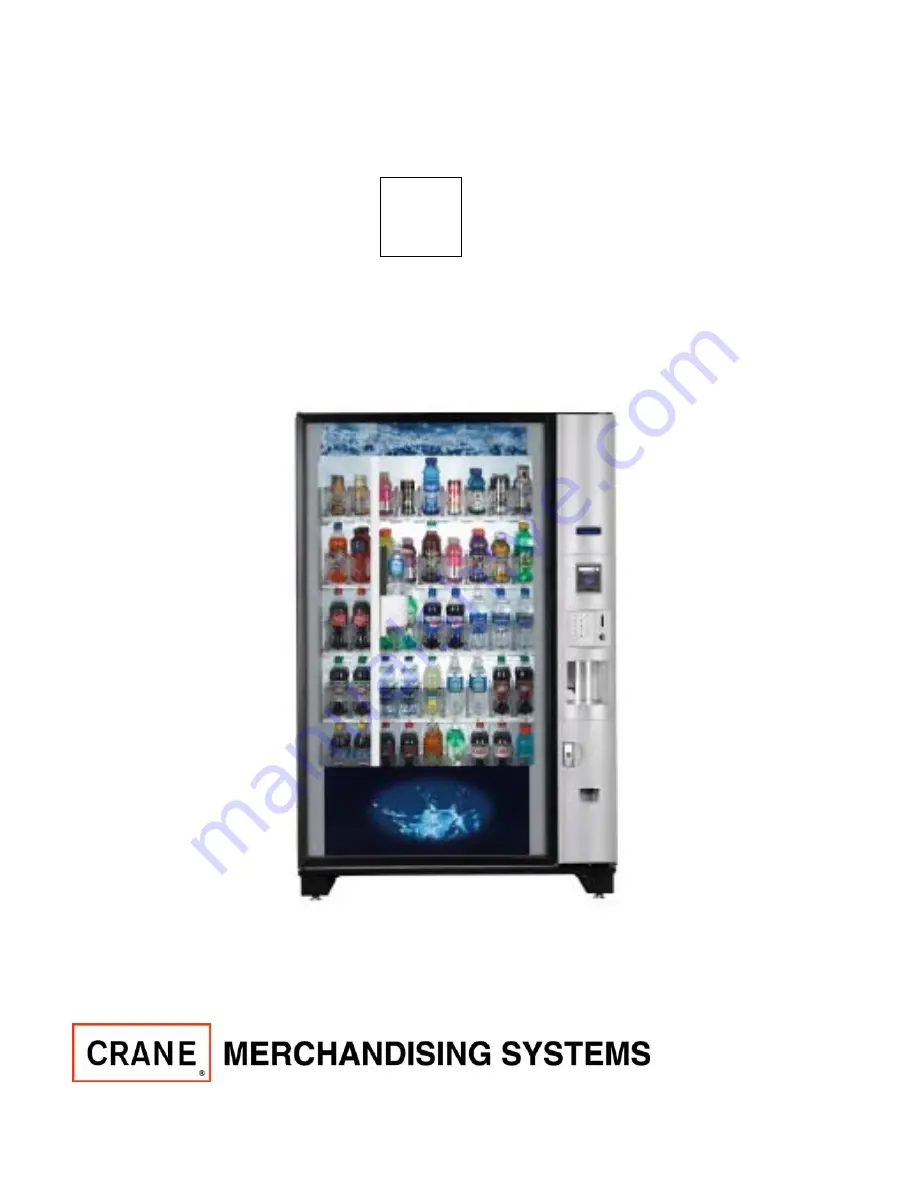
background image


BEV

MAX


MODEL 5800-6 


Glassfront Vender 

Models DN5800-6, DN5800-E6, DN3800-6, DN3800-E6 
Production Run ####BL & higher 


Manufactured by 


Crane Merchandising Systems 
P.O. Drawer 719 
3330 Dixie Narco Blvd. 
Williston, SC  29853-0719 
803-266-5001 
fax: 803-266-5049 
Visit us on the web:  
www.cranems.com 
 

English ######## 


BevMax 6 Keypad 
Programming 
1

st

 Draft


6

Summary of Contents for BEVMAX 6

Page 1: ...6 DN3800 6 DN3800 E6 Production Run BL higher Manufactured by Crane Merchandising Systems P O Drawer 719 3330 Dixie Narco Blvd Williston SC 29853 0719 803 266 5001 fax 803 266 5049 Visit us on the web www cranems com English BevMax 6 Keypad Programming 1st Draft 6 ...

Page 2: ... 38 Combo Vends 39 42 Token Enable 43 Rapid vend 43 MultiVend Discount 43 44 Monetary Mode 44 49 Coins In out 45 Bill Validator 46 Coin Mech 46 Card reader 46 On Board Cashless Enable 46 Bill Acceptance 47 Correct Chang Parms 47 48 Card Revalue 48 Stack Bills 49 System Setting Modes 49 58 Machine Info 49 50 Time Date 50 51 Language 51 52 DTS Data Transfer System 52 54 Software Updates 54 Backup Re...

Page 3: ...ogramming the vender in conjunction with a 14 button keypad integrated in the cladding on the monetary panel of the machine It is used to convey information to the consumer as well as to the person programming the vender The Pill The Pill is what we refer to the polycarbonate front on the service door The Pill houses the Surround Lighting Keypad LCD Display Touchscreen Integrated Payment System an...

Page 4: ...of the errors that may display TO TEST VENDER OPERATIONS To set the different operations of the vender enter the Test mode by opening the service door entering the PIN number and pressing the 3 Key Follow the menu prompts or refer to the Test programming section in this manual for step by step instructions to perform tests for vending coin return motor surround lighting screen refrigeration MagTec...

Page 5: ...eate Config Clone 1 Power Losses 1 Add Group Menu 1 Coins In Out 3 Install Config Clone 2 Door Events History 2 Delete Group 1 Stop Dispensing 4 Remove Clone from Stick 4 Identification Numbers 3 Edit FIFO Group 2 0 05 8 Screen Brightness Mech Validator Cashless 4 FIFO Mappings 3 0 10 9 LED Color 2 Diagnostics 3 UPC EAN Codes 4 0 25 Scroll down second screen 1 Screen Data 4 Shopping Cart Set Up 5 ...

Page 6: ...t 2 Backup Events 3 Power Savings Events 0 Telemetry 1 Assign Unit 2 Ping Server 3 Get Network Status 4 Show Network Config 5 Load Network Config Machine Configuration 1 Refrigeration Settings 2 Space to Sales 3 Picker Cup Sensor 4 Port Sensor 5 Manual Key Switch 6 Firmware Information EVS Compliance Shelf Location Model Scroll down second screen Hook Offset Shelf Offset Encoder Resolution ...

Page 7: ...hat contain the data in this group TECH TIP The listings in this group are a running total and will not be reset when a DEX read is done or the DATA CLEAR function is used Press the numeric Keys to choose a Sub Group Choosing a Sub Group will bring up the first screen in that Sub Group 1 Overall Totals Press the 1 Key to bring up a table listing data Overall Totals Sales 0 00 0 Discounts 0 00 0 Su...

Page 8: ... up a screen listing the product selections on that tray Press a numeric Key to select an individual product selection and you will bring up a table listing dollar values and number of vends for that product This table includes a line to include the Price of the product set in the selection The date and time of the last vend of the selected product is displayed below the table Last Vend Date Time ...

Page 9: ...ss the 5 Key to bring up a table listing Cashless Data Cashless Sales 0 00 0 Discounts 0 00 0 Surcharge 0 00 0 Revalue 0 00 0 6 Bill Data Press the 6 Key to bring up a table listing Bill Data The contents of the recycler unit have been listed below the table Recycler Contents 0 00 Cash Cash In 0 00 ______ To Cash Box 0 00 ______ To Tubes 0 00 ______ Bills In 0 00 ______ Dispensed 0 00 ______ Manua...

Page 10: ... choose a Sub Group Choosing a Sub Group will bring up the first screen in the chosen Sub Group 1 Overall Totals Press the 1 Key to bring up a table listing data Overall Totals Sales 0 00 0 Discounts 0 00 0 Surcharge 0 00 0 Test Vend 0 00 0 Free Vend 0 00 0 Token Vend 0 00 0 2 By Tray Press the 2 Key to bring up a screen listing all trays Press a numeric Key to select a tray and you will bring up ...

Page 11: ... product is displayed below the table Last Vend Date Time 4 Cash Press the 4 Key to bring up a table listing Cash Data NOTE Press the bottom section of the OK Key to scroll thru entire list It has multiple screens The last line of data on the first screen is repeated as the first line of the second screen when you scroll down By Product 1 Tray 1 2 Tray 2 3 Tray 3 4 Tray 4 5 Tray 5 Tray 1 1 101 101...

Page 12: ...t have been listed below the table Recycler Contents 0 00 7 Clear Data Press the 7 Key to clear resettable data Press the 7 Key will bring up a screen asking you if you are sure you want to clear the resettable data Respond by pressing a numeric Key Do you really want to clear all Resettable data Yes No 1 Press the 1 Key for YES 3 Press the 3 Key for NO This is also the data that is cleared each t...

Page 13: ...age is the cause of a reported problem Press the bottom or top section of the OK Key to scroll through multiple screens 2 Door Events History Press the 2 Key will bring up a screen listing data about recorded door events The data is recorded in order of occurrence and can be a valuable tool used to determine if the door has been opened and closed at a time when it should not have been Press the to...

Page 14: ...with the time and date they occurred or a message of No Errors Registered will display Diagnostics time date Coin Tube 1 Empty 14 35 04 12 2013 Cabinet not cooling 09 45 03 25 2013 Coin Tube 2 Empty 17 00 02 28 2013 If necessary use top and bottom of OK Key to scroll thru multiple screens This screen will automatically come up when the service mode is entered if errors currently exist You may use ...

Page 15: ...l validator and harnessing installed Replace the coin mechanism Coin Mech ROM Error Coin Mech ROM Error Replace the coin mechanism Coin Mech Acceptor Coin Mech Acceptor Unplugged Check the connections within the coin mechanism Unplugged Replace the coin acceptor Replace the coin Mechanism Coin Mech Acceptor Coins or other items are stuck in the acceptor Remove the coins or other items from the acc...

Page 16: ...Installed Replace the coin mechanism Coin Return Motor Not Control board not sensing the presence Check the connection J6 on the I O board to the Present of a coin return motor coin return motor Home the coin return motor Replace the coin return motor Check for damage to harnessing Reset or replace the control board Coin Return motor Run The board has determined that the coin Check the connections...

Page 17: ... ongoing operation Re start the machine and let it re boot Remove monetary devices and re start the machine Reset and or replace the control board No Selections Available The control board is not sensing any motors Check for motors to be homed available for use Check for motors and harnesses to be connected Check for power to I O board Replace I O board Reset and or replace control board All Selec...

Page 18: ...amage crushed cut etc Check the right side SureVend board to be an updated board and replace if it is not Replace the SureVend boards SureVend Is Blocked The control board has determined that a SureVend Check the delivery bin for items that may have hung Not Applicable Sensor is blocked Can be fatal or non fatal depending up and blocked a beam on SureVend settings optional or must Check harnesses ...

Page 19: ...nd settings for the validator bill validator Replace the harness Replace the validator Bill Validator Motor Error The validator has reported an error to a drive motor Check for a broken belt or blockage within the validator Replace the bill validator Bill Validator Sensor Error The validator has reported an error to a sensor within Check for a sensor blockage the validator Replace the bill validat...

Page 20: ...tware settings Return Air Temperature The control board has recorded sensor readings Check the readings for high or low temperatures Sensor Error that are outside of allowed parameters Check for a defrost event Check for ice buildup on the evaporator Evaporator Temperature The control board has recorded sensor readings Check the readings for high or low temperatures Sensor Error that are outside o...

Page 21: ...k for ice buildup on evaporator are stopped Check for excessive moisture Replace the temperature sensor IO Even Input Short The I O board is reporting that an even input switch Check for motor errors out of home position has shorted out replace the I O board IO Odd Input Short The I O board is reporting that an odd input switch Check for motor errors out of home position has shorted out replace th...

Page 22: ... reported concerning the stacker Check the bill path for a blockage preventing the Error Motor in the bill validator proper operation of the bill stacker motor Replace the bill validator Bill Validator Recycler Gate An error has been detected in the recycler gate Check for an blockage in the bill path preventing the Error gate from functioning Replace the bill validator Bill Validator Recycler Tap...

Page 23: ...ich is not has stopped out of its home position allowing the stacker motor to complete its cycle Check for proper installation of the bill box Replace the bill box Replace the bill validator Recycler Out Of Position The recycler is not able to accept bills Check for proper installation of the recycler cassette Check for an obstruction or blockage which is preventing the cassette from locking into ...

Page 24: ...failed Check for proper mounting of the motor Check for proper mounting of the coin mechanism Replace the coin return motor Cold Drink Picker Home The control board has reported that the picker Use the position test functions to test or cycle the Failure has failed to return to its home position at the picker back to its home position end of a cycle Replace the picker cup Cold Drink Temperature Th...

Page 25: ...al error has occurred within the card Reset the card reader and retry Error reader Replace the card reader Card Reader Jam OOS Error An internal error has occurred within the card Reset the card reader and retry reader Replace the card reader Card Reader Manufact OOS An internal error has occurred within the card Reset the card reader and retry Error reader Replace the card reader Health Check Err...

Page 26: ...other cool down period to check for proper health control function Reset the control board to default settings and set up for another test Replace the control board and re test Capacity Sensor Failure An error has been reported with a sensor inside Re start the bill validator and check function the bill validator Replace the bill validator Not Calibrated Sensor Error An error has been reported wit...

Page 27: ...nction Press the 1 Key opens a window allowing you to enter another selection using the numeric Keys Press the OK Key to save Press the 2 Key to run the selected motor Note The left door switch must be pulled to the out position for the XY to move 2 Coin Return Motor Press the 2 Key to activate the test Press the 2 Key will run one cycle on the coin return motor and display will show gears moving ...

Page 28: ...be will turn on change colors then turn off 4 Screen Test Press the 4 Key to enter the function Press the 4 Key will bring up a screen with four colored bands which get progressively brighter The colors from top to bottom are Red Green Blue and White 5 Refrigeration System Press the 5 Key to enter the function Press the 5 Key will bring up a screen which displays the data listed Return Air is the ...

Page 29: ...s Use the numeric Keys to set up test settings Manufacturing Use Only This menu if of Manufacturing purposes only and should not be used in the field Do Not Use 9 Monetary Press the 9 Key to bring up a screen Press the 9 Key will bring up the screen that shows data about the coin mechanism and the bill validator When there are empty columns with no column header it simply means we are using a pre ...

Page 30: ... a screen Press the 4 Key will bring up a screen allowing you to turn the components on and off Press a numeric Key will toggle the state of the chosen component between On and Off Note For the Lighting the side LEDs are controlled by this switch The top LEDs are not controlled by this switch Pressing the red X button will exit the group of functions Port and Cup Sensors Port Sensor Port Open Swit...

Page 31: ...w will open allowing you to enter a new price using the numeric Keys Price 6 Entire Machine 0 00 7 Individual Prices Press the center section of the OK Key to accept the new pricing for entire vender 7 BY INDIVIDUAL SELECTION Press the 7 Key to enter Price for Individual Selection Press the 7 Key to select Individual Prices and a tray list will come up Press a numeric Key to select a tray and you ...

Page 32: ...chosen tray Check marks will indicate the active selections Use the numeric Keys to check or un check selections as needed 2 FIFO Setup Press the 2 Key to bring up a screen This screen will only show Add Group Menu if no Groups have been created It will be expanded to include options 2 3 and 4 after a group is added Press the 1 Key to add a group Product Configuration 1 Selection Configuration 2 F...

Page 33: ...ay from the group All checks for selections will disappear Press a numeric Key for an individual selection will check or un check that selection Checks will appear for selections included in the group and disappear for selections not included in the group continued Second Screen The lists use more than one screen use the top and bottom of the OK Key to scroll to the desired screen Once a group has...

Page 34: ...ressing the 1 Key your work will be lost Use the numeric Keys to select a tray to edit Once a tray is selected a screen will come up that will allow you to edit all the selections on that tray Press the 1 Key will include all selections on the tray in the group A check will appear for each selection Press the 2 Key will remove all selections on the tray from the group All checks for selections wil...

Page 35: ...n is assigned to or that it is unassigned Some selection lists use more than one screen Use the top and bottom of the OK Key to scroll forward and backward thru the screens 3 UPC Universal Product Codes EAN Article Numbering System Codes Press the 3 Key to bring up a list Press the 3 Key will bring up a tray list of UPC EAN Codes Press a numeric Key to choose a tray Choosing a tray will bring up a...

Page 36: ...d thru the screens 4 Shopping Cart Set Up Press the 4 Key to bring up a list Press the 4 Key brings up a screen listing two options for setting up the shopping cart function Shopping Cart Setup 1 Shopping cart size 3 2 Max Fund Amount 0 00 1 Shopping Cart Size Press the 1 Key opens a window allowing you to set the maximum number of items to be placed in the shopping cart so they can be purchased i...

Page 37: ...eric Keys to choose a tray Choosing a tray will bring up a screen showing you the selections on the tray along with the product codes and prices ADD PIC Press the X delete Key to back out Custom Planograms can be downloaded in the machine from a memory stick 6 SPECIAL VEND MODES Press the 6 Key to bring up a screen Press the 6 Key will bring up a screen listing all of the functions that can be acc...

Page 38: ...Prize is selected the chosen product is given and a second product the Prize is also given continued Second Screen Press the 3 Key allows you to determine the frequency or how often a Winner Vend happens based on the number of successful vends completed This window only appears if the Prize Setting has been chosen with the 2 Key Press the 4 Key will open a live window allowing you to enter the sel...

Page 39: ...e a group If you fail to save the data for your group the data will be lost Once a group has been created the original screen will be expanded to include more functions for managing the Winner Mode function 2 Delete Group Press the 2 Key to bring up a screen listing the existing groups Use the numeric Keys to select the group to be deleted and a screen will come up asking if you are sure you want ...

Page 40: ...roup When you have finished Editing you MUST return to the screen with SAVE GROUP assigned to the 1 Key and press the 1 Key to save the changes you have made to the group If you fail to save your changes the changes will be lost 4 Winner Selections Press the 4 Key to bring up a screen Press the 4 Key will bring up a screen listing all the trays Use a numeric Key to choose a tray Choosing a tray wi...

Page 41: ...of products that will be involved in the Combo A The 2 setting will involve two groups of products Example Chips Candy Bar B The 3 setting will involve three groups of products Example Chips Candy Bar Soda If 3 setting is selected an additional line will appear further down in your screen It will have the title of Edit Group 3 and show the number selected as do the other two groups The numeric Key...

Page 42: ...e three group setting has been chosen previously with the two Key B The editing for Group 3 is the same as for Group1 8 Press the Key for Enable Custom Message will toggle the setting in the live window between Yes and No When Yes is selected an additional line will appear at the bottom of the screen titled Message 9 Press the Key for Message will open a live window allowing you to enter a custom ...

Page 43: ...ll the same rules in effect Press the 3 Key will bring up a screen listing the existing groups that can be deleted Delete Promotion 1 Delete Promotion 1 2 Delete Promotion 2 Use the numeric Keys to select the group to be deleted and a screen will come up asking if you are sure you want to delete the group Respond using the numeric Keys Press the 1 Key for YES and the 3 Key for NO Press the 4 Key w...

Page 44: ...the screen with SAVE GROUP assigned to the 1 Key and press the 1 Key to save the changes you have made to the group If you fail to save your changes the changes will be lost Press the 5 Key will bring up a screen showing Combo Vend Selections or Mapping Press the 5 Key will bring up a screen that will let you see the Combo Vend Selections Press the 5 Key will bring up a screen listing all the tray...

Page 45: ...e token or coupon you are using 5 Rapid Vend Press the 5 Key to bring up a screen Press the 5 Key will toggle the setting in the live window between No and Yes 1 With this set to Yes the shopping cart is active and you can use it to purchase multiple items in one transaction The OK Key must be used to complete the transaction 2 With this set to No the shopping cart is disabled and the transaction ...

Page 46: ...for that function or toggle choices Bill Validator MDB Level 1 Coin Mech MDB Level 3 Use the top and bottom sections of the OK Key to scroll to the second screen The last entry on the first screen is repeated on the second screen Current settings are listed on the right side of the line MultiVend Discount 1 MultiVend Discount Yes 2 Percent Discount 10 All selections in a cart with two or more item...

Page 47: ...he OFF setting brings up a screen allowing you to use the numeric Keys to check and un check the channels Use the 1 Key to toggle the Auto Detection feature between On and Off If set to Off use the numeric Keys to check and un check the channels The checked channels are active The list uses more than one screen Use the top and bottom of the OK Key to scroll thru the list Coins In Out 1 Stop dispen...

Page 48: ...ey to bring up a screen Press the 4 Key will bring up a screen allowing you to choose the card reader type being used Use the numeric Keys to select the type of card reader being used in the machine The checked option is active Use the center section of the OK Key to accept any changes 5 Onboard Cashless Enable Press the 5 Key to bring up a screen Press the 5 Key to toggle the Cashless Enable feat...

Page 49: ...cted a declining balance will be allowed This means that when money is inserted and a purchase is made the change will be held for a period of time so that a second purchase can be made without re inserting the money B When the NO setting is selected a declining balance will not be allowed The change will be returned without delay at the end of a successful purchase 2 Force Vend Press the 2 Key to...

Page 50: ...allows you to set an option in the case of a failed vend Use the numeric Keys to check and un check the action that will happen in the case of a failed vend 1 Return the credit to the customer 2 Hold the credit to allow another vend attempt 6 Allow Consumer Overpay Press the 6 Key to toggle between Yes and No Press the 6 Key will change the setting in the live window between Yes and No This allows...

Page 51: ...achine Information Press the 1 Key to bring up a screen Press the 1 Key will bring up a screen allowing you to select to set the Machine ID or set the Machine Location Press the 1 Key to set the Machine ID number Use a numeric Key to choose a number to be entered in place of BevMaxG Once the number has been entered use the center section of the OK Key to accept the entry Press the 2 Key to set the...

Page 52: ... of the OK Key to scroll thru the screens Use the numeric Keys to choose the Time Zone to be set Use the center of the OK Key to accept the chosen selection 2 Press the 2 Key will bring up a screen allowing you to select the Time Format for displaying the time Use the numeric Keys to choose a format The selected format will be checked Use the center section of the OK Key to accept the chosen Forma...

Page 53: ...oices 1 Press the 1 Key for Service Applications will bring up a screen that displays available languages for the service menus Use the numeric Keys to choose an option The chosen option will be checked Use the center of the OK Key to accept the option selected Press the 2 Key for User Interface brings up a screen listing the choices for applying languages that will display to the customers 2 Pres...

Page 54: ... Keys to select an action Selecting an action will cause all the items in the audit list to change status to active or in active depending on the numeric Key used Use the numeric Keys to change the status of individual lines Checked lines are active This gives you the ability to shorten the DEX file Do not remove items without checking with your DEX provider or manufacturer representative The list...

Page 55: ...ent Reset on Transfer setting in a live window between RESET and NO A If the RESET setting is active all the event data will be reset upon successful completion of a data transfer B If the NO setting is active the event data will not be reset 6 Press the 6 Key for Passcode Reset will bring up a screen asking if you are sure you want to reset the passcode Respond using the numeric Keys A Use the 1 ...

Page 56: ...at can be used for an Up Grade Use a numeric Key to choose the file to be used for the Up Date Use a numeric Key to Start to Up Date This may take several minutes When done shut down the machine and re start It is recommended that a backup copy always be made before Up Dating software 6 Backup Restore Press the 6 Key to bring up a screen Press the 6 Key will bring up a screen listing the available...

Page 57: ...ss the 7 Key will bring up a screen listing the available options for this function This function is used to load a memory stick that can be used to copy the current configuration settings from a machine to other machines making them all identical If there is no USB flash drive plugged in USB Port 1 on the Control Board a screen will come up saying flash stick not found please replug it and reboot...

Page 58: ...reen Brightness Press the 8 Key to bring up a screen Press the 8 Key will bring up a screen that has two options Press the 1 Key will open a window that allows you to enter a new setting for the screen brightness 79 is the default value Use the numeric Keys to enter a new value from 10 to 90 Use the center of the OK Key to accept the new setting selected and change the screen brightness Press the ...

Page 59: ...e five listed since the customer may have uploaded an advertisement configuration 4 Custom Messages Press the 4 Key from the Second Screen to bring up a screen Press the 4 Key will bring up a screen listing the options for messages Press the numeric Keys 1 or 3 to check or uncheck the option to use the message Note Keys 2 and 4 options only appear if Options at Key 1 and 3 are checked Press the nu...

Page 60: ...Screen to bring up a screen Press the 6 Key will bring up a screen listing the options for Talker Settings Press the 1 Key to check or uncheck the Talker Enable option When checked the Talker is enabled or on when not checked the Talker is disabled or off Press the 2 Key will open a window allowing you to enter a Talker Volume level between 5 and 200 using the numeric Keys Use the center of the OK...

Page 61: ...ew 4 digit number Use the center section of the OK Key to lock in the new number Entering an operator PIN of 3 3 3 3 will allow full access to all the Operators functions in the service mode as detailed in the pages of the programming section of the manual Entering the Driver PIN of 1 1 1 1 will allow a driver limited access to the service mode functions listed as follows 1 2 3 Data Recall Telemet...

Page 62: ...ack to the Planogram Management Menu When a selection number is entered or scrolled to a screen will come up listing the following data about that selection A The name of the product if defined B The Universal Product Code C The currently set price for the product Press the 2 Key will bring up a screen with four actions Press the 1 Key opens a window to enter a selection number to view data Press ...

Page 63: ...e functions 4 a Change Engineer PIN function was added Press the 4 Key will open a window that will allow you to change the Engineer PIN Use the numeric Keys to enter a new 4 digit number Use the center section of the OK Key to lock in the new number This feature is meant for Factory Engineering use only and should not be used in the field Test 1 Test Vend 2 Coin Return Motor 3 Reliability Test 4 ...

Page 64: ... option Choosing an option will bring up the first screen for that option Press the 1 Key will scroll forward through the available options of settings to adjust Press the 2 Key will list any errors registered Press the 3 Key will enter the option shown and allow adjustments as explained in other sections of the programming information Press the X Key to move backward 1 step in the menu Press the ...

Page 65: ... and display will show 1 Shelf Offset Press the 1 Key to scroll to the Next step Press the X Key to move backward 1 step in the menu Press the 1 Key will scroll to the next item available and bring up a screen with the option Press the 2 Key will list any errors registered Press the 3 Key will make the changes listed on display and the display will move to the Next step Press the 3 Key enter the o...

Page 66: ...ss the info button to bring up a screen Press the information Key bottom left on the numeric keypad will bring up a screen listing the timed events options Use the numeric Keys to choose an option Choosing an option will bring up the first screen for that option 1 Press the 1 Key will bring up the first screen for Time of Day Events Use the numeric Keys to choose the type of event you wish to crea...

Page 67: ...eck all the days of the week at once D You do not need to save the choices here just return to the setup menu for the event by pressing the X Key and proceed Press the 8 Key to bring up a screen that allows you to choose the type of price adjustment that is happening Use the numeric Keys to check one Use the center of the OK Key to lock in the choice and return to the setup menu Press the 9 Key to...

Page 68: ...your needs Press the 1 Key to SAVE your settings or your work will be lost Press the 2 Key to REMOVE the event from memory Press the 3 Key to toggle the setting for the state of the event between ON and OFF Press the 4 Key to toggle the setting for the frequency of the event between DAILY and WEEKLY Selections for event 1 Tray 1 2 Tray 2 3 Tray 3 4 Tray 4 5 Tray 5 6 Add all selections Tray 2 1 Add...

Page 69: ...an one screen Use the top and bottom of the OK Key to scroll thru the entire list Use the numeric Keys to check or un check the selections as needed Checked selections will be involved in the event REMEMBER TO SAVE YOUR SETTINGS OR YOUR WORK WILL BE LOST 3 Press the 3 Key will bring up a screen listing the options for Inhibit Press the 1 Key here will create an event and begin a list of saved even...

Page 70: ...l the days of the week at once D You do not need to save the choices here just return to the set up menu for the event and proceed Press the 8 Key to bring up a tray list Use the numeric Keys to choose a tray Choosing a tray will bring up a screen listing all the selections on that tray Some selection lists will use more than one screen Use the top and bottom of the OK Key to scroll thru the entir...

Page 71: ... events Press the 3 Key will bring up a screen allowing you to set up timed power saving events Press the 1 Key here will create an event and begin a list of saved events that can be set up as needed Use the numeric Keys to choose a created event to set up for use and another screen will come up allowing you to configure the event to fit your needs Press the 1 Key to SAVE your settings or your wor...

Page 72: ...on 1 Press the 1 Key to Assign a Unit ASSIGNING AN ATLAS UNIT board Required items for assigning an Atlas Unit via onboard Telemetry Service Mode menu 1 A USB flash memory stick 2 A folder must be created on the flash memory stick and named atlas 3 A file must be copied and pasted in the atlas folder VIXConfigData cfg 4 The file is received by e mail after setting up an account with Streamware A D...

Page 73: ...ard 2 Enter the service mode and press the Key to go into the Telemetry menu 3 Press the Key to enter the Assign Unit function A If the values in the new file on the stick are different than the current values in the Board the new values will be loaded into the board and the machine will be re booted B After the re boot is complete it will be necessary to re enter the service mode then re enter th...

Page 74: ...et Type identifies the radio type that is plugged into the VMC It will read either GSM or CDMA if a radio is present If the radio is unplugged it will read No Adaptor IP is the IP address of the machine if it s assigned URL is the URL for the DMS that handles the SOAP calls from the machine ESN is electronic serial number of the radio Sim ID is the ID of the SIM card in the radio BT is a holdover ...

Page 75: ... BevMax Media referenced as BMM below 2 On the BMM check load the Control Board software It should be version 10 6 10 or higher 3 On the BMM check set the current Time and Date 4 Make sure the machine fully operates and vends product before proceeding 5 On Control Board make sure J27 has a jumper across pins 2 3 6 On the BMM set cashless reader to Onboard Reader A In Service Mode go into Monetary ...

Page 76: ...e versa 10 Assigning Telemetry A Depress the Monetary Panel interlock switch and wait for security pin entry to appear on display Enter four digit pin factory default 3333 B Insert USB stick into any open USB port on control board C At Service Menu screen press the O button for Telemetry D In Telemetry screen press 1 for Assign Unit E The Control Board should now update the customer information fr...

Page 77: ...lidate Entries This step will validate the Machine ID Machine ID is validating user information Machine ID validated and assignment complete H Press button 1 to reboot machine and complete assignment process I Upon reboot remove USB memory stick J Test machine for wireless operation ...

Page 78: ... Machine alerts are processed upon receipt by the telemetry devices and sent to the Operators VendMAX system or by email to non VendMAX users The Gateway Navigator or Merchant media Machine onboard Gateway device receives DEX and machine Alert information from the Client devices on its mesh network It then transmits the information over the cell network to Streamware Connect for storage and proces...

Page 79: ...n VendMAX customers At the time of purchase Streamware Connect sends the Operator a welcome package with all templates and instructions for filling out the plan o gram template and where they send it once it s complete for processing Definitions DEX stands for Data Exchange and is uniform data that allows vending machines to report information to data collection systems Alerts provide operators wi...

Page 80: ...ity with redundant power networks and on site support The infrastructure serves the entire installed base of telemetry devices and the communications to and from he operators VendMAX systems Navigator the telemetry devices that receives information from the Vending machine and transmits the files across the cell network and internet to Streamware Connect the Credit card Processor and toteh Operato...

Page 81: ...e center of the OK Key to lock in the new setting 2 Press the 2 Key will open up a window allowing you to set a new temperature set point for storage temperature using the numeric Keys The vender leaves the factory set at 45 F temperature set must be between 32º and 75º F or 0º and 23 8º C Use the center of the OK Key to lock in the new setting Storage time must be set and Storage Temp Enabled for...

Page 82: ...l occur and lockout the enabled selection s from vending until the error is cleared To set selections for Health Control Press the 5 Key Use the numeric Keys to choose a tray Choosing a tray will bring up a screen listing all the selections on that tray Some selection lists will use more than one screen Use the top and bottom of the OK Key to scroll thru the entire list Use the numeric Keys to che...

Page 83: ...erride is on will allow free vends to occur unless the No Vend override is also checked In that case No Vend will override the Free Vend setting 3 Discount when checked and Manual Key Switch Override is on will not allow Discounted vends to occur even when discounted vends is set to occur Discount prices may are set in Timed Events Menu or Special Vend modes Menu 4 Block when checked and Manual Ke...

Page 84: ...ayed in a vender with a Currenza C2 Coin Mech Currenza Validator no card reader LE Control Board control board software version and the Kernel Linux Operating System version Press the X Key to return to Machine Configuration Firmware Information Bill Validator SMV US MDB CCD 0254 Card Reader No MDB Card Reader Onboard Disabled Coin Mechanism C2Pv0 1 455 NRI 0200 LE Board Ver Kernel 10000104000 10 ...

Page 85: ...OMMENTS CONNECTION DESCRIPTION COMMENTS P1 Power Power from AC Distribution Box FH1 FH2 Fuse 3AMP 250V P2 Port P3 Motor Power Interrupt J12 Temp P7 Refrigeration J16 MDB P8 Y Z Motors J18 Coin Return P10 Switch P14 Y Z Motors P15 X Motor MDB J16 Coin Return J18 Power P1 Temp J12 Refrig P7 X Motor P15 Y Z Motors P8 Fuse FH1 FH2 Cup P14 Switch P10 Port P2 Motor Power Interrupt P3 ...

Page 86: ...J42 Cashless Bezel J5 Service J20 USB1 USB2 J6 Selection J22 USB3 P2 Battery J8 Zigbee J28 Boot loader S1 Service J9 Zigbee J30 Cab Connection S2 Master Reset J11 Power J31 LCD Power J12 Boot loader J34 DPS J14 MDB J35 MSL MDB J14 LCD Power J31 J38 Battery J37 Selection J6 Aux Console J4 Console J3 DPS J34 Cab Connection J30 Cashless Bezel J42 USB3 J22 Temp1 J18 RF ID J36 DEX IRDA J16 Boot loader ...

Page 87: ... and adjust as needed b Perform vend test on selections Test Menu Test Vend i Only occurs on one column 1 Defective target 2 Defective gear box 3 Defective follower ii Occurs on entire shelf 1 Shelf not secured on supports 2 Position alignment iii Occurs on same column multiple shelves A2 B2 C2 D2 E2 1 Shelf not secured on supports 2 Position alignment 3 Plunger did not cycle fully a Replace plung...

Page 88: ...ssed and good i Adjust the X drive belt 4 Elevator will not move vertically a Perform Test Vend in Test Menu to test movement b Check top door switch i Is it functioning ii Is it being made when door is closed c Check the Delivery Cup Plunger Plunger Home Switch i If plunger arm is stuck out it will shut down XY delivery system ii If plunger arm home switch fails it will shut down XY delivery syst...

Page 89: ...heck for broken parts d Replace port assembly e Check harness and motor f Replace I O Control board 8 Double Vend From Gate a Is correct gate assembly used for product being vended b Too many packages loaded in column c Check Plunger Return Spring d Check Cup Motor Cam e Check the trigger on the Plunger Assembly f Check the Picker Cup Ribbon Cable for bad connection or damage g Check the Y E Chain...

Page 90: ...nnected to I O Control board NO YES Plug in connector Plug in Vender Manually move XY to HOME position In position test is X Home On Y Home On Picker Home On Message displayed in Test menu Platform Movement YES NO X Home On X Axis Home Picker home On Plunger Home Does XY move to HOME position using Key Pad YES NO Change Control Board Change failed Motor Picker Motor Home Message OFF ON Red Light P...

Page 91: ...HOME In Test Menu Platform Movement Press 3 key to cycle plunger Is Picker Motor Home Message with picker at the home position YES NO Cycle plunger multiple times to ensure proper operation If Plunger is stuck in the out or in position Refer to Delivery Picker Cup Troubleshooting or replace Cup Assembly Picker Motor Failure In Test menu Platform Movement Picker Motor message ON OFF ...

Page 92: ...he way to the home position to the bottom left Does X motor run YES NO Check repair replace harness Problem solved YES NO Replace I O Control board Check belt and pulley Is the X Home message on YES NO Do a Vend Test with Door Closed On showing a switch or ground wire issue OFF showing a mechanical obstruction NO YES Check replace X motor Problem solved YES NO X Motor Failure In Test Menu Platform...

Page 93: ...ace I O Control board Check belt and pulley Is the Y Home message on YES NO Do a Vend Test with Door Closed On showing a switch or ground wire issue Off showing a mechanical obstruction NO YES Check replace Y motor Problem solved YES NO Y Motor Failure In Test Menu Platform Movement is Y Home message ON OFF Manually move cup to A9 and pull top door switch out Press the F key Picker Cup goes to the...

Page 94: ...O Check for Y Home On X Home On message If On go to appropriate Trouble Shooting Pages If OFF 0 showing is a mechanical obstruction Check replace motor as needed Problem solved NO YES Pull top door switch out Press the F key Picker Cup goes to the home position YES NO Do a Platform Movement test Run Y axis A to E X axis 2 to 7 five times each Does Picker Cup stop in correct position YES NO Do a ve...

Page 95: ... in connector Plug in Vender Does plunger cycle YES NO Remove Cup bottom cover Is motor plugged in YES NO Press 3 key Is there power to the motor for 1 second between 20 30 VDC NO YES Check repair or replace plunger spring plunger home and out switches Replace picker motor Refer to Y Motor failure Trouble shooting Check fuse on I O board Good Failed Check top left door switch working NO YES Replac...

Page 96: ...helf Is cup in correct location YES NO Fire the plunger to ensure correct location Repeat A E cycle two to three times Is cup in correct location YES NO Repeat A E cycle two to three times Does cup position get worse YES NO Enter Security Code Menu enter Manufacturing Security Code 5555 go to Factory Setup Shelf Offset setting and adjust offset as needed CUP AT WRONG LOCATION HIGH LOW or Y AXIS Cl...

Page 97: ...nt correct YES NO See X Axis troubleshooting Enter Security Code Menu enter Manufacturing Security Code 5555 go to Factory Setup Shelf Offset setting and adjust offset as needed Check Harness Keypad X Motor I O Board See XY Not Working troubleshooting Check Harness Keypad X Motor I O Board Do a Keypad test Works YES NO CUP AT WRONG LOCATION LEFT RIGHT or X AXIS Repeat test at several locations Doe...

Page 98: ...oes Port Close say On YES NO Check repair and replace door switch components mounting bracket strike plate switch and harness Is port open all the way YES NO Enter Test Menu Press 2 to open port Does the Port Open Switch change to On and the Port Close Switch change to Off YES NO Check repair and replace door close switch DELIVERY PORT DOOR WORKS IN FACTORY DIAGNOSTICS BUT NOT IN SALES MODE Check ...

Page 99: ...ACCEPTANCE ISSUES PROBLEM CAUSE FIX Bill Validator will not run Prices tube cash conditions Check Mech Tubes Takes Bill in Then Rejects it Check Validator or Replace Stacks Bill while in Escrow Mode Max Price Not Yet Reached Bill Validator No Comms error listed in Diagnostics Menu Diagnostics Errors Communication Error with Bill Validator Bill Validator Reported Error Takes Bill Gives No Credit Ha...

Page 100: ...rs ALL COINS ARE REJECTED All coins are rejected Main Power Off disconnected Blown I O Board fuse Loose connection Apply power Check fuse replace as necessary Check harness at Coin Mech and Atlas Board Jammed Coin Mech Clear coins Weak springs on changer gate Replace spring Gate partially open Clean reset gate Dirty faulty coin sensor Clean replace Incompatible Coin Mech Replace Defective coin mec...

Page 101: ...hine is out of service See Diagnostics Errors list to determine cause of out of service Loose connection Check harness at bill validator and Atlas board Coin Mech low on coins Fill coin tubes Bill path obstructed dirty Clear clean path Wrong option switch settings Refer to manufacturers manual and reset Incompatible bill validator Replace Defective bill validator Replace Defective Atlas Board Repl...

Page 102: ...15 2013 INCORRECT CHANGE DISPENSED Incorrect change dispensed Vend prices set incorrectly Check price and reset if necessary Coins not laying flat in tubes Check coin tubes clear and reload coins Defective Coin Mech Replace Defective Atlas board Replace ...

Page 103: ...ched Check for correct product set up Gate sticking Move product away from gate and do a test vend to check gate operation Check for bent pins in gate assy Dirty worn slide assy Clean check for flash lubricate replace as needed Loose connections Check harness connections at I O board Atlas board motors Defective Plunger arm Use Test Menu Port Cup Sensor to check Plunger arm replace as needed Defec...

Page 104: ... plugged Clear drain Vender not level Level vender Air leak Check product door seal and harness openings in cabinet Check gasket seals on refrigeration unit Machine in direct sunlight Move machine Machine in location with relative humidity above 70 Move machine Compressor will not stop Defective thermostat temp sensor Replace Defective relay Replace Condensate on outside of product door ...

Page 105: ...AC Distribution Box Defective Door interlock Switch Replace Low voltage Check power source Defective thermostat temp sensor Replace Defective stating component capacitor relay Replace Defective Compressor Replace Troubleshooting Tip For domestic venders use a short 15 AMP extension cord plug the compressor directly to the wall outlet This will bypass the AC Distribution Box IMPORTANT FOR TESTING P...

Page 106: ... semsor Replace Restricted airflow Check rear screen for obstructions Ensure rear of cabinet is at least 4 10cm away from wall Machine in direct sunlight Move machine Faulty product seal Replace Condenser fan or evaporator fan not running Check blade for obstruction Check fan circuit Evaporator is iced up Check for air leaks or clogged condensate drain line ...

Reviews: