Craftsman 320.19730, Operator'S Manual
The Craftsman 320.19730 Operator's Manual provides essential information for utilizing this product to its full potential. Download your free manual from manualshive.com and gain access to valuable instructions and insights, ensuring a seamless user experience. Simply click to download and begin leveraging the Craftsman 320.19730's capabilities effortlessly.
Share
Download


Reviews:
No comments
Related manuals for 320.19730

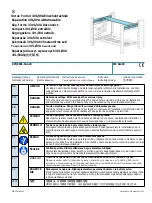
UltraRack URPS
Brand: Innovative Pages: 2

DS-520 - ASSEMBLY
Brand: MINOURA Pages: 1

OL-1
Brand: Viozon Pages: 2

KingJoe Pro 2
Brand: Yakima Pages: 30

LinidoSolutions LI2608.000 Series
Brand: Handicare Pages: 8

Wall/Ceiling Mounting Bracket MB3
Brand: Electro-Voice Pages: 4

TVM110B
Brand: Displays2go Pages: 11

FHB3036
Brand: CHIEF Pages: 4

TM-SS2
Brand: GABOR Pages: 12

SM-M
Brand: VC Pages: 6

MMK-3100L
Brand: Crestron Pages: 12

DU-FLP-0001-10
Brand: GCX Pages: 2

8GK4 801-2KK13
Brand: Siemens Pages: 2

3KX3612-1B
Brand: Siemens Pages: 2

3VL9500-8SA40
Brand: Siemens Pages: 3

8MF1 2AS30 Series
Brand: Siemens Pages: 6
3VL/3VA
Brand: Siemens Pages: 8

3WL/3WA/4000A
Brand: Siemens Pages: 16


