background image

Turtlebot4 User Manual

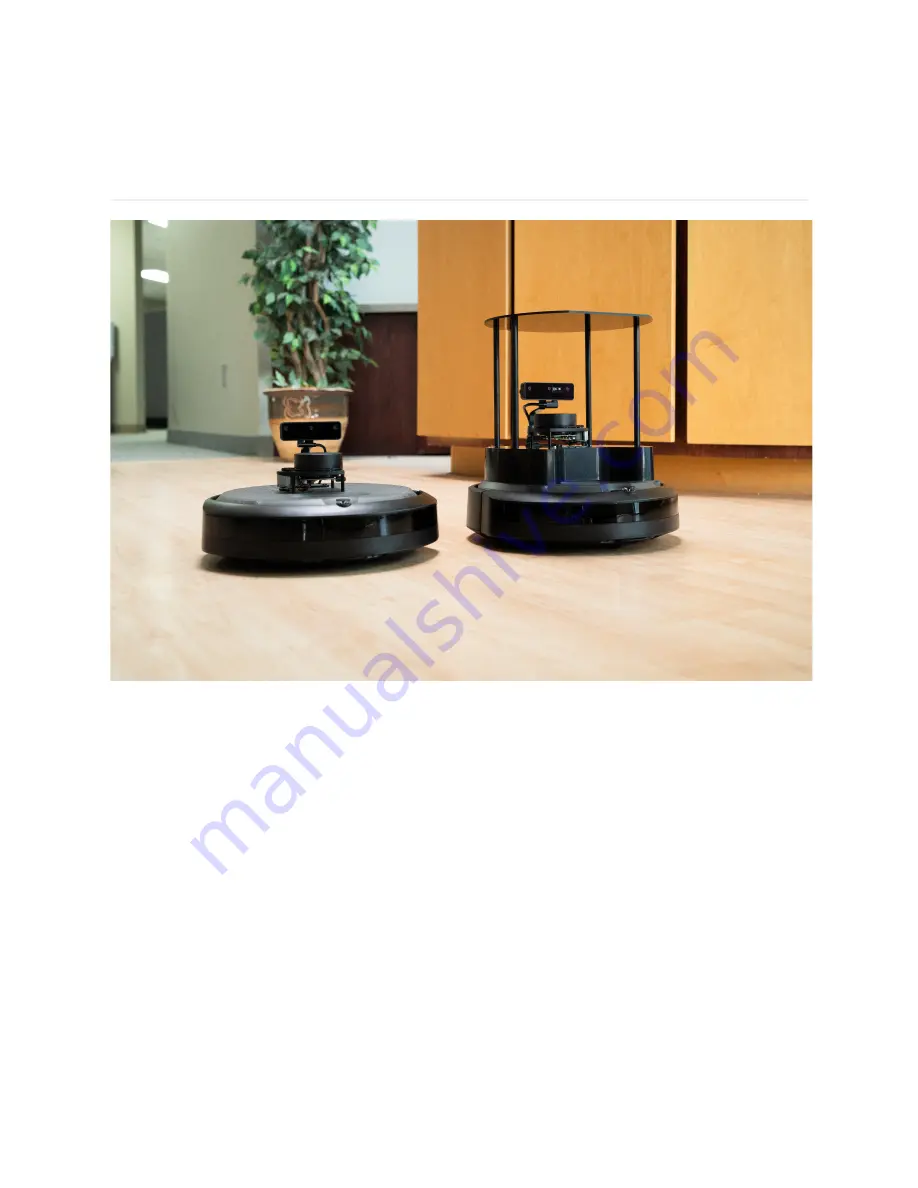
TurtleBot 4 Lite (left) and TurtleBot 4 (right)

TurtleBot 4 is the next-generation of the world's most popular open source robotics
platform for education and research, offering better computing power, better sensors
and a world class user experience at an affordable price point.

TurtleBot 4 comes in two models - TurtleBot 4 and TurtleBot Lite. Both are equipped
with an iRobot® Create® 3 mobile base, a powerful Raspberry Pi 4 running ROS 2,
OAK-D stereo camera, 2D LiDAR and more. All components have been seamlessly
integrated to deliver an out-of-the-box development and learning platform. Tap into the
thriving open source ROS developer community and get started learning robotics on
day one.

Summary of Contents for TurtleBot 4 Lite

Page 1: ...user experience at an affordable price point TurtleBot 4 comes in two models TurtleBot 4 and TurtleBot Lite Both are equipped with an iRobot Create 3 mobile base a powerful Raspberry Pi 4 running ROS...

Page 2: ...bot 18 Installing ROS2 Galactic on your PC 18 Network Configuration 18 WiFi Setup 19 Find the Raspberry Pi IP on your network 20 Create 3 WiFi Setup 22 TurtleBot 4 Controller Setup 23 Updating the Tur...

Page 3: ...Node 35 Functions 36 Configuration 36 Buttons 37 Example 38 LEDs 38 Examples 39 Display 42 Menu Control 42 TurtleBot 4 Robot 43 Installation 43 Source installation 43 Base 44 GPIO Interface 44 I2C In...

Page 4: ...lbox 55 Sensors 55 RPLIDAR A1M8 56 Connecting 56 Installing 56 Running 56 OAK D 56 Connecting 57 Installing 57 Running 57 Create 3 57 Cliff 57 Bumper 58 Wheeldrop 58 IR Proximity 58 Slip and Stall 58...

Page 5: ...Removing the Create 3 Integration Plate and Shell 75 TurtleBot 4 Lite 76 Attaching Accessories to the Base Unit 76 Removing the Create 3 Integration Plate 77 Accessing the Raspberry Pi Computer 78 Pay...

Page 6: ...103 Publish the lightring command with a button press 107 Toggle the lightring 108 Your first C Node 109 Creating your first node Python 113 Create a workspace 113 Create a package and node 113 Write...

Page 7: ...Watch navigation progress in Rviz 136 Navigate Through Poses 136 Code breakdown 136 Set goal poses 138 Navigate through the poses 138 Watch navigation progress in Rviz 138 Follow Waypoints 139 Code b...

Page 8: ...151 Access the RPi over Ethernet 151 1 Waiting to connect to bluetoothd 152 2 No default controller available 152 Common issues with the user PC 153 1 ros2 command not found 153 2 Create 3 topics are...

Page 9: ...esearch The TurtleBot 4 is capable of mapping its surroundings navigation autonomously running AI models on its camera and more It uses a Create 3 as the base platform and builds on it with the Turtle...

Page 10: ...B 3 0 type C ports as well as additional power ports and some Raspberry Pi pins for the user TurtleBot 4 UI Board On top of the UI board sits a RPLIDAR A1M8 360 degree lidar and an OAK D Pro camera Ab...

Page 11: ...nents for navigation mapping and AI applications The TurtleBot 4 has the same Raspberry Pi 4B which sits in the cargo bay of the Create 3 as well as the same RPLIDAR A1M8 The camera on the TurtleBot 4...

Page 12: ...ter Raspberry Pi 4B 4GB Raspberry Pi 4B 4GB Maximum linear velocity 0 31 m s in safe mode 0 46 m s without safe mode 0 31 m s in safe mode 0 46 m s without safe mode Maximum angular velocity 1 90 rad...

Page 13: ...3 0 Type C x4 Programmable LEDs Create 3 Lightring Create 3 Lightring User LED x2 Status LEDs Power LED Motors LED WiFi LED Comms LED Battery LED Buttons and Switches Create 3 User buttons x2 Create...

Page 14: ...e use this sensor For more information click here OAK D Lite OAK D Lite The OAK D Lite camera from Luxonis uses a 4K IMX214 colour sensor along with a pair of OV7251 stereo sensors to produce high qua...

Page 15: ...ite has but uses higher resolution OV9282 stereo sensors and adds an IR laser dot projector and an IR illumination LED This allows the camera to create higher quality depth images and perform better i...

Page 16: ...av2 Documentation https navigation ros org Github https github com ros planning navigation2 SLAM slam_toolbox https github com SteveMacenski slam_toolbox TurtleBot 4 Common package https github com tu...

Page 17: ...RobotEducation irobot_create_msgs Luxonis OAK D Lite product details https docs luxonis com projects hardware en latest pages DM9095 html OAK D Pro product details https docs luxonis com projects hard...

Page 18: ...nstructions to install ROS2 Galactic Desktop on your PC Also install useful tools with this command sudo apt update sudo apt install y Build essential cmake git python3 colcon common extensions python...

Page 19: ...n the first boot the Raspberry Pi will enter AP mode which will allow you to connect to it over WiFi On a PC connect to the Turtlebot4 WiFi network The password is also Turtlebot4 Once connected you c...

Page 20: ...Raspberry Pi IP on your network The TurtleBot 4 will display its WiFi IP address on the display WiFi IP address on a TurtleBot 4 For the TurtleBot 4 Lite you will need to check the ip topic for the ne...

Page 21: ...should see the IP address printed out in your terminal periodically Echoing the IP address of a TurtleBot 4 If you are unable to find the IP address with the previous methods you can try to use nmap s...

Page 22: ...P mode you can call sudo wifi sh a Create 3 WiFi Setup Press both Create 3 button 1 and 2 simultaneously until light ring turns blue Putting the Create 3 in AP mode The Create 3 is now in AP mode Conn...

Page 23: ...4 comes with an included TurtleBot 4 Controller It is paired in advance with the Raspberry Pi If you wish to manually pair a controller follow these instructions SSH into the TurtleBot 4 sudo bluetoo...

Page 24: ...er connect MAC_ADDRESS The CLI should report that the controller has been connected and the light on the controller will turn blue Enter exit to exit the CLI Updating the TurtleBot 4 It is recommended...

Page 25: ...s into a browser You will be taken to the Create 3 webserver Go to the Update tab and click the Update button The robot will automatically download and install the latest firmware Updating the Create...

Page 26: ...swu ubuntu xxx xxx xxx xxx home ubuntu SSH into the Raspberry Pi and update the Create 3 firmware over USB C sudo create_update sh Create3 G X Y swu or curl X POST data binary Create3 G X Y swu http 1...

Page 27: ...Raspberry Pi image Warning Installing a new image on the Raspberry Pi will delete any changes you may have made Save your changes before proceeding If you wish to install the latest image onto your ro...

Page 28: ...d e g turtlebot4_images backup_image Get the SD flash script from turtlebot4_setup and flash the SD card wget https raw githubusercontent com turtlebot turtlebot4_setup galactic scripts sd_flash sh ba...

Page 29: ...open source under the Apache 2 0 license and is available on the TurtleBot Github There are 2 main computers that run software used by TurtleBot 4 the onboard Raspberry Pi 4 the Create 3 onboard proc...

Page 30: ...ver ROS2 Galactic and TurtleBot 4 software The latest TurtleBot 4 images can be found here The purpose of the Raspberry Pi 4 is to run the TurtleBot 4 ROS nodes run sensor ROS nodes use bluetooth to c...

Page 31: ...ges are automatically installed when either of turtlebot4_robot or turtlebot4_simulator is installed Debian installation Individual packages can be installed through apt sudo apt update sudo apt insta...

Page 32: ...given number of iterations DockServo Command the robot to dock into its charging station DriveArc Command the robot to drive along an arc defined by radius DriveDistance Command the robot to drive a...

Page 33: ...ping or not StopStatus Whether the robot is currently stopped or not WheelStatus Current PWM readings from the robot s two wheels in addition to whether wheels are enabled WheelTicks Reading from the...

Page 34: ...h to map yaml file to load default path to turtlebot4_navigation maps depot yaml use_sim_time Use simulation Gazebo clock if true options true false default false param_file Full path to the ROS2 para...

Page 35: ...ormation that is to be displayed TurtleBot 4 model only ip std_msgs msg String description The IP address of the Wi Fi interface Subscribers battery_state sensor_msgs msg BatteryState description Curr...

Page 36: ...isplay menu Currently the supported functions are Dock Call the dock action Undock Call the undock action Wall Follow Left Call the wall_follow action with direction FOLLOW_LEFT and a duration of 10 s...

Page 37: ...in turtlebot4_node provides functionality to all buttons on the robot This includes the Create 3 buttons HMI buttons and TurtleBot 4 Controller buttons The node receives button states from the interf...

Page 38: ...all Follow Right 3000 controller home Power 5000 Launch the robot with your new configuration ros2 launch turtlebot4_bringup standard launch py param_file home ubuntu turtlebot4_ws example yaml The bu...

Page 39: ...vary based on battery percentage Battery percentage is received on battery_state topic User LEDs The user LEDs can be set by publishing to the hmi led topic with a UserLed message UserLed message led...

Page 40: ...User 1 Solid Green Set USER_1 OFF ros2 topic pub hmi led turtlebot4_msgs msg UserLed led 0 color 0 blink_period 1000 duty_cycle 1 0 once...

Page 41: ...User 1 Off Blink USER_2 red at 1hz with 50 duty cycle ros2 topic pub hmi led turtlebot4_msgs msg UserLed led 1 color 2 blink_period 1000 duty_cycle 0 5 once...

Page 42: ...y default The menu entries are specified in configuration and are a set of the available functions The 5 menu lines can be overwritten by publishing to the hmi display message with a String message No...

Page 43: ...nu is already showing the menu entries it will return to showing the first 5 menu entries and the first entry will be highlighted TurtleBot 4 Menu Controls TurtleBot 4 Robot Source code is available h...

Page 44: ...erry Pi which allows it to read the state of the buttons as well as write to the LEDs and display Publishers hmi buttons turtlebot4_msgs msg UserButton description Button states of the TurtleBot 4 HMI...

Page 45: ...to write pixels shapes and characters to the display Configuration Warning Do NOT change pin definitions if you are using the standard PCBA or do not know what you are doing The turtlebot4_base_node p...

Page 46: ...ve running bringup turtlebot4 To read the most recent logs from the service call sudo journalctl u turtlebot4 r To stop the service call sudo systemctl stop turtlebot4 service This will kill all of th...

Page 47: ...the TurtleBot 4 nodes Lite Launches all necessary nodes for the TurtleBot 4 Lite Standard Launches all necessary nodes for the TurtleBot 4 Config files TurtleBot 4 Controller Configurations for the T...

Page 48: ...frequency of images from the OAK D colour sensor stereo image Check the frequency of depth images from the OAK D hazard_detection Check for detected hazards imu Check the frequency of IMU messages mo...

Page 49: ...Test the Create 3 light ring Create 3 Button Test the Create 3 buttons User LED Test the HMI LEDs TurtleBot 4 model only User Button Test the HMI buttons TurtleBot 4 model only Display Test the HMI d...

Page 50: ...Running the Light Ring test...

Page 51: ...04 with ROS2 Galactic Debian installation To install the metapackage through apt sudo apt update sudo apt install ros galactic turtlebot4 desktop Source installation To manually install this metapack...

Page 52: ...e the TurtleBot 4 in Ignition Gazebo Installation Source code is available here Note The turtlebot4_simulator metapackage can be installed on a PC running Ubuntu Desktop 20 04 with ROS2 Galactic Dev T...

Page 53: ...imulator dependencies repos rosdep install from path src yi Build the packages source opt ros galactic setup bash colcon build symlink install Ignition Bringup The turtlebot4_ignition_bringup package...

Page 54: ...turtlebot4_node yaml world Which world to use for simulation default depot robot_name What to name the spawned robot default turtlebot4 Running the simulator with default settings ros2 launch turtleb...

Page 55: ...ignition_toolbox package contains the source code for the TurtleBot 4 HMI node The TurtleBot 4 HMI node acts as a bridge between the turtlebot4_node and ros_ign_bridge to convert the custom TurtleBot...

Page 56: ...ev rules are installed the RPLIDAR will appear as dev RPLIDAR Otherwise it will be dev ttyUSB0 To check that the USB device exists use the command ls dev RPLIDAR If the device exists the terminal will...

Page 57: ...launch py Other nodes are available in the DepthAI ROS examples package For example ros2 launch depthai_examples mobile_publisher launch py AI examples are available on the DepthAI github To view the...

Page 58: ...he robot is lifted off of the ground the spring is decompressed and the wheeldrop hazard is activated IR Proximity The IR proxmity sensors are located on the front of the bumper and are used for the w...

Page 59: ...t is installed by default with ROS2 and requires a desktop version of Ubuntu to use turtlebot4_desktop provides launch files and configurations for viewing the TurtleBot 4 in Rviz2 View Model To inspe...

Page 60: ...2 launch turtlebot4_viz view_robot launch py This is useful when mapping or navigating with the robot Rviz2 launched with the View Robot configuration Rviz2 Displays Rviz2 offers support for displayin...

Page 61: ...Adding Displays in Rviz2...

Page 62: ...messages On the TurtleBot 4 the RPLIDAR supplies this data on the scan topic LaserScan displayed in Rviz2 Camera The Camera display shows camera images from sensor_msgs msg Image messages The OAK D c...

Page 63: ...Camera image displayed in Rviz2...

Page 64: ...the links that make up the robot When you first add the TF display it will show every link that makes up the robot TF with default settings You can uncheck the All Enabled box and then select the lin...

Page 65: ...comes in This results in maps with high accuracy and detail The downside to synchronous SLAM is that it requires high processing power from the computer running it to keep up with the sensor data Thi...

Page 66: ...us SLAM ros2 launch turtlebot4_navigation slam_async launch py Saving the map Once you have driven the robot around and generated the map you can use the following call to save the map to your current...

Page 67: ...default off localization Launch localization with an existing map options true false default false map Path to existing map default path to turtlebot4_navigation maps depot yaml params_file Full path...

Page 68: ...map and costmaps can be viewed in Rviz2 ros2 launch turtlebot4_viz view_robot launch py Nav2 with SLAM Obstacles that are detected on the map will have a padding around with a radius equivalent to the...

Page 69: ...e easiest way to set a navigation goal is to use Nav2 Goal in Rviz2 With Nav2 running select the Nav2 Goal tool at the top of Rviz2 and click the location on the map where you would like to navigate t...

Page 70: ...se the ros_ign_bridge This ROS node translates data from ROS to Ignition and vice versa Installing Ignition Gazebo Requirements Ubuntu 20 04 ROS2 Galactic Recommended PC with dedicated GPU Follow the...

Page 71: ...TurtleBot 4 in Ignition Gazebo TurtleBot 4 Lite launch ros2 launch turtlebot4_ignition_bringup ignition launch py model lite TurtleBot 4 Lite in Ignition Gazebo...

Page 72: ...at the top that is easy to modify in order to attach additional sensors and peripherals Warning Modifications to the plate should only be done when it is removed from the robot attempting to modify th...

Page 73: ...ories to the Base Unit There is space for sensors to be attached to the base unit above the PCBA as well as near the Create 3 User Buttons and inside the Shell To attach accessories above the PCBA mou...

Page 74: ...low the steps below to remove the PCBA 1 Remove the Top Integration Plate and the four standoffs 2 Disconnect the USB cables connected to the Oak D Camera and the RPLIDAR Feed these cables through the...

Page 75: ...disconnect the USB C cable and the power harness from the Create 3 base Feed these cables through the slot at the back of the Create 3 Using the tabs on the Create 3 twist the plate counter clockwise...

Page 76: ...nsors and accessories to be attached to the base unit around the Oak Camera and RPILIDAR To attach accessories to the Create 3 the existing holes in the plate can be used These 3 5mm holes are spaced...

Page 77: ...cables through the slot opening at the back of the Robot TurtleBot 4 Lite Cable Passthrough 1 Using the tabs on the Create 3 twist the plate counter clockwise until it snaps to unlock it and remove t...

Page 78: ...RPLIDAR Accessing the Raspberry Pi Computer The Raspberry Pi is found in the rear tray of the robot To fully access the Raspberry Pi disconnect the USB cables connected to the Oak Camera and RPLIDAR...

Page 79: ...y using a custom plate 2 Add an additional caster wheel to the rear of the Create 3 This will ensure that the payload is fully supported and balanced Detailed instructions as well as design files are...

Page 80: ...erts of the robot are M4x0 7mm The mounting pattern can be taken from 3D CAD available on Github or it can be transferred from the integration plate itself TurtleBot 4 Mounting Inserts When reassembli...

Page 81: ...rd The manipulator was mounted such that the COG was further forward and supported by the front caster wheel An external NEC ALM 12V7 Battery 0 9kg was also attached to power the device In this partic...

Page 82: ...TurtleBot 4 Lite with a NED2 arm...

Page 83: ...y enabled and 0 46 m s with safety overridden The angular velocity is limited to 1 9 rad s For heavy payloads you may want to limit this further The method to do this will vary based on how you are dr...

Page 84: ...3 actions you can set velocity limits in the action goal Nav2 To limit velocity during navigation you can create a modified nav2 yaml configuration file Changing parameters such as controller_server...

Page 85: ...n 1 The VBAT line is fused with a PTC fuse rated at 2A Create 3 Power Adapter left and J7 connector right The Create 3 power adapter also supplies the Raspberry Pi 4 with power and communication throu...

Page 86: ...n connector and a USB 3 0 Type B cable The USB 3 0 type cable enables communication to 4 USB C ports on the UI board while the ribbon cable passes the 40 GPIO pins of the Raspberry Pi through to the U...

Page 87: ...iew The TurtleBot 4 comes with an additional User Interface board that expands on the Raspberry Pi 4 functionality to give the user ease of control over the Create 3 robot and Raspberry Pi and to act...

Page 88: ...PIO numbers are a direct match to the Raspberry Pi 4 GPIO Table 1 2x20 RPi Connector Pinout GPIO Function Pin Pin Function GPIO 3V3_RPi 1 2 5V_RPi GPIO2 USER_PORT 3 4 5V_RPi GPIO3 USER_PORT 5 6 GND GP...

Page 89: ...e 2X12 Auxiliary connectors Table 2 2x12 User I O Pinout GPIO Function Pin Pin Function GPIO 3V3_RPi 1 2 5V_RPi GPIO2 USER_PORT 3 4 5V_RPi GPIO3 USER_PORT 5 6 GND GND 7 8 USER_PORT GPIO14 3V3_RPi 9 10...

Page 90: ...ition to these GPIO ports the user has two additional power ports available supplying 3 3V 5V 12V VBAT 14 4V and two grounds each TurtleBot 4 Additional Power Ports The pinout and power ratings can be...

Page 91: ...50 2 12V 300 350 3 GND 4 5V 500 500 5 3V3 250 300 6 GND Molex Picoblade 6 Pin cable assembly The two connectors are both 6 Pin Molex PicoBlade P N 0532610671 The cable assembly needed to use these con...

Page 92: ...ords each port is capable of supplying 3A if the others aren t in use or the available 3A is shared amongst ports that are in use The bandwidth for communication is split among 4 dynamically depending...

Page 93: ...for the other Thus although maximum theoretical power consumption of individual components is mentioned in Table 2 the true limiting factor is the remaining power available to the whole system Table...

Page 94: ...2 User LEDs 5 0 007 0 17 USER PWR Ports VBAT 0 3 4 32 12 0 3 3 6 5 0 5 2 5 3 3 0 25 0 825 OAK D Lite 5 1 5 OAK D Pro connected to RPi 5 1 5 OAK D Pro connected to UI Board 5 1 5 7 5 RPLIDAR A1M8 5 0 6...

Page 95: ...plest way to get your robot driving is to use a keyboard application on your PC You can install the teleop_twist_keyboard package on your PC by running the following commands sudo apt update sudo apt...

Page 96: ...ler s light turns blue If your controller is not paired or connecting refer to the Controller Setup section Note If you are using a TurtleBot 4 Lite the Bluetooth packages will not be installed by def...

Page 97: ...ic uses a geometry_msgs Twist message to tell the robot what linear and angular velocities should be applied You can manually publish to this topic through the command line by calling ros2 topic pub c...

Page 98: ...our files For this tutorial we will create a package called turtlebot4_cpp_tutorials with a node called turtlebot4_first_cpp_node source opt ros galactic setup bash cd turtlebot4_ws src ros2 pkg creat...

Page 99: ...RED find_package rclcpp REQUIRED find_package irobot_create_msgs REQUIRED and add this line under add_executable turtlebot4_first_cpp_node src turtlebot4_first_cpp_node cpp ament_target_dependencies t...

Page 100: ...eBot4FirstNode Node turtlebot4_first_cpp_node Notice that our class calls the Node constructor and passes it the name of our node turtlebot4_first_cpp_node We can now create our node in the main funct...

Page 101: ...rface_buttons rclcpp SensorDataQoS std bind TurtleBot4FirstNode interface_buttons_callback this std placeholders _1 private Interface buttons subscription callback void interface_buttons_callback cons...

Page 102: ...n 1 is pressed Edit the interface_buttons_callback function to look like this Interface buttons subscription callback void interface_buttons_callback const irobot_create_msgs msg InterfaceButtons Shar...

Page 103: ...ber of packages that you want to build in case you don t want to build all packages in your workspace Now try running the node ros2 run turtlebot4_cpp_tutorials turtlebot4_first_cpp_node When you run...

Page 104: ...buttons subscription callback void interface_buttons_callback const irobot_create_msgs msg InterfaceButtons SharedPtr create3_buttons_msg Button 1 is pressed if create3_buttons_msg button_1 is_presse...

Page 105: ...n 0 LED 1 lightring_msg leds 1 red 0 lightring_msg leds 1 blue 255 lightring_msg leds 1 green 0 LED 2 lightring_msg leds 2 red 0 lightring_msg leds 2 blue 0 lightring_msg leds 2 green 255 LED 3 lightr...

Page 106: ...with whatever colours we want LED 0 lightring_msg leds 0 red 255 lightring_msg leds 0 blue 0 lightring_msg leds 0 green 0 LED 1 lightring_msg leds 1 red 0 lightring_msg leds 1 blue 255 lightring_msg...

Page 107: ...our lightring publisher Simply call button_1_function inside the interface_buttons_callback Interface buttons subscription callback def interface_buttons_callback self create3_buttons_msg InterfaceBut...

Page 108: ...he light void button_1_function Create a ROS2 message auto lightring_msg irobot_create_msgs msg LightringLeds Stamp the message with the current time lightring_msg header stamp this get_clock now Ligh...

Page 109: ...override_system false Publish the message lightring_publisher_ publish lightring_msg Toggle the lights on status lights_on_ lights_on_ Now the Create 3 will regain control of the lightring if we pres...

Page 110: ...rclcpp SensorDataQoS private Interface buttons subscription callback void interface_buttons_callback const irobot_create_msgs msg InterfaceButtons SharedPtr create3_buttons_msg Button 1 is pressed if...

Page 111: ...ing_msg leds 4 green 255 LED 5 lightring_msg leds 5 red 0 lightring_msg leds 5 blue 255 lightring_msg leds 5 green 255 Lights are currently on else Disable system override The system will take back co...

Page 112: ...status bool lights_on_ int main int argc char argv rclcpp init argc argv rclcpp spin std make_shared TurtleBot4FirstNode rclcpp shutdown return 0 Don t forget to build the package again before runnin...

Page 113: ...tutorial we will create a package called turtlebot4_python_tutorials with a node called turtlebot4_first_python_node source opt ros galactic setup bash cd turtlebot4_ws src ros2 pkg create build type...

Page 114: ...bot_create_msgs msg import InterfaceButtons LightringLeds import rclpy from rclpy node import Node from rclpy qos import qos_profile_sensor_data Create a class Now that the dependencies are set we can...

Page 115: ...erface_buttons topic self interface_buttons_subscriber self create_subscription InterfaceButtons interface_buttons self interface_buttons_callback qos_profile_sensor_data Interface buttons subscriptio...

Page 116: ...self create3_buttons_msg InterfaceButtons Button 1 is pressed if create3_buttons_msg button_1 is_pressed self get_logger info Button 1 Pressed Now every time we receive a message the one interface_bu...

Page 117: ...to enter any number of packages that you want to build in case you don t want to build all packages in your workspace Now try running the node ros2 run turtlebot4_python_tutorials turtlebot4_first_py...

Page 118: ...self lightring_publisher self create_publisher LightringLeds cmd_lightring qos_profile_sensor_data Note The Lightring publisher uses the LightringLeds message type Next lets create a function that wi...

Page 119: ...lightring_msg leds 4 green 255 LED 5 lightring_msg leds 5 red 0 lightring_msg leds 5 blue 255 lightring_msg leds 5 green 255 Publish the message self lightring_publisher publish lightring_msg This fun...

Page 120: ...tring_msg leds 2 red 0 lightring_msg leds 2 blue 0 lightring_msg leds 2 green 255 LED 3 lightring_msg leds 3 red 255 lightring_msg leds 3 blue 255 lightring_msg leds 3 green 0 LED 4 lightring_msg leds...

Page 121: ...buttons_callback self create3_buttons_msg InterfaceButtons Button 1 is pressed if create3_buttons_msg button_1 is_pressed self get_logger info Button 1 Pressed self button_1_function Test this out by...

Page 122: ...stamp self get_clock now to_msg Lights are currently off if not self lights_on_ Override system lights lightring_msg override_system True LED 0 lightring_msg leds 0 red 255 lightring_msg leds 0 blue...

Page 123: ...ate 3 will regain control of the lightring if we press button 1 again Your first Python Node You have finished writing your first Python node The final py file should look like this from irobot_create...

Page 124: ...n_1_function self Create a ROS2 message lightring_msg LightringLeds Stamp the message with the current time lightring_msg header stamp self get_clock now to_msg Lights are currently off if not self li...

Page 125: ...currently on else Disable system override The system will take back control of the lightring lightring_msg override_system False Publish the message self lightring_publisher publish lightring_msg Togg...

Page 126: ...map Launch SLAM First make sure that the RPLIDAR and description nodes are running on the TurtleBot 4 Then run SLAM It is recommended to run synchronous SLAM on a remote PC to get a higher resolution...

Page 127: ...drive the robot around the area you wish to map Check out the driving tutorial if you are unsure of how to drive the robot Keep watch of RVIZ as you drive the robot around the area to make sure that...

Page 128: ...ave_map slam_toolbox srv SaveMap name data map_name This will save the map to your current directory View the map Once the map is saved it will generate a map_name pgm file which can be viewed in an i...

Page 129: ...tion uses an existing map along with live odometry and laserscan data to figure out the position of the robot on the given map It does not update the map if any changes have been made to the environme...

Page 130: ...t in as a launch argument For example ros2 launch turtlebot4_ignition_bringup ignition launch py nav true slam off localization true world classroom map classroom yaml Interacting with Nav2 In a new t...

Page 131: ...the arrow on the map to approximate the position and orientation of the robot Setting the initial pose Publish Point The Publish Point tool allows you to click on a point on the map and have the coor...

Page 132: ...ool allows you to set a goal pose for the robot The Nav2 stack will then plan a path to the goal pose and attempt to drive the robot there Make sure to set the initial pose of the robot before you set...

Page 133: ...iour as Nav2 Goal The Nav2 stack is given a pose on the map with which it calculates a path The robot then attempts to drive along the path This example is demonstrated in the depot world of the Turtl...

Page 134: ...object This will initialise any ROS2 publishers subscribers and action clients that we need rclpy init navigator TurtleBot4Navigator Dock the robot Next we check if the robot is docked If it is not we...

Page 135: ...e we start sending navigation goals navigator waitUntilNav2Active Note This call will block until Nav2 is ready Make sure you have launched nav bringup in a separate terminal Set the goal pose Now we...

Page 136: ...Navigate Through Poses behaviour tree The Nav2 stack is given a set of poses on the map and creates a path that goes through each pose in order until the last pose is reached The robot then attempts t...

Page 137: ...e Set goal poses goal_pose goal_pose append navigator getPoseStamped 0 0 1 0 TurtleBot4Directions NORTH goal_pose append navigator getPoseStamped 1 7 1 0 TurtleBot4Directions EAST goal_pose append nav...

Page 138: ...d navigator getPoseStamped 1 6 3 5 TurtleBot4Directions NORTH goal_pose append navigator getPoseStamped 6 75 3 46 TurtleBot4Directions NORTH_WEST goal_pose append navigator getPoseStamped 7 4 1 0 Turt...

Page 139: ...ypoints the robot will plan to reach each waypoint individually rather than planning to reach the last pose by driving through the other poses This example is demonstrated in the depot world of the Tu...

Page 140: ...avigator getPoseStamped 2 1 6 3 TurtleBot4Directions EAST goal_pose append navigator getPoseStamped 2 0 1 0 TurtleBot4Directions SOUTH goal_pose append navigator getPoseStamped 1 0 0 0 TurtleBot4Direc...

Page 141: ...s Then we use the Follow Waypoints behaviour to follow those poses This example was run on a physical TurtleBot 4 To run this example start nav bringup on your PC or on the Raspberry Pi ros2 launch tu...

Page 142: ...createPath if len goal_pose 0 navigator error No poses were given exiting exit 0 Start on dock if not navigator getDockedStatus navigator info Docking before intialising pose navigator dock Set initia...

Page 143: ...exit 0 Set initial pose and clear costmaps Next we set the initial pose and clear all costmaps We clear costmaps because the 2D Pose Estimate tool is subscribed to by the Nav2 stack and every time we...

Page 144: ...We finish the example by docking the robot This assumes that the last pose in the created path is near the dock If it is not you can remove this action Creating a path with Rviz Running this example...

Page 145: ...ncy To check that diagnostics are running properly call ros2 node list You should see a node called turtlebot4_diagnostics Additionally calling ros2 topic list should list topics such as diagnostics d...

Page 146: ...ndow and a summary of all topics in the All devices section at the bottom Each topic has a status level of OK WARNING ERROR or STALE There is also a more detailed message included as well You can clic...

Page 147: ...Color camera diagnostics...

Page 148: ...tests that can be run from CLI to test basic system functions Each test uses a ROS2 topic action or service to perform the action To run Create 3 tests the Create 3 must be connected to the Raspberry...

Page 149: ...Test results are saved to turtlebot4_test_results Y_m_d H_M_S where Y_m_d H_M_S is the date and time of the test A rosbag is also recorded for the duration of the test and saved to the same location...

Page 150: ...C port Make sure it is illuminated If the LED is not on then the Raspberry Pi is not powered Check the USB C connection and make sure the Create 3 power adapter board is inserted fully Check for obst...

Page 151: ...see the Turtlebot4 access point you can connect directly to the RPi using an ethernet cable You may need a USB to Ethernet adapter for your PC Connecting to the TurtleBot 4 over Ethernet The Raspberr...

Page 152: ...ain run sudo systemctl start bluetooth 2 No default controller available This error occurs if you are attempting to connect a bluetooth device to the Raspberry Pi with sudo bluetoothctl and the hciuar...

Page 153: ...e If it is connected to WiFi check if you can see Create 3 topics on the Raspberry Pi If topics are visible on the Raspberry Pi ensure that your PC has the following configuration set for CycloneDDS C...

Reviews: