background image


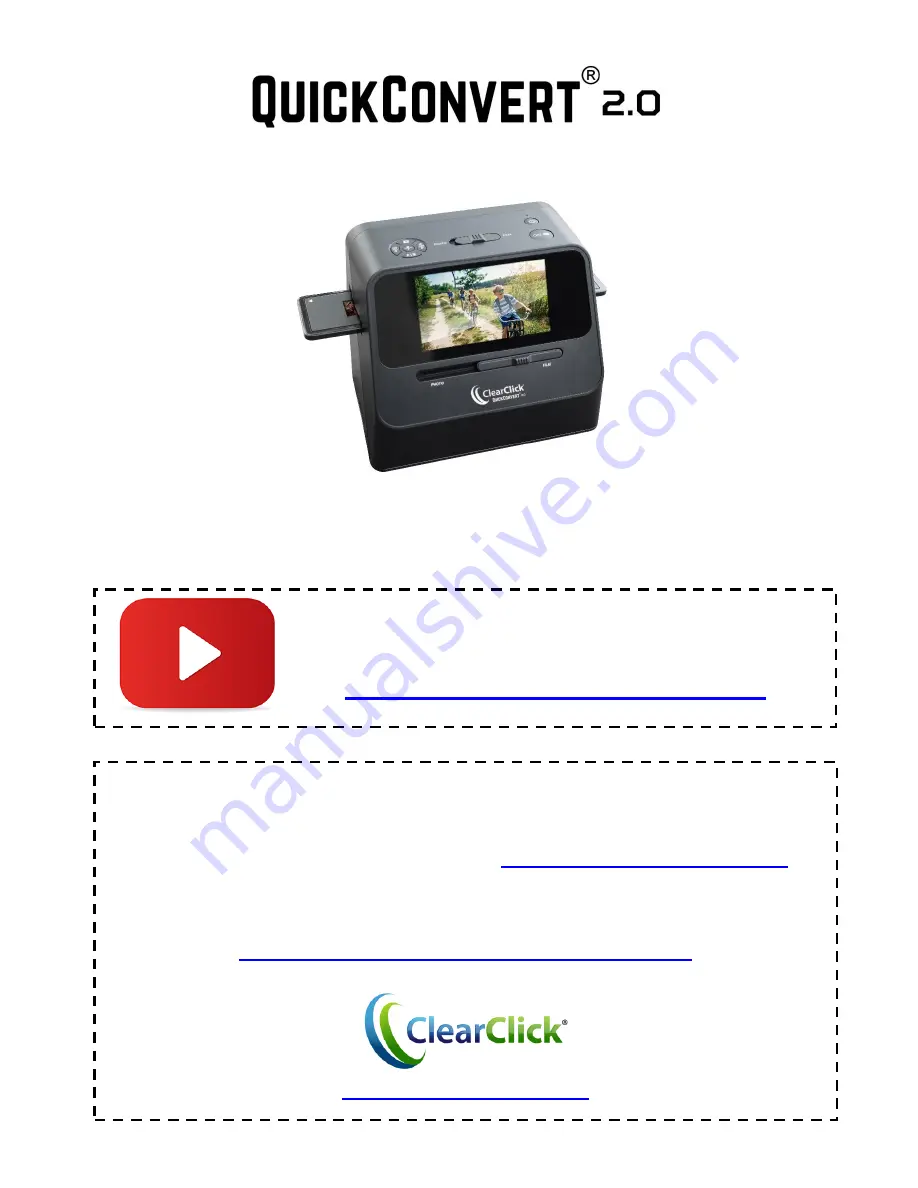
22 MP Photo, Slide, & Negative Scanner


User’s Manual & Quick Start Guide


2-Year Warranty & USA-Based Tech Support


For tech support, email us at: 

[email protected] 


Extend your warranty to 3 years for free by registering at: 

www.clearclicksoftware.com/Register/


www.ClearClick.tech


WATCH: Video Tutorial


How To Set Up Your QuickConvert 2.0


www.ClearClick.tech/setup


Summary of Contents for QuickConvert 2.0

Page 1: ...ranty USA Based Tech Support For tech support email us at support clearclick tech Extend your warranty to 3 years for free by registering at www clearclicksoftware com Register www ClearClick tech WATCH Video Tutorial How To Set Up Your QuickConvert 2 0 www ClearClick tech setup ...

Page 2: ...warm during use 4 Do not operate the unit around water or rain Do not operate the unit around any kind of machines or appliances other than computers 5 Turn off and unplug the unit when not in use 6 Use only the included accessories with the device 7 Do not connect high powered amplified audio outputs to the in ports of the device 8 Follow all copyright laws in your country You are responsible for...

Page 3: ... 35mm Negative Holder 35mm Slide Holder 110 Film Holder 126 Film Holder Cleaning Brush User s Manual 32 GB SD Memory Card PhotoPad Pro Software License Card NOTE Have a part that s missing or broken Please contact us directly at parts clearclick tech For all other technical issues or support please contact us at support clearclick tech ...

Page 4: ...4 Device Diagram ...

Page 5: ...bottom of the box underneath the packing materials Remove it from its packaging and install it by itself in the battery compartment in the back of the scanner Make sure the battery is inserted the correct direction by ensuring the and sides of the battery line up with the markings shown in the battery compartment WATCH Video Tutorial www ClearClick tech setup ...

Page 6: ...l power adapter The blue LED next to the power button will illuminate when the battery is charging The LED will turn off when it is fully charged 2 Insert the SD memory card Insert the included memory card into the slot in the back of the scanner The gold contacts go in first face down Press the card into the slot until it clicks into place Maximum Card Size 32GB ...

Page 7: ...see the main menu of the scanner You re ready to start scanning 4 How to scan PHOTOS a Set BOTH switches on the front and top of the scanner to PHOTO b Make sure any film holders are removed from the scanner c In the device s main menu choose the Scan Photos option and press the OK button ...

Page 8: ...ize options are 4 x6 3 x5 4 x4 4 2 x3 2 or 3 4 x2 1 e The right side of the scanner will display the current scanning resolution 14MP or 22MP For the highest possible scanning quality set the scanner to 22 megapixels Press the Resolution button on the scanner until the setting is set to 22M f To scan a photo remove the scanner s base Load a photo inside the base and replace the scanner on top of t...

Page 9: ... and saved onto the SD memory card g Optional To adjust the brightness and color of the photo before each scan press the RGB right button on the scanner Use the left and right arrows to adjust the brightness of the image To move to the red green blue settings press the Play button Then use the right and left arrow keys to adjust the setting To save the settings press the OK button ...

Page 10: ...ain menu choose the Scan Film option and press the OK button c Next the scanner will ask you what type of film you would like to scan Use the arrow buttons to select the appropriate type and press the OK button You may also be asked to choose the subcategory of film Select the appropriate type and press the OK button ...

Page 11: ...an Each holder is described below 35mm Negative Holder 2 large openings 35mm Slide Holder 3 openings 110 Film Holder 8 openings 126 Film Holder 7 openings e Open the slide or negative holder insert your film so that it is aligned correctly and close the holder as shown in the diagrams below ...

Page 12: ...Insert the slide or negative holder into the scanner If the holder is marked with a insert it through the right side of the scanner If the holder is marked with a insert it into the left side of the scanner ...

Page 13: ... Simply repeat this process for each slide or negative image NOTE To switch from negative to slide scanning or vise versa press the Home button and enter Film scanning mode again choosing the Film type as described in steps b and c h Optional To adjust the brightness and color of the photo before each scan press the RGB right button once on the scanner Use the left and right arrows to adjust the b...

Page 14: ... the OK button 6 Download scanned images to your computer touch up with software a With the scanner turned OFF plug the scanner into your computer using the included USB cable b Turn the scanner on c Select the USB Upload menu option and press the OK button d Once the scanner successfully connects to the computer the scanner s LCD screen may turn off ...

Page 15: ...the memory card Select the images and drag copy them to a folder on your computer s hard drive f To disconnect the scanner s link to your computer simply hold down the power button to turn the scanner off and unplug the USB cable g Now you can use the included PhotoPad Pro software to touch up your photos See page 19 For other options and details of using the scanner please refer to the subsequent...

Page 16: ...st Brightness Color In scanning mode you can adjust the scanner s brightness color before you scan the images To adjust the brightness and color of the image before scanning press the RGB right button once on the scanner Use the left and right arrows to adjust the brightness of the image To move to the red green blue settings press the Play button Then use the right and left arrow keys to adjust t...

Page 17: ... on simply press the play button on the scanner The most recently scanned image will appear on the screen You can browse through the scanned images by pressing the left and right arrow buttons To delete an image select it and press the Delete button once and confirm To view an image press the OK button To start a slide show of the images press the Playback button again To exit the slideshow press ...

Page 18: ...ply use the included HDMI cable to plug the scanner s HDMI OUT port into your TV s HDMI INPUT port Please ensure the HDMI cable is very securely connected to the HDMI OUT port of the scanner for proper connection Set your TV to the correct HDMI INPUT and you will be able to view your images How To Change The Time Date On The Scanner If you d like you can change the time date on the scanner This wi...

Page 19: ... started with the included PhotoPad Pro software published by NCH Software simply follow the steps below 1 Download install the software www ClearClickSoftware com PhotoPad7 zip Go to the link above and download the software Open the ZIP file and run the setup file to install it 2 Activate the software Go to www NCHsoftware com activation Enter your information and the serial number on the softwar...

Page 20: ...ftware and choose to activate the software by clicking File PhotoPad Register Enter the activation code that was emailed to you 4 You can now start using the software We have several easy to follow tutorial videos on how to use the PhotoPad Pro software To view these videos please simply visit the URL below Watch PhotoPad Tutorial Videos at www ClearClickSoftware com PhotoPad ...

Page 21: ...21 Explanation of Icons Indicators ...

Page 22: ...22 Explanation of Icons Indicators Continued ...

Page 23: ...lides Press the Home button and then follow the steps on page 10 3 The scanner won t connect to my TV with the HDMI cable Please make sure your HDMI cable is very securely pushed into the scanner s HDMI port Also make sure your TV is set to the correct HDMI input 4 My SD card isn t recognized by the device Please make sure you are using an SD card that is 32 GB or smaller Please make sure you are ...

Page 24: ...24 5 I have a question that isn t listed here or need further support No problem Please email us at support clearclick tech with your order number and we will get back to you as soon as possible ...

Page 25: ...25 Technical Specifications ...

Page 26: ...26 Need help Open a support ticket and we ll get back to you ASAP We are a USA based small business Please email us at support clearclick tech www ClearClick tech ...

Reviews: