E
n
g
lis
h
GREAT BRITAIN •
for consumer contact, please visit www.clasohlson.co.uk and click on customer service.
V
er
. 20
11
07
TV/Monitor Bracket
Art.no 38-4565 Model WLB006N
Please read the entire instruction manual before use and save
it for future reference. We reserve the right for any errors in text
or images and for making any necessary technical changes to
this document. If you should have any questions concerning
technical problems please contact our Customer Services.
Safety
Before mounting: Note! Make sure the wall you are mounting
the wall bracket on can support the weight of the TFT/LCD
screen you plan to mount.
Note:
Do not use the wall bracket for TVs heavier than 15 kg.
For other methods of anchoring into drywall, a drywall an-
chor screws must be used, (wood screws and drywall anchor
screws are not included).
Parts
1. Wall bracket
2. TV mounting plate
3. Safety screws
A. M4X8-screw x 4
B. M4X12-screw x 4
C. M5X8-screw x 4
D. M5X12-screw x 4
E. 1/4
″
– 20 x 5/8
″
-screw x 4
F. M5-washer x 6
G. M6-washer x 4
H. Wall screw x 2
I. Wall plug x 2
Installation
Mounting into wooden wall studs
1. Use the wall bracket as a template and make sure that
it is level. Make sure that the mounting holes line up with
the middle of the wall stud.
2. Drill 2 holes (3 mm in diameter) about 5 cm deep.
3. Line up the wall bracket and fasten it securely to the wall
using the wall screws (H) and washers (F). Do not
overly tighten!
Mounting into a concrete wall
1. Use the wall bracket as a template and make sure that it is
level. Make sure that the mounting holes line up.
2. Drill 2 holes (8 mm in diameter) about 55 mm deep.
3. Insert 2 plugs (I) into the holes.
4. Line up the wall bracket and fasten it securely to the wall
using the wall screws (H) and washers (F). Do not
overly tighten!
Attaching the TV mounting plate to the back of
the flatscreen
1. Line up the mounting plate’s 4 screw holes to the back of
the flatscreen.
2. Select the most appropriate screws (A, B, C, D, E) and
tighten them to the flatscreen together with the washers
(F, G). Do not overly tighten!
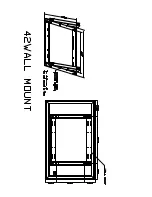
Mounting the TV mounting plate into the wall bracket
1. Place the TV mounting plate
along with the mounted TV
into the wall bracket by
slowly lowering it into the bracket.
2. To secure the TV, tighten
the 2 safety screws (3)
from underneath. Do not
overly tighten!
Disposal
Disposal of this product should be
in accordance with local regulations.
If you are unsure how to proceed,
contact your local authority.
Specifications
VESA standard
100 x 100, 50 x 50, 75 x 75
Max. load capacity
15 kg