GREAT BRITAIN
For consumer contact, please visit www.clasohlson.
co.uk and click on customer service. Internet: www.clasohlson.co.uk
ENGLISH
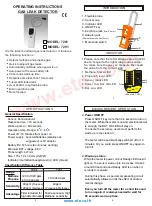
Fully Automatic Metal/Voltage/Stud Detector
No: 32-6991 • Model: FAD-2203
1. General
FAD-2203 is a fully automatic multi detector for metal, electric
cables and studs. Equipped with a LCD screen. A blue diode
and buzzer helps you find the object. The user can choose bet-
ween 3 manual modes to find selected objects with different
warning sounds. It is an ideal tool for professional and DIY use.
With this you can find metal, electric cables and studs.
2. Screen
1. Calibration icon
2. Level indicator with 10 levels
3. Battery indicator
4. Auto mode
5. Metal mode
6. Vertical stud mode
7. AC Voltage mode
3. Function
FAD-2203 is easily controlled using two buttons [FUNCTION]
and [CAL]. When [FUNCTION] is pressed, the modes are
changed as follows:
ON in Auto mode (
) -> Metal (
) ->
Stud (
) -> Electric cables (
) -> OFF.
Shutting off
Press and hold [CAL] and then press [FUNCTION] until the
device shuts off.
3.1 Auto mode
Lay the detector on the felt pads (with the bottom against the
surface to be scanned) before you begin detecting.
Press [FUNCTION] to turn the device on. All segments will
appear on the LCD screen for a second.
The device then calibrates automatically as follows:
When the calibration is completed, the
icon will appear.
The detector is now ready to be used in Auto mode. If two
different objects are found at the same time the stronger
signal with a clear icon is shown while the weaker signal is
indicated by a blinking icon.
Move the detector over the area to be scanned.
When the discovered object is found, all the display bars light
up, the buzzer sounds and the blue diode lights up.
3.2 Manual mode
Start in the manual mode if you know what you’re looking for,
that’s to say, looking for a specific object (metal, live wire or woo-
den stud).
Note!
Lay the detector on the felt pads (with the bottom
against the surface to be scanned) before you begin detecting.
3.2.1 Metal
Press the [FUNCTION] button until the
icon appears on the
display. The power bars are scanning during the calibration. When
the calibration is finished it is ready to use. Move the detector over
the area to be scanned. When the metal object is found, the bars
light up, buzzer sounds and the blue diode lights up.
3.2.2 Studs
Press the [FUNCTION] button until the
icon appears on the
display. The power bars are scanning during the calibration. When
the calibration is finished the device is ready to use. Move the
detector over the area to be scanned. When a stud is found, all the
bars light up, the buzzer sounds and the blue diode lights up.
3.2.3 Electric cables
Press the [FUNCTION] button until the
icon appears on the
display. The power bars will scan during the calibration. When the
calibration is finished the device is ready to use. Move the detec-
tor over the area to be scanned. When a live wire is found, all the
bars light up, the buzzer sounds and the blue diode lights up.
Note!
Aim the detector’s yellow line at the surface to be scanned.
4. Troubleshooting
Fault:
The detector beeps as soon as it is placed against the
wall (surface).
Solution:
1. Place the detector against the wall (surface) when it is
TURNED OFF.
2. Turn on the detector by pressing the [FUNCTION] button
three times until the
icon appears on the display.
3. The detector will now begin calibrating itself for the thickness
of the wall (the bars on the display will move back and forth).
4. When the calibration is finished the detector can be
moved sideways and will beep when it detects a stud in
the wall that was thicker than at the point of calibration.
If no studs are found, it might be because the detector was
calibrated directly over a stud, in that case repeat the calibra-
tion procedure at another place.
Always check before scanning * that the felt pads on the stud
detector are pressed against the surface to be scanned.
* Does not apply when scanning for live wires/cables (see 3.2.3)
5. Specification
- The LCD screen repeat frequency is 5 hertz.
- Max time for calibration: 3 seconds.
- Battery: 1x 9 V (6LR61).
- Four indicators for the battery power. If the power is to low
the detector automatically shuts OFF.
- If the unit is not used for 3 minutes, it automatically shuts off.
- Power supply: In Auto mode <= 8 mA, in manual mode
<= 6 mA.
1
2
3
4
5 6 7