background image


CG800


S

ERIES


ZIGBEE


WIRELESS


SWITCH 


U

SER 

M

ANUAL


V

ERSION 

1.1 

17


J

ANUARY

,


2014 


Disclaimers and Copyright 

Nothing contained in this publication is to be construed as granting any right, by implication or otherwise, for the 
manufacture, sale, or use in connection with any method, apparatus, or product covered by letters patent, or as 
insuring anyone against liability for infringement of letters patent. 
Efforts have been made to ensure the accuracy and reliability of the data contained in this publication; however, 
Citygrow Energy Systems Limited. makes no representation, warranty, or guarantee in connection with this 
publication and hereby expressly disclaims any liability or responsibility for loss or damage resulting from its use or 
from the use of any product or methodology described herein; for any violation of any federal, state, or municipal 
regulation with which this publication may conflict; or for the infringement of any patent from the use of this 
publication. Nothing contained in this publication should be viewed as an endorsement by Citygrow Energy Systems 
Limited. of any particular manufacturer’s products. 
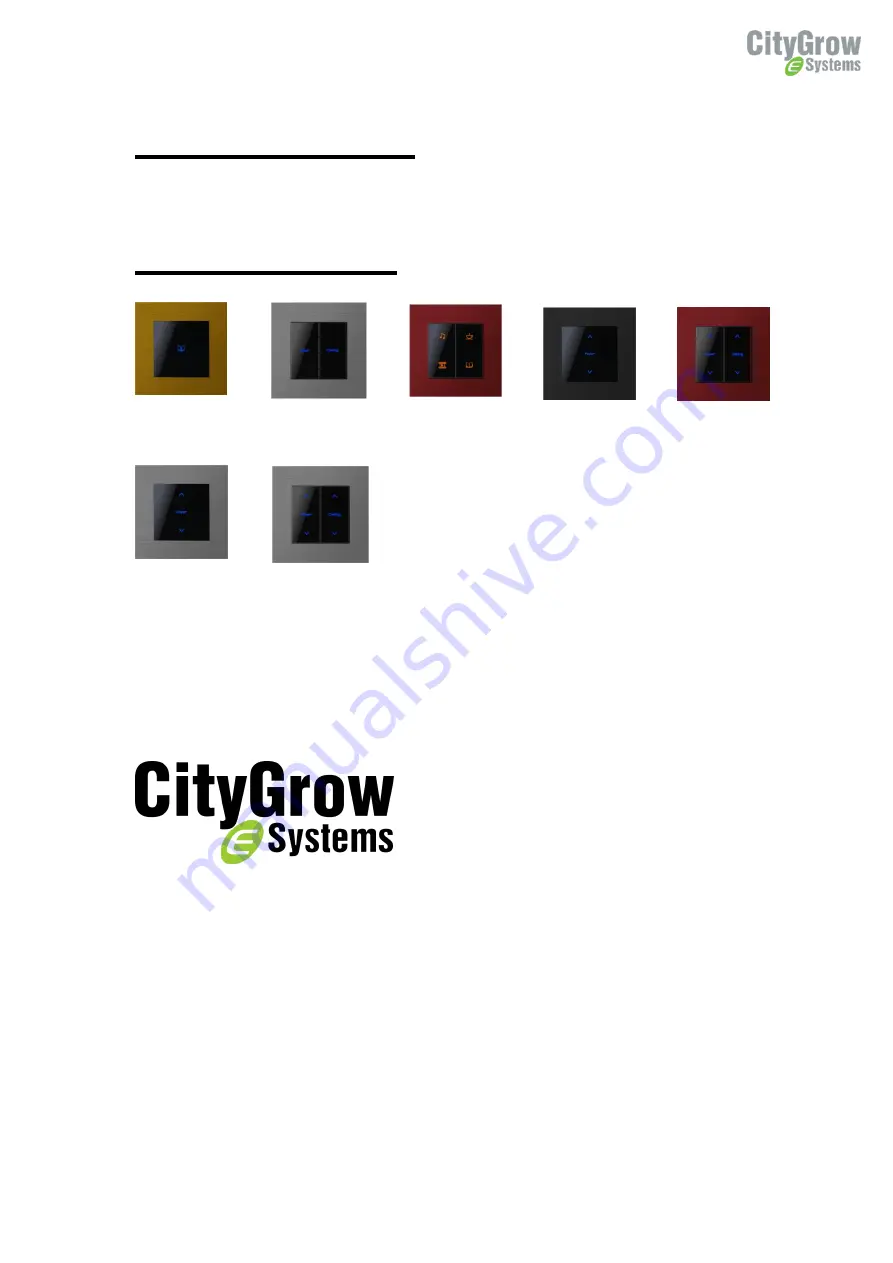
CG800S1


One Gang Switch


CG800S2 

Two Gang Switch 

CG800S4 

Four Gang Switch 

CG800DM 

One Gang Dimmer 

CG800DM2 

Two Gang Dimmer 

CG800S2-CCP 

One Gang Curtain 

Control Switch 

CG800S4-CCP 

Two Gang Curtain 

Control Switch 

Summary of Contents for CG800 Series

Page 1: ...warranty or guarantee in connection with this publication and hereby expressly disclaims any liability or responsibility for loss or damage resulting from its use or from the use of any product or me...

Page 2: ...near water 6 Clean only with dry cloth 7 Do not block any ventilation openings Install in accordance with the manufacturer s instructions 8 Do not install near any heat sources such as radiators heat...

Page 3: ...DM2 4 5 Wiring CG800S2 CCP S4 CCP 6 6 Installation 7 7 Operation instruction 9 7 1 CG800S1 S2 S4 9 7 2 CG800DM DM2 10 7 3 CG800S2 CCP S4 CCP 11 7 3 1 Setting the open and close travel distant for the...

Page 4: ...5 CG800S2 CCP CG800S4 CCP is for control of electronic curtain or window blind 6 LED indicator for on off status 7 Load loads are directly driven by the build in driver 8 Control button can be configu...

Page 5: ...Control unit Front view Mounting hole Connector to control unit Metal clip to fix the button panel Load terminals Live Brown Neutral Black Model number plate Control button Programming port Reset but...

Page 6: ...oad 4 CG800DM One Gang Dimmer Load1 NC NC NC CG800DM2 Two Gang Dimmer Load1 Load2 NC NC CG800S2 CCP One Gang Curtain Control Switch Motor 1 Forward Motor 1 Backward NC NC CG800S4 CCP Two Gang Curtain...

Page 7: ...point of CG800 Situation 1 Live Neutral and Load wires are ready at wall box 4 3 2 1 Load terminals See Table 4A CG800S1 CG800S1 Load Lamp Wall box Distribution panel Situation 2 Neutral wire is only...

Page 8: ...able for any damage incurred with the misuse of this product IMPORTANT Pre setup can only be done by a professional worker or manufacturer agent WARNING It must be installed by a qualified electrician...

Page 9: ...be done by a professional worker or manufacturer agent WARNING It must be installed by a qualified electrician in accordance with all applicable regulations and building codes Improper wiring can res...

Page 10: ...TEP 3 Connect the main power cable to the Live and Neutral terminals and the load cable to the Load terminals at the rear cabinet of the product STEP 4 Fasten the screws of all terminals and check tha...

Page 11: ...function as expected please check the wiring connection again Notes Use standard UK wall box BS4662 minimum 35mm deep During installation of the wall box it is recommended to embed the wall box deepe...

Page 12: ...Cover BUTTON HOLDER 2 4 5 3 Master Kitchen 2 Label LED Indicators 3 ON OFF Buttons 4 Programming Port 5 Reset Button 1 Press ON OFF Button once to toggle between ON and OFF BRIGHT LED indicates that t...

Page 13: ...mming Port 6 Reset Button 1 Press the Dim Up Dim Down button ONCE to Toggle between ON and OFF LED FLASHING indicates that that the Button was pressed and dimming is in progress When the LED stops fla...

Page 14: ...Press the Open Close Button once to control the electric curtain When the electric curtain is stopped press the OPEN button to open the electric curtain When the electric curtain is stopped press the...

Page 15: ...arning Mode function please follow the below steps STEP 1 Press the CLOSE Button until the curtain is fully closed NOTE You may have to press the Button once or more times in order for the curtain to...

Page 16: ...urtain is fully opened press and release any Button NOTE The duration of the Opening Closing time will be stored once the Button is pressed STEP 5 Use a thin object to press the Reset Button again The...

Page 17: ...able into the 5 pin socket of the product and then plug the other end of the CG101UT5 cable into the mini USB end of the CG101UTC cable STEP 3 Plug the CG101UTC cable into the USB port of a PC that is...

Page 18: ...oduct will no longer reply to any Remotes that it had previously bound to In order to perform the Clear Memory function please follow the below steps STEP 1 Press and HOLD anyone of the ON OFF Button...

Page 19: ...16 STEP 4 Press and release the ON OFF Button again to stop blinking STEP 5 Press and release the Reset Button The memory inside of the product has now been cleared...

Page 20: ...pact Fluorescents and LEDs see remarks 3 4 AC motor AC motor Maximum number of devices included in scene setting Remarks 1 2 50 50 50 50 50 NO NO Remarks 1 When up button is used for dimming up functi...

Page 21: ...HZ 2 4GHZ 2 4GHZ 2 4GHZ Remote control distance M line of sight 100M 100M 100M 100M 100M 100M 100M Dimensions mm Length x Width x Depth 87x87x39 87x87x39 87x87x39 87x87x39 87x87x39 87x87x39 87x87x39 R...

Reviews: