

High Definition Upconverting
DVD Player
MODEL NO.: C556DVD
Instruction Manual
Please read this manual carefully before using the unit for the
first time and keep for future reference.
www.citizen-electronics.com
Maintenance and Care
Caring for the player
• “The apparatus shall not be exposed to dripping or splashing” and that no objects filled with
liquid shall be placed on the unit.
• Electronic products of this kind should never be subjected to extreme temperatures or high
humidity. For instance, this set should not be placed in bathing areas or around stoves and
radiators.
• If anything falls into the cabinet, unplug the unit and have it checked by qualified personnel
before operating it any further.
Cleaning the Unit
• To prevent fire or shock hazard, disconnect your unit from the AC power source when cleaning.
• The finish on your unit may be cleaned with a dust cloth and cared for as other furniture. Use
caution when cleaning and wiping the plastic parts.
• Mild soap and a damp cloth may be used on the front panel.
Inclination
• Do not install the unit in an inclined position. It is designed to be operated in a horizontal
position only.
Condensation
• If the unit is brought directly from a cold to a warm location, moisture may condense inside the
DVD player and cause damage to the lenses. When you first install the unit, or when you move
it from a cold to a warm location, wait for 30 minutes before operating the unit.
Avoid Interference
• Depending on the reception condition of the TV, interference may appear on the TV screen
while you watch a TV broadcast and the unit is left on. This is not a malfunction of the unit or
the TV. To watch a TV broadcast, turn off the unit.
Disconnect Power
• If you are not going to use the player for a long time, be sure to disconnect the player from the
wall outlet. To disconnect the AC power cord (main leads), grasp the plug itself, never pull the
cord.
• The mains plug is used as the disconnect device, the disconnect device shall remain readily
operable.
Disc Maintenance
• Before playback, wipe the disc from the center hole toward
the outer edge with a clean cloth.
• Never use benzine, thinner, cleaning fluid, static electricity
prevention liquids or any other solvent.
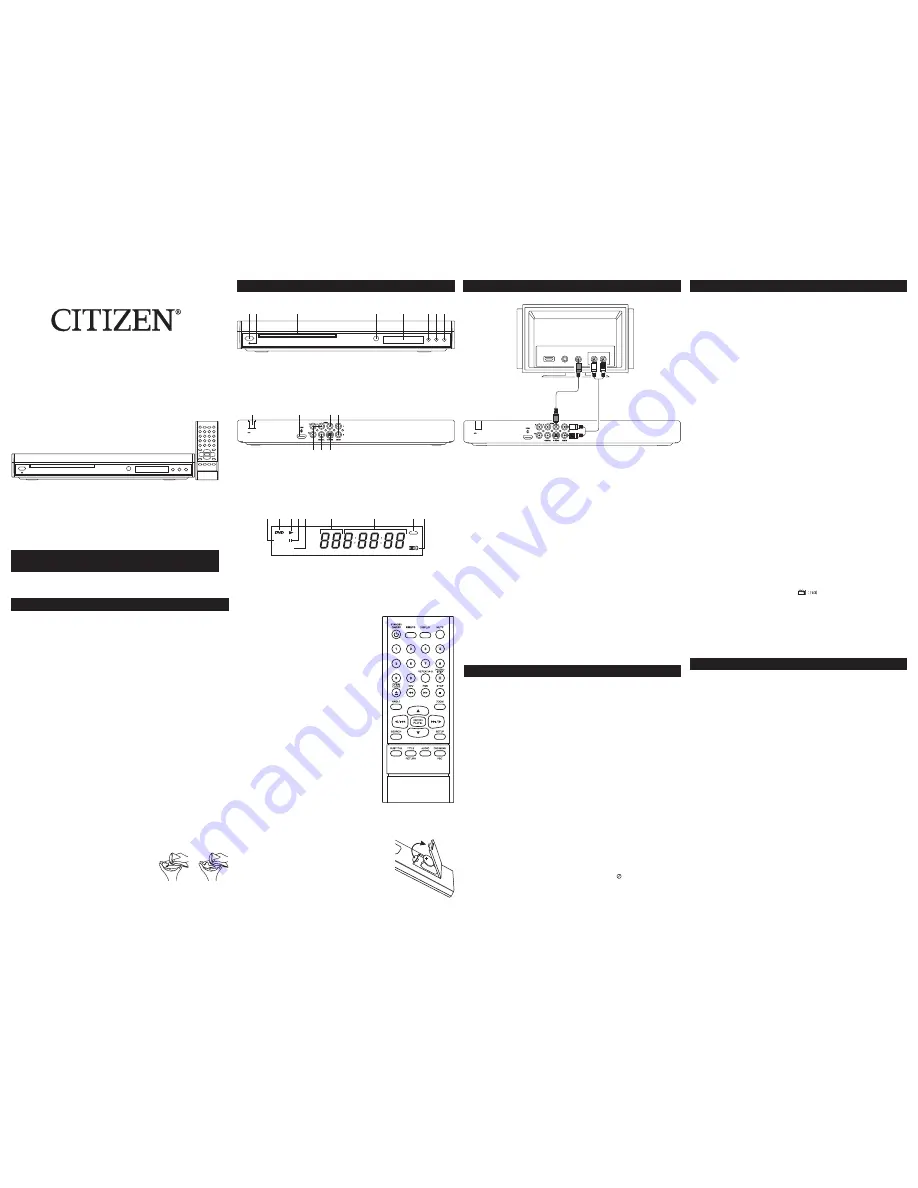
Location of Features
Front Panel Controls
1. STANDBY Button
5. Display Window
2. STANDBY Indicator
6. OPEN/CLOSE Button
3. Disc Tray
7. PLAY Button
4. Remote Sensor
8. STOP Button
Remote Control Unit
STANDBY ON/OFF
ON/OFF function.
HDMI/PS
Select HDMI output or PS.
DISPLAY
Provides playback status.
MUTE
Lowers and restores the volume.
0
–
9
Number entry.
REPEAT/A-B
Selects the repeat playback mode.
PAUSE/STEP
Freezes frame, frame advance.
OPEN/CLOSE
Open and close the tray.
REV
Searches back through the disc.
FWD
Searches forward through the disc.
STOP
Stops playback.
ANGLE
Accesses the camera angle.
ZOOM
Accesses the Zoom feature. (if available)
ENTER/PLAY
Selects item highlighted in menu/Starts
playing a disc.
3
,
4
,
5
,
6
Navigates through the menus.
9
,
:
Advances to the Next/Previous Chapter
or Track.
SEARCH
Goes to a specific play time or track.
SETUP
Accesses and exits the General setup
main menu.
SUBTITLE
Select and Turns the subtitle on and off.
TITLE
Accesses the title menu of the disc.
RETURN
Return to the PBC menu in VCD V.2.0.
AUDIO
Selects the audio language.
DVD MENU
Accesses the disc’s menu. (if available)
PBC
For VCD Disc, selects PBC.
Note: Point remote control unit no more than 6m from the remote sensor and within about 45° of
the front of the unit.
Rear Panel Jacks
1. AC Power Cord
5. S-VIDEO Output
2. HDMI Output
6. COAXIAL Digital Audio Output
3. VIDEO Output
7. Component Video (Y, Pb, Pr) Output
4. Audio L/R Output
3
4
1
2
5
6
7
Basic Connection (DVD TV + Video Recorder)
Note: Whenever you are connecting your system cables, turn off the power and make certain that
the power cord has been removed from the wall outlet.
Use Audio Cable (Red/White), Video Cable (Yellow) to connect the DVD player and your TV.
1. Connect the audio cables to the AUDIO OUT L and R jacks on the back of your DVD player and
to the corresponding AUDIO INPUT jacks on your TV.
2. Connect the Video cable
• Basic connection — Connect the video cable to the VIDEO OUT jack on the back of your DVD
player, and to the VIDEO INPUT jack on your TV. Or
• S-VIDEO — If your TV set has an S-Video jack, connect the S-Video cable (not included) to the
S-Video jack on the DVD to the S-Video of your TV.
Digital Out Coaxial (Audio)
Use this jack to connect your DVD player to a Dolby Digital receiver or decoder.
HDMI (High-Definition Multimedia Interface) Jack
The HDMI jack provides optimum picture quality. This jack gives you an uncompressed digital
interface that carries both video and audio data by way of an integrated miniplug cable. In order
to obtain an HDMI quality level of picture and sound, it is necessary to use a HDMI cable (not
included) to connect the HDMI output jack of this DVD player to the HDMI input jack on the TV set.
Note: Make sure you set the HDMI setup option in the menu system to the resolution setting that
most closely matches your TV.
Component (Y, Pb, Pr) Video Out
The Y, Pb, Pr jacks provide optimum picture quality because the video signal is separated into
three parts. To ensure maximum picture quality use three video-grade cables (yellow) for the
connection. You can also buy bundled component video cables that are color
–
coded to match
he Y, Pb, Pr jacks.
Note: Make sure to connect an audio cable when using this type of connection because the
component cables only carry the video signal, and not the sound.
Right
Wrong
Display
1. VCD/CD Indicator
6. Chapter Track Indicator
2. DVD Indicator
7. Playtime Indicator
3. PLAY Indicator
8. Repeat Indicator
4. PAUSE Indicator
9. DOLBY DIGITAL Indicator
5. PBC indicator
VCD
PBC
1
2
4
6
8
3
5
7
9
Basic Operation
Title/Chapter Search
Press the SEARCH button, then key in the desired title or chapter number using the Number buttons.
Then, press the left or right navigation button to select title or chapter and key in the desired title or
chapter using the number buttons. For example, for number 8 press “0” and followed by “8”. The
player will automatically begin playback at the selected title/chapter.
Time Search
While in the Play mode, press the SEARCH button twice. Then use the Number buttons to select
the desired Title time (Hour: Minute: Second) or press the SEARCH button a third time and key in
the desired Chapter time (Hour: Minute: Second). The player will automatically begin playback at
the selected time.
You can also use the following search features:
Picture Scan
When you’re playing a disc, each time you press FWD or REV, your DVD player scans the disc
faster and faster until you reach the fastest scan speed. To resume normal playback, press
ENTER/PLAY
4
or continue to press FWD or REV.
Note: Sound will be muted during FWD or REV Scan.
Freeze Frame and Frame Advance
While a disc is playing, press PAUSE/STEP to freeze the picutre. To advance one frame at a
time, press PAUSE/STEP repeatedly. To resume normal playback, press ENTER/PLAY
4
.
Note: After approximately one minute in PAUSE mode with no user interaction, the player goes
into screen saver mode.
Slow Motion
While a disc is playing, press PAUSE/STEP followed by FWD (each time you press FWD, the
slow motion will get even slower until you reach the slowest speed). To resume normal playback,
press ENTER/PLAY
4
.
Chapter/Track Advance
While a disc is playing, you can skip forward or backward a chapter or track at a time by pressing
the Skip
:
and Skip
9
.
Note: You can use the numeric buttons to directly access a specific track or chapter number. For
single digit tracks or chapters, enter a 0 before single digit numbers; for example, enter 0,
then 3 for chapter/track 3.
Zoom
While a disc is playing, press ZOOM (the player zooms in on the image). Each time you press
ZOOM the picture is magnified even more until you reach the maximum zoom level. To see other
parts of the picture when you’ve zoomed in on the image, try pressing the
3
,
4
,
5
and
6
buttons to go in corresponding directions. This feature is called pan and scan. To return to normal
playback, press ZOOM repeatedly until the screen returns to normal playback.
Angle
Some discs may contain scenes which have been shot simultaneously from a number of different
camera angles. This jacket will be marked with “ ”.
• While in the Playback mode, press the ANGLE button; the total number of angles will appear
on the screen. Repeatedly press the ANGLE button to select the desired angle; the angle will
change in one to two seconds. This is not available on all discs.
Mute
To temporarily mute the playback sound, press the MUTE button. Press again to resume normal
playback.
Advanced Playback Features
Audio (DVD, VCD and CD)
Some discs have several audio tracks created in different languages of different audio formats. To
change the language or audio format during play. Press the AUDIO button one or more times to
select one of the available audio formats or languages.
Note: This option is only available if the disc offers a number of languages or fomats.
Subtitle
Press the SUBTITLE button repeatedly to select a subtitle language or to turn the subtitle menu
off. This feature is not available on all discs.
DVD Menu
Press the DVD MENU button and the Main Menu of the disc will appear. Use the Navigation
(
3
,
4
,
5
,
6
) buttons to select the desired option, and then press the ENTER/PLAY
4
button to
confirmed the selection. This is not available on all discs.
Title
Press the TITLE button and the Title Menu of the disc will appear. Use the Navigation (
3
,
4
,
5
,
6
)
buttons to select the desired option, and then press the ENTER/PLAY
4
button to confirmed the
selection. This is not available on all discs.
Display
The Display appears across the top of the screen when you press the DISPLAY button on the
remote while playing a disc. Press the DISPLAY button repeatedly to scroll through playback
information.
Playback Control (PBC)
The Playback Control feature is available only on version 2.0 Video CDs. Press the DVD MENU
button to turn the PBC feature on and off. The Playback Control feature supports the menus of the
VCD format similar to a DVD menu when the PBC function is switched on.
Return function (VCD2.0 Only)
Press the RETURN button to quickly go back to the Menu Page when VCD version 2.0 disc is
playing and the PBC function is ON.
Battery installation (Remote Control)
1. Remove the battery cover.
2. Insert one battery (CR2025) making sure the polarity (+/–)
matches the marks inside the unit.
3. Replace the cover.
• Do not attempt to recharge, short-circuit, disassemble, heat or
throw the batteries into the fire.
Note: A battery is included in the remote control, remove the protective
film before the first time use.
CAUTION: Danger of explosion if battery is incorrectly replaced. Replace
only with the same or equivalent type.
Basic Operation
Turn on the DVD Player
1. Plug the AC power cord into your AC power outlet at home. The STANDBY indicator turns on.
The unit is connected to the main power.
2. If the unit is on stand by mode. Press the STANDBY ON/OFF button of the remote handset to
turn on the player.
3. Press the OPEN/CLOSE button to open the disc tray. “Open” will appear on the TV screen.
Insert a disc with the label side facing up on the disc tray.
• Hold the disc without touching either of its surfaces, position it with the printed title side facing
up, align it with the guides, and place it in its proper position.
4. Press the OPEN/CLOSE button to close the disc tray. “Close” will appear on the TV screen.
After loading, Use the Navigation (
5
,
4
,
6
,
3
) buttons to select the desired option and the
ENTER/PLAY
4
button to select it.
5. To stop playback, press the STOP button once; “Press Play Key To Continue” will appear
on the TV screen. Because the unit will remember where you stopped, simply press the
ENTER/PLAY
4
button to resume playback where you left off (resuming playback). If the
STOP button is pressed twice, the unit will stop completely.
Notes:
• If a MENU appears on the TV screen, press the Navigation (
5
,
4
,
6
,
3
) buttons to select the
desired option/item, then press the ENTER/PLAY
4
button. Please make sure to refer to the
disc’s jacket or case for additional information.
• Resuming playback may not work on all discs.
Search
This feature allows you to directly go to a specific Title and / or a Chapter or a specific time of a Title
or Chapter.
Notes:
• Title search may not work properly with some discs.
• If the Search feature is attempted in the Play mode, then you can only go to a specific Chapter or
time, you cannot change the Title number.
• If you enter a time that exceeds the time limit of the DVD, then “ Input Invalid” will appear,
and you must try again.
HDMI
PLASMA TV
AUDIO IN
R
S-VIDEO
IN
VIDEO
IN
L
1 2
3
4
5
6
7
8
Please read this manual carefully before using the unit for the
first time and keep for future reference.


