

VIDEO
PAGE
EXIT
TV/RADIO
BMAIL
SUBT
AUDIO
MUTE
STANDBY
MENU
1
3
def
2
abc
4
ghi
6
mno
5
jkl
7
pqrs
9
wxyz
8
tuv
0
SETUP
OK
VOL+
CH+
VOL-
CH-
FAV
EPG
INFO
2
3
4
6
Safety Instructions
• Always follow these instructions to avoid the risk of injury to yourself or damage to
your equipment.
• Unplug the STB from the AC power outlet before cleaning. Use only a damp cloth
for cleaning the exterior of the STB.
• Do not use accessories or attachments not recommended by the STB
manufacturer, as they may cause hazards and will void the warranty.
• Do not operate the STB in high-humidity areas, or expose it to water or moisture.
• Do not place the STB on an unstable cart, stand, tripod, bracket, or table.
The STB may fall, causing serious personal injury and damage to the STB.
• Do not block or cover slots and openings in the STB. These are provided for
ventilation and protection from overheating. Never place the STB near or over
a radiator or heat register. Do not place the STB in an enclosure such as a cabinet
without proper ventilation.
• Do not stack the STB on top of or below other electronic devices.
• Operate the STB using only the type of power source indicated on the
marking label.
• Unplug the STB power cord by gripping the power plug, not the cord.
• Route power supply cords so that they are not likely to be walked on or pinched
by items placed upon or against them. Pay particular attention to cords at plugs,
convenience receptacles, and the point where they exit from the unit.
• Use an outlet that contains surge suppression or ground fault protection.
For added protection during a lightning storm, or when the STB is left
unattended and unused for long periods of time, unplug it from the wall outlet
and disconnect the lines between the STB and the antenna. This will provide
some protection against damage caused by lightning or power line surges.
• Do not attempt to service the STB yourself, as opening or removing covers
may expose you to dangerous voltage, and will void the warranty.
Refer all servicing to authorized service personnel.
• Unplug the STB from the wall outlet and refer servicing to authorized service
personnel whenever the following occurs:
o The power supply cord or plug is damaged;
o Liquid has been spilled, or objects have fallen into the STB;
o The STB has been exposed to rain or water;
o The STB has been dropped or the chassis has been damaged;
o The STB exhibits a distinct change in performance.
WARNING
Failing to heed the instructions provided on this page could result in serious
damage to your health or damage equipment or other such property.
Contents
Safety Instructions
Product Overview
- Front View
- Rear View
Remote Control Unit
Set Top Box Connections
Basic Settings
Basic Functions
- Channel List
- Channel Bar
- Reminders
- EPG
Troubleshooting
3
4
4
5
6
7
8
11
11
12
13
14
16
User’s Manual
Digital Set Top Box
ARS-N210S
5
Remote Control Unit
1. MUTE
4. MENU
5. SETUP
6. PROGRAM GUIDE
7. INFO
11. OK
12. LEFT / RIGHT
8. FAVORITES
10. UP / DOWN
13. VOL +/-
14. CH +/-
15. EXIT
16. TV / RADIO
17. VIDEO
18. BMAIL
19. AUDIO
20. SUBTITLES
9. RECALL
2. STANDBY
3. NUMBER /
ALPHABET
IR
STANDBY
SIGNAL
ARS-N210S
Standard Definition Digital Satellite Receiver
Standard Definition Digital Satellite Receiver Conax Embedded
IR
STANDBY
SIGNAL
ARS-N210S
Standard Definition Digital Satellite Receiver
Product Overview
Front View ::
1. LED
•
STANDBY: Lights in red to indicate ARS-N210S is in Standby mode.
This light is turned off when the product is in operation.
•
SIGNAL: Lights in green to indicate the channel is searched and tuning
properly.
•
IR: Lights in yellow to indicate the remote is in proper operation.
2. CH
▼/▲
: Changes channels in the No-menu State and moves the cursor
up/down in the Menu state.
3. On/ Standby
: Switch the STB to On or Standby.
1
2
3
7
8
Set Top Box Connections
DO NOT PLUG the STB into the Main Power outlet until all the other cables
are connected to the STB.
Before connecting the cables, you should first connect the IF IN connector
of the STB to the cables from the satellite.
TV with RCA Cable
+12V DC
L
R
13/18V
200mA Max.
AUDIO
IF IN
VIDEO
CARD SLOT
USB
5V
200mA Max.
12V
,
1
.
0A
VIDEO
DISH to IF IN
+12V DC
L
R
13/18V
200mA Max.
AUDIO
IF IN
VIDEO
CARD SLOT
USB
5V
200mA Max.
12V
,
1
.
0A
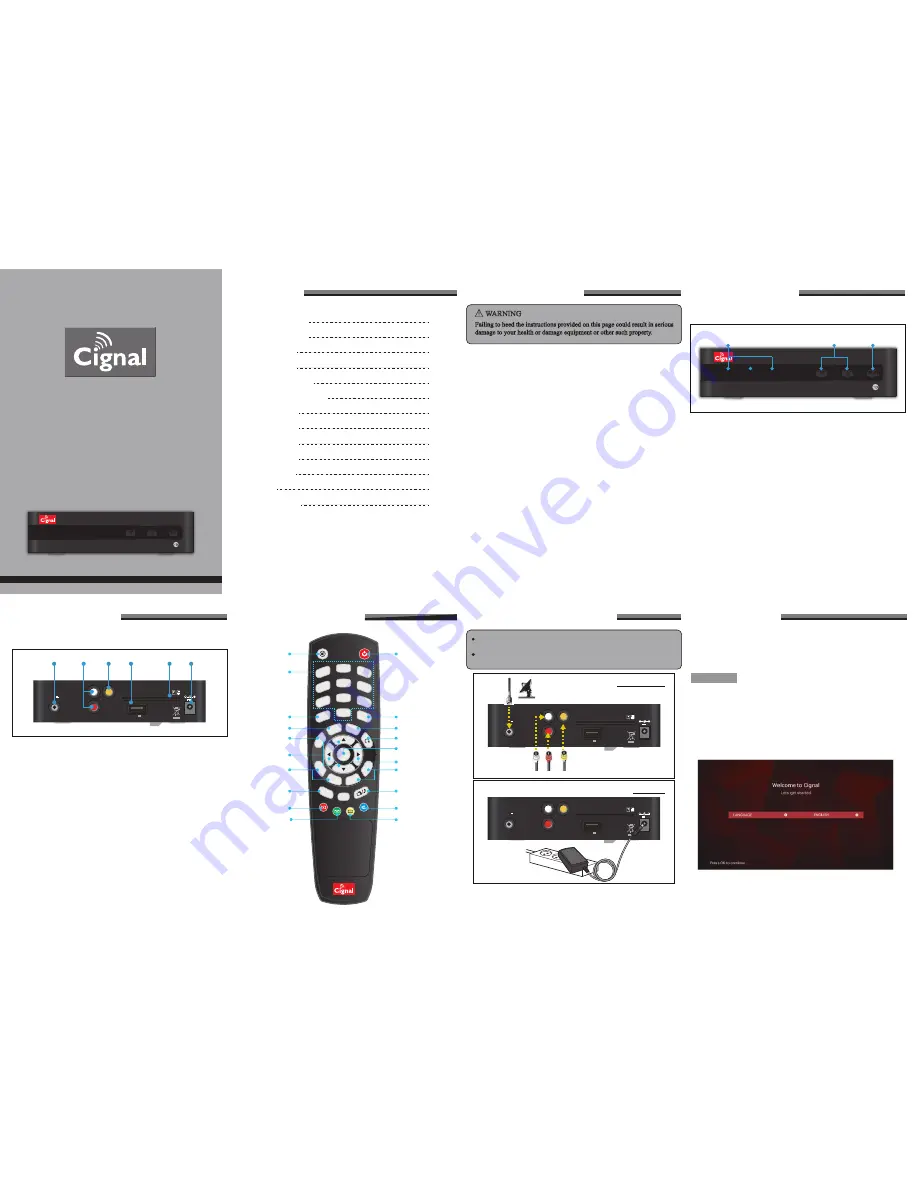
Starting Up
Product Overview
Rear View ::
1. IF IN
:
Connect this to a dish antenna to receive the digital broadcasts.
2 RCA Audio Connector
: Connect these to desired audio output system.
3. RCA Video Connector
: Connect this to the composite video input of the TV.
4. USB
: Used for Set Top Box software updates.
5. Smart Card Slot
:
Used for smart card (when applicable).
6. DC POWER
:
Turn the ARS-N210S On/Off.
+12V DC
L
R
13/18V
200mA Max.
AUDIO
IF IN
VIDEO
CARD SLOT
1
5
3
6
4
2
USB
5V
200mA Max.
12V
,
1
.
0A
Basic Settings
Warning!
If you are using this product for the first time, check all the cables are connected
to the STB and perform the basic settings procedure.
When you successfully complete setting up your STB, all TV and radio channels
will be ready for your entertainment.
1. After turning on your TV and STB, follow the instructions on the screen.
Press “OK” button to start the basic setting.
Press the “MENU” button in order to save previous input data and exit
the Basic settings. If you are exiting the basic settings without first successfully
completing the setup procedure, no TV and radio channel will be available.
If the video display does not match the TV type, no video is seen.
To change the video format, go to "SETTINGS > USER > VIDEO OUTPUT”


