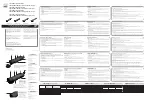
Use the three tightening screws located at the
bottom of each leg to secure the extended legs
in place.
To set up the tripod, spread the legs outward
until they are fully extended and push down
center locking brace. Extend the center portion
of each of the three tripod legs down 6-8".
Item #31132
Quick Set-up Guide
1
2
3
All three legs should be the same length to
provide a level platform for the telescope.
4
7
Locate the optical tube and line up the tube
with the holes on the mount.
5
Properly assembled, the accessory tray should
appear as pictured above.
6
Secure the tube to the mount using the two
threaded mounting bolts. Tighten to secure in
place.
8
Insert the slow motion control rod into the hole
on the mount.
9
PowerSeeker 60AZ
Your PowerSeeker 60AZ includes: optical tube with
two threaded mounting bolts; tripod with center
support bracket & yolk mount attached; two
eyepieces; a 3x barlow lens, finderscope; star
diagonal; slow motion control rod; eyepiece
accessory tray; The Sky™ CD software; owner’s
manual.
Item# 21041
Place the accessory tray on top of tripod's
center leg brace. Thread the tray into the
threaded hole in the center of the leg brace.
Questions or Problems with Set-up?
CONTACT:
Celestron Technical Support: 310
.
803
.
5955