RJA520274-001V01
MO0811-A
CASIO Electronic Dictionary
Quick Guide (Version C)
The contents of this Quick Guide apply to the
CASIO XD-SF and XD-GF Series Electronic
Dictionaries. Most illustrations and screen shots
show the XD-SF6200.
Hangul, Russian, Simplified Chinese, and accented
characters cannot be input on a model that
does not include a dictionary that requires such
characters. Input of the applicable characters
becomes possible when optional software is
installed.
The screen shots and product illustrations shown
in this manual may be different from those of the
actual product. Also note that some keys and icons
are not shown in examples of this manual for the
sake of simplicity.
Example:
→
,
→
Loading Batteries for the First Time
Load the two AAA-size batteries that come with
the electronic dictionary before trying to use it.
1
Remove the battery cover.
Pressing at the two points
shown in the illustration,
slide the cover in the
direction indicated by the
arrows.
2
Load two batteries.
Push against the spring with the (–) end of a
battery.
With the battery on top of the ribbon, press the
(+) end down.
Make sure the (+) and (–) ends are facing
correctly and that the springs are pressed
straight down.
3
Replace the battery cover.
4
Remove the stylus
from the side of the
electronic dictionary
and then press the
RESET button on the
bottom.
Do not use a toothpick,
lead pencil, or other
breakable object.
5
Unfold the electronic
dictionary.
6
On the
メインパネルコント
ラスト設定
(Main Panel
Contrast Adjustment)
screen, use
and
to adjust display
contrast. Then press
.
7
On the
手書きパネルコント
ラスト設定
(Handwriting
Panel Contrast
Adjustment) screen,
use
and
to adjust
handwriting panel
contrast. Then press
.
•
•
•
•
•
•
•
Stylus
RESET
button
Stylus
RESET
button
Handwriting panel
Handwriting panel
8
On the
電池設定
(Battery Settings)
screen, confirm
that
アルカリ電池
(Alkaline Batteries)
is selected as the
battery type.
9
Press
to
display the
メニュー
(MENU) screen.
If the
本機はユーザー
名を登録することがで
きます
...
(You can
register a user name
for this dictionary...)
message appears
instead of the
メ
ニュー
screen, press
.
Turning Power On and Off
Power turns on and off
automatically whenever
you open or close the
electronic dictionary’s
panels.
You also can use the following
key operation to turn power on
or off.
1
Press the
key to turn on power.
Power also turns on when you press a
dictionary/mode key.
2
Press
again to turn off power.
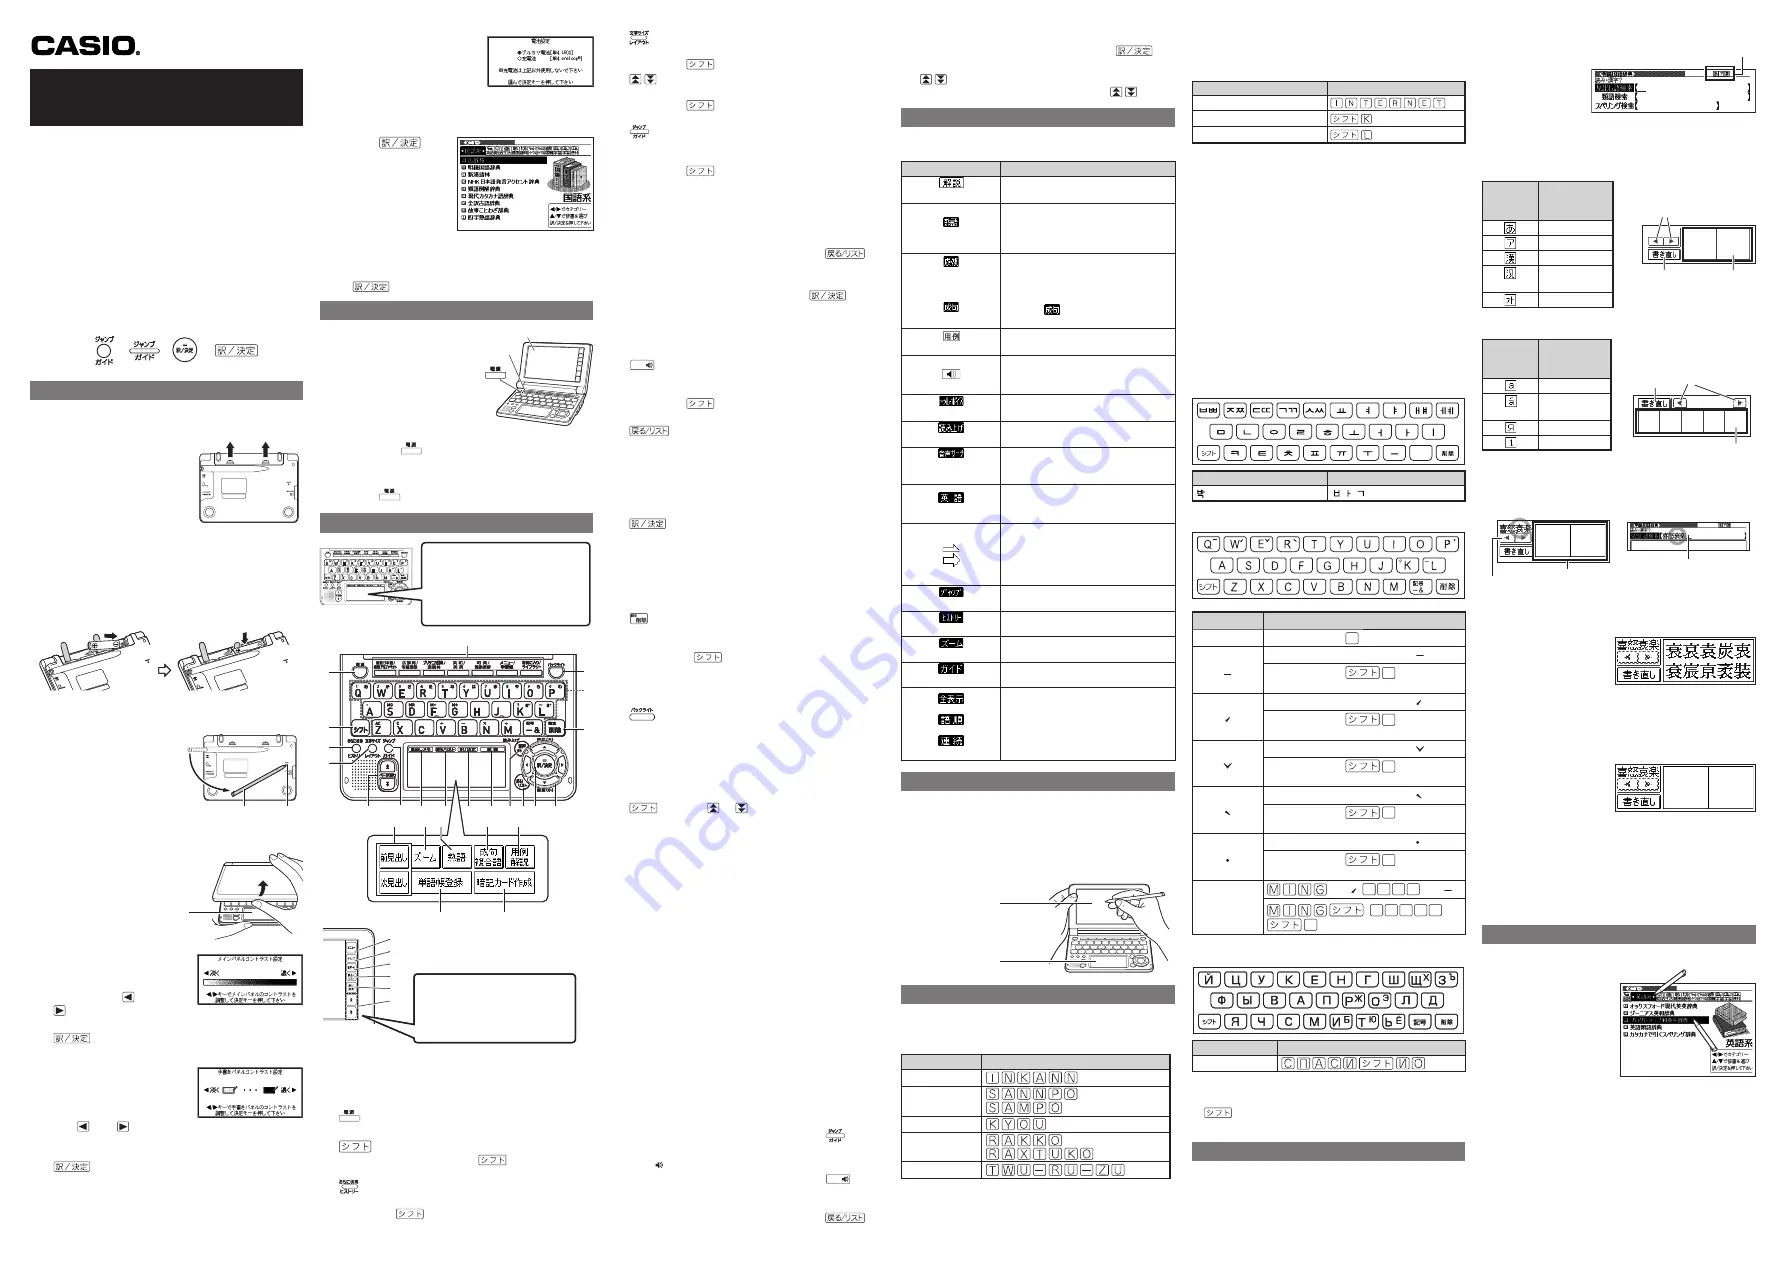
General Guide
Handwriting panel
Use this panel to hand-write
characters for input. Also,
touching icons that appear here
performs certain operations.
①
Dictionary/mode keys
Toggle between the initial screens of the two
dictionaries/modes assigned to each key.
②
Key
Toggles power on and off.
③
(Shift) Key
Shifts the keyboard. To use
, press and
release it and then press the next key.
④
(Additional Search) (History) Key
Performs additional search.
Press after
to access history data.
•
•
•
Main panel
Dictionary/
mode keys
Main panel
Dictionary/
mode keys
①
⑥
⑦
⑲
⑭
⑮
③
④
⑤
②
⑯
⑰
⑱
⑬
⑩
⑪
⑫
⑨
⑧
⑳
㉒
㉓
㉔
㉕
㉑
①
⑥
⑦
⑲
⑭
⑮
③
④
⑤
②
⑯
⑰
⑱
⑬
⑩
⑪
⑫
⑨
⑧
⑳
㉒
㉓
㉔
㉕
㉑
㉖
㉗
㉘
㉙
㉚
㉛
Quick Palette
Quick Palette keys provide one-
touch access to often-used
operations.
㉖
㉗
㉘
㉙
㉚
㉛
Quick Palette
Quick Palette keys provide one-
touch access to often-used
operations.
⑤
(Text Size) (Layout) Key
Cycles through available screen text sizes.
Press after
to change the screen layout.
⑥
(Scroll) Keys
Scroll screen contents up and down.
Press after
to jump back or forward between
definitions.
⑦
(Jump) (Guide) Key
Enables look up of a term on the currently
displayed definition or explanation screen.
Press after
to view guide information.
⑧
【見出しメモ】
(Headword Memo)
Touch to affix a
midashi memo
(headword memo)
to a definition or explanation produced by a
search.
⑨
【戻る
/
リスト】
(Back/List)
Performs the same functions as the
⑬
(Back/List) key.
⑩
【訳
/
決定】
(Translate/Select)
Performs the same functions as the
⑭
(Translate/Select) key.
⑪
【認識】
(Confirm)
Touch after inputting a character when inputting
individual characters on the handwriting panel.
⑫
音声
読み上げ
(Audio) (Read) Key
Press when you want to hear something
pronounced by a native speaker.
Press after
to hear a reading by a
synthesized voice.
⑬
(Back/List) Key
Back-steps through previous operations.
Press while a dictionary’s initial screen is
displayed to return to the
メニュー
screen.
Press while a definition screen is on the display
to switch to the list of terms, which includes the
term whose definition you were viewing.
⑭
(Translate/Select) Key
Executes a function or selects an on-screen item.
⑮
Arrow Keys
Move the selection highlighting or cursor up,
down, left, or right.
Used during volume adjustment to raise and
lower the volume level.
⑯
(Setup/Delete) Key
Deletes the character at the current cursor
location.
Press after
to display a screen for changing
the setup of the electronic dictionary.
⑰
Letter Keys
Enter letters and numbers.
⑱
(Backlight) Key
Toggles the backlight on and off.
⑲
【前見出し】・【次見出し】
(Previous Headword/
Next Headword)
Jump from the current term to the previous or next
term.
The same result can be achieved by pressing
and then
or
.
⑳
【ズーム】
(Zoom)
Enlarges the characters of a definition or
explanation screen.
㉑
【熟語】
(Compound Terms)
Displays compound terms that use the kanji you
are currently viewing in the
新漢語林
(Japanese
kanji) dictionary.
㉒
【成句複合語】
(Phrases and Compound
Expressions)
Displays phrases and compound expressions that
use the term you are currently viewing.
㉓
【用例解説】
(Examples and Explanations)
Displays examples and explanations in dictionaries
that include such information.
㉔
【暗記カード作成】
(Create Flash Card)
Creates a flash card.
㉕
【単語帳登録】
(Add to Word List)
Display a term, example or phrase screen and
then touch this key to add the term, example or
phrase to the word list.
㉖
【メニュー】
(Menu)
Displays the menu screen.
㉗
【ジャンプ】
(Jump)
Performs the same functions as the
⑦
(Jump/
Guide) key.
㉘
【音声
】
(Audio)
Performs the same functions as the
⑫
音声
読み上げ
(Audio/Read) key.
㉙
【戻る/リスト】
(Back/List)
Performs the same functions as the
⑬
(Back/List) key.
•
•
•
•
•
•
•
㉚
【訳/決定】
(Translate/Select)
Performs the same functions as the
⑭
(Translate/Select) key.
㉛
(Scroll)
Perform the same functions as the
⑥
keys.
Display Indicators
The following explains the meanings of display
indicators.
This indicator:
Means this:
(Explanation)
There is an explanation for the word
where the indicator is located.
(Compound Term)
The
新漢語林
(Japanese kanji)
dictionary contains a compound
term that includes the kanji
character you are looking up.
(Phrases/Compound
Expression)
(Phrase)
There is a phrase or compound
term that uses the term you are
looking up.
With some electronic dictionary
models,
will appear if optional
software is installed.
(Example)
There is an example that uses the
term you are looking up.
Native speaker pronunciation is
available for the contents to the
right or below this indicator.
(True Voice)
Native speaker pronunciation is
available.
(Reading)
Synthetic voice reading is available.
(Pronunciation
Search)
Pronunciations are available for the
English on the screen.
(English)
The language whose pronunciation
is applied for pronunciations and
readings
There is a term that contains the
term you are viewing or there is
related information about the term
in the dictionary you are currently
accessing.
(Jump)
Jump function in use
(History)
History function in use
(Zoom)
Display zoom in use
(Guide)
Guide function in use
(Display All)
(Word Order)
(Continuous)
Indicates the display method when
using
例文検索
(Example Search) or
成句検索
(Phrase Search).
Precautions when Using the Stylus
When using the stylus to perform operations on the
main panel, avoid applying excess pressure. Excess
pressure can crack the main panel.
When using the stylus to perform an operation on
the main panel, support the main panel from behind
with your hand.
Keyboard Input
Japanese
Use alphabetic characters to input Japanese.
To input this:
Type this:
いんかん
さんぽ
or
きょう
らっこ
or
とぅーるーず
•
•
•
Main panel
Handwriting panel
Main panel
Handwriting panel
Alphabetic Characters
Use English input for unaccented alphabetic
characters.
To input this:
Type this:
internet
?
~
Accented Characters
All alphabetic characters are input in lower-case,
regardless of their normal capitalization.
For the German “ß”, input “ss”.
For other characters that normally include a
diacritic, input the character without the diacritic.
Example: “à” --> “a”, “ê” --> “e”, etc.
For the French “ç” input “c”, and for “œ”, input “oe”.
Input hyphenated terms as single words, without a
hyphen. To look up “peut-être”, for example, input
“peutetre”.
When inputting a term that consists of multiple
words, input the words without any spaces. To
look up “magna cum laude”, for example, input
“magnacumlaude”.
When entering a noun that is normally accompanied
by an article, enter the noun only without the article.
To look up “die Elbe” for example, input “Elbe”.
Hangul
To input this:
Type this:
GGG
Chinese (Pinyin)
1
2
3
4
To input this:
Perform this operation:
ü
Type (Keyboard):
V
Touch (Handwriting Panel):
【一声 】
Type (Keyboard):
Q
(Displayed as
1.)
Touch (Handwriting Panel):
【二声 】
Type (Keyboard):
W
(Displayed as
2.)
Touch (Handwriting Panel):
【三声
】
Type (Keyboard):
E
(Displayed as
3.)
Touch (Handwriting Panel):
【四声 】
Type (Keyboard):
R
(Displayed as
4.)
Touch (Handwriting Panel):
【軽声 】
Type (Keyboard):
P
(Displayed as
0.)
ming2tian1
(
明天
)
【二声 】
T I A N
【一声 】
W T I A N
Q
Russian
To input this:
Type this:
сласибо
To input a character marked in the upper right
corner of a key, press (and immediately release)
and then press the key.
All of the above characters are input in lower-case.
Handwriting Input
Use the stylus to write characters on the
handwriting panel and then touch
【認識】
.
With some search methods, like
単漢字/熟語を手
書き入力から探す (新漢語林)
, you can enter search
terms using handwriting input only.
•
■
•
•
•
•
•
•
•
•
•
Character Input Mode
The indicators
described below
appear on the main
panel to show the
current input mode.
Also note that the handwriting panel changes to
two characters per screen or five characters per
screen in accordance with the input mode.
Two Characters Per screen
Indicator
Supported
Input
Characters
Hiragana
Katakana
Kanji
Simplified
Chinese
Hangul
Five Characters Per screen
Indicator
Supported
Input
Characters
Alphabetic
Accented
alphabetic
Russian
Numbers
Correcting Character Input
Example: After mistakenly inputting
喜怒衰楽
instead of
喜怒哀楽
1
On the
handwriting panel
or in the input
field on the main
panel, touch a
character (
衰
).
This displays up to 10 possible candidates for
the character.
2
If you find the
correct character
among the
candidates,touch
it.
3
If you do not find the correct character,
touch
【書き直し】
, rewrite the character on the
handwriting panel and then touch
【認識】
.
Touching
【書き直し】
while the character cells of
the handwriting panel are blank (nothing input)
will delete the character currently in the input
field of the main panel.
Stylus Basics
To select a dictionary
1
On Quick Palette,
touch the
【メニュー】
(Menu) icon to
display the menu
screen.
2
Touch a category
①
and then a
dictionary name
②
.
The category and
mode you touch will
be highlighted on
the screen.
3
Touch the highlighted dictionary name
again.
This displays the initial screen of the dictionary.
You also could touch
【訳
/
決定】
on the
handwriting panel instead of the dictionary
name in step 3.
•
•
■
•
•
•
Indicator
Indicator
Two-character Handwriting
Panel
Rewrite button
Scroll buttons
Character
cells
Two-character Handwriting
Panel
Rewrite button
Scroll buttons
Character
cells
Scroll buttons
Character cells
Rewrite
button
Five-character Handwriting
Panel
Scroll buttons
Character cells
Rewrite
button
Five-character Handwriting
Panel
Handwriting panel
Character cells
Main panel
Input field
Scroll buttons
(When there are too many
characters to fit in the display
area above, touch these buttons
to scroll the screen contents.)
Handwriting panel
Character cells
Main panel
Input field
Scroll buttons
(When there are too many
characters to fit in the display
area above, touch these buttons
to scroll the screen contents.)
①
②
①
②
(Continued on other side.)