Canon VIXIA HF10, Instruction Manual
The Canon VIXIA HF10 is a high-definition camcorder that captures stunning videos. With its sleek design and advanced capabilities, this user-friendly device is perfect for capturing life's precious moments. To fully explore its endless possibilities, download the comprehensive Instruction Manual for free at manualshive.com.
Share
Download


Reviews:
No comments
Related manuals for VIXIA HF10
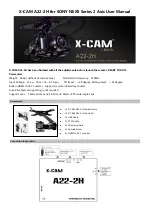
A22-2H
Brand: X-cam Pages: 4

LIFE
Brand: Medion Pages: 166

Elecam 360
Brand: HK ELEPHONE COMMUNICATION TECH CO. Pages: 13

DH-HAC-EW2501
Brand: Dahua Pages: 18

AJ-HPX2000
Brand: Panasonic Pages: 113

Mini O
Brand: Ezviz Pages: 65

VP-L600B
Brand: Samsung Pages: 67

Legira HFR76
Brand: Canon Pages: 7

SC-HMX10 - 8GB Flash Memory High Definition...
Brand: Samsung Pages: 124

EX10
Brand: Bosch Pages: 24

XA20
Brand: Canon Pages: 187

XA10
Brand: Canon Pages: 191

XA25
Brand: Canon Pages: 4

XA30
Brand: Canon Pages: 192
VM-E70
Brand: Canon Pages: 52

VM-E708
Brand: Canon Pages: 64

XA20
Brand: Canon Pages: 2

Horizon
Brand: ATIK Cameras Pages: 11


