Canon SD30 - PowerShot Digital ELPH Camera, User Manual
The Canon SD30 - PowerShot Digital ELPH Camera is a high-quality compact camera designed to capture stunning images. To help users maximize its features, a detailed connection manual and user manual are available for free download at manualshive.com. Explore the camera's potential and enhance your photography skills effortlessly.
Share
Download


Reviews:
No comments
Related manuals for SD30 - PowerShot Digital ELPH Camera

IntelliJack NJ200
Brand: 3Com Pages: 14

VIP-102B
Brand: Valcom Pages: 5

GS700AT Series
Brand: NETGEAR Pages: 2

Ultramix
Brand: Mackie Pages: 8

PC400
Brand: Campbell Pages: 250

DATA IGLOO
Brand: FARONICS Pages: 42

ENTERPRISE LINUX 3 - SECURITY GUIDE
Brand: Red Hat Pages: 410

ANTI-VIRUS - FOR MICROSOFT EXCHANGE
Brand: F-SECURE Pages: 115
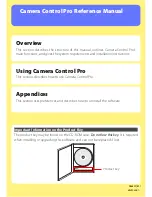
25366 - Camera Control Pro
Brand: Nikon Pages: 94

ALIAS SURFACE
Brand: Autodesk Pages: 10

MK-96RD617-08
Brand: Hitachi Pages: 248

eld
Brand: HP Pages: 283
ThinkPad L410
Brand: Lenovo Pages: 284

THINKPAD X32
Brand: Lenovo Pages: 2

THINKPAD X200S
Brand: Lenovo Pages: 4
ThinkPad Z60t Series
Brand: Lenovo Pages: 166

ThinkPad X60 Tablet
Brand: Lenovo Pages: 206

ThinkPad Edge E420
Brand: Lenovo Pages: 218


