

EN-1
①
②
③
④
⑤
⑥
⑦
⑧
⑨
⑩
⑪
❶
❷
❸
❹
Mount Adapter EF-EOS M
Instructions
EN
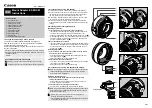
Nomenclature
①
Lens release lever
②
EF-S Lens mount index
③
EF Lens mount index
④
Camera lens mount index
⑤
Contacts (camera side)
⑥
Contacts (lens side)
⑦
Tripod mount socket
⑧
Tripod mount screw
⑨
Tripod mount knob
⑩
Tripod socket
⑪
Certification/Regulatory Logos
Thank you for purchasing a Canon product.
The Canon Lens Mount Adapter EF-EOS M is designed to
allow EF series lenses*
1
to be used with EF-M lens compatible
interchangeable-lens digital cameras*
2
.
Before using this adapter, please make sure that the camera and
the lens is compatible.
*1 Does not include EF-M lenses or CN-E lenses (EF Cinema lenses).
*2 Only the following cameras are compatible with EF-M lenses (as of
September 2012):
EOS M
Conventions used in this instruction
Warning to prevent lens or camera malfunction or damage.
Supplementary notes on using the adapter and taking pictures.
1. Precautions when using this adapter
z
Attaching this adapter to a lens does not affect lens performance.
z
Use the switches on the lens to set lens functions. In the event that
the settings found in the camera’s menu differ from those found on
the lens, priority is given to the settings found on the lens.
z
When using a lens that is heavier than the camera, be sure to hold
the lens while carrying the camera and while shooting.
z
Since a lens’ minimum focusing distance is lengthened when this
adapter is attached, maximum magnification and field of view might
change.
2. Mounting and Detaching the Adapter
Mounting Procedures
1. Attach the EF lens to the EF mount side of the adapter.
• Insert the lens into the adapter by aligning the mount index found
on the EF lens (red circle) with the same mark found on the
adapter, and turn the EF lens clockwise until you hear a click. (fig.
❶
)
• When attaching an EF-S lens to the adapter, insert the lens into the
adapter by aligning the EF-S mount index marks (white squares)
and turn the lens clockwise.
(fig.
❶
)
2. Mount the adapter to the camera.
• Insert the adapter into the camera by aligning the EF-M lens mount
index found on the adapter (white circle) with the same mark found
on the camera, and turn the adapter counter clockwise until you
hear a click.
(fig.
❷
)
Detaching Procedures
1. Turn the camera OFF, and detach the adapter from the camera
while the EF lens is still attached to it.
• Turn the adapter counter clockwise while pressing the camera’s
lens release button.
(fig.
❸
)
• Detach the adapter once it has stopped turning.
2. Detach the EF lens from the adapter.
• Turn the EF lens counter clockwise while pushing the lens release
lever found on the adapter.
(fig.
❹
)
• Detach the EF lens once it has stopped turning.
3. Precautions when using this adapter with a tripod
When shooting with a tripod, do not use the camera’s tripod mount
socket while the adapter is attached. Be sure to use the tripod
mount included with the adapter.
Attaching the tripod mount
1. Attach the included tripod mount to the adapter by firmly
turning the tripod mount knob.
• Please make sure that the tripod mount is facing in the correct
direction in relation to the adapter.
2. Attach the tripod using the tripod mount socket.
• Securely attach the tripod while firmly holding the adapter.
When using a tripod with EF lenses that are equipped with a tripod
mount, such as super telephoto lenses, please be sure to use it to
mount the lens to the tripod.
• Please refer to your tripod’s instructions for information on
mounting and detaching components.
• The certification/regulatory logos for this adapter can be checked
by removing the tripod mount.
Tripod mount
CEL-ST6BA210


