Candy CCVB 30F, User Manual
The Candy CCVB 30F is a versatile and efficient refrigerator that combines style with functionality. For a hassle-free experience, we provide a comprehensive user manual that you can download for free from our website. This manual offers step-by-step instructions and valuable insights to ensure you make the most of your refrigerator.
Share
Download


Reviews:
No comments
Related manuals for CCVB 30F

Captain 1000 Series
Brand: U-Line Pages: 38

30WCM
Brand: Marvel Pages: 12

PWC-24ZWX
Brand: Premia Pages: 9

JC-163
Brand: Haier Pages: 88
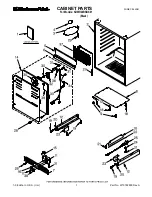
KUWO24RSBX01
Brand: KitchenAid Pages: 5

KUWL204ESB
Brand: KitchenAid Pages: 44

BPWKN 177
Brand: BORETTI Pages: 60

268 68 20 01
Brand: WineEnthusiast Pages: 7

WFG 22
Brand: Vestfrost Pages: 84

110 GC
Brand: Vinobox Pages: 8

Vino Pins Flex Series
Brand: VintageView Pages: 4
3SWC-BB-G
Brand: Marvel Pages: 8

WF-21BD
Brand: DIHL Pages: 10

WINE-MATE WM-1520CD
Brand: Vinotemp Pages: 23

WCR8500SDZ
Brand: Avanti Pages: 20

Wine-Mate WM-1500SSL
Brand: Vinotemp Pages: 30

HWC241L
Brand: Dacor Pages: 17


