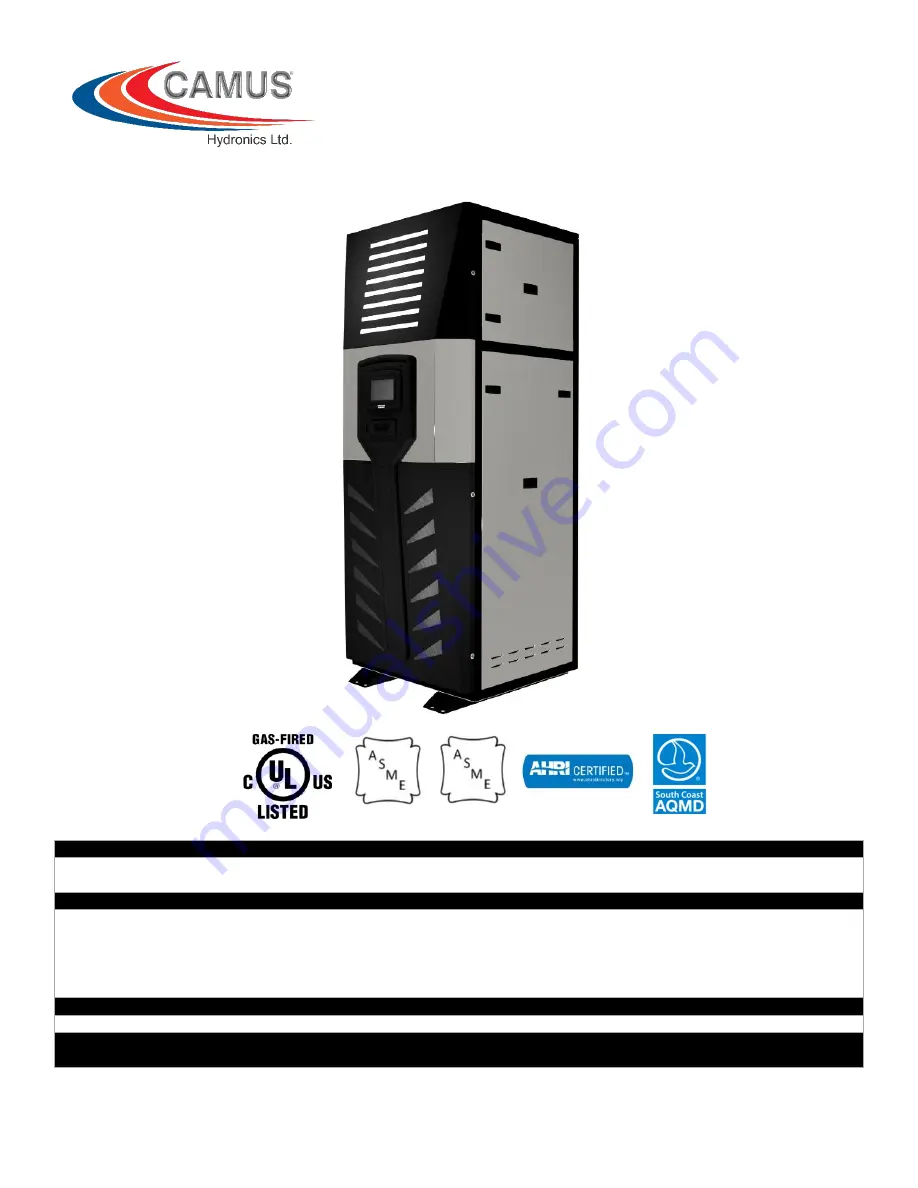
background image

99-0600 Rev.03 


Avenger® Series  

Installation, Operation and Service Manual 

Gas Fired Commercial Condensing Stainless Steel Boilers 

Hydronic Heating Models ARH1000 thru ARH4000 

Hot Water Heater Models ARW1000 thru ARW4000 


WARNING 

If the information in these instructions is not followed exactly, a fire or explosion may result causing property damage, personal injury 

or death.


WHAT TO DO IF YOU SMELL GAS 

  Do not try to light any appliance, 

  Do not touch any electrical switch; do not use any phone in your building, 

  Immediately call your gas supplier from a neighbour’s phone. Follow the gas supplier’s instructions, 

  If you cannot reach your gas supplier, call the fire department. 

A Qualified installer, service agency or the gas supplier must perform installation and service. 

WARNING 

Do not store or use gasoline or other flammable vapours and liquids in the vicinity of this or any other appliance. 

TO THE INSTALLER:

 After installation, these instructions must be given to the end user or left on or near the appliance. 

TO THE END USER:

 This booklet contains important information about this appliance. Retain for future reference. 


HLW 

Summary of Contents for Avenger Series

Page 1: ...l switch do not use any phone in your building Immediately call your gas supplier from a neighbour s phone Follow the gas supplier s instructions If you cannot reach your gas supplier call the fire de...

Page 2: ......

Page 3: ...3 2 1 8 MASONRY CHIMNEY INSULATIONS 13 2 1 9 VERTICAL VENTING TERMINATION 13 2 1 10 COMBINED COMBUSTION AIR INLET 13 2 1 11 DRAIN TEE 14 2 2 CONVENTIONAL VENTING INDOOR INSTALLATIONS 15 2 2 1 AIR REQU...

Page 4: ...L 32 5 4 BLOCKED FLUE SWITCH 33 5 5 HIGH AND LOW GAS PRESSURE SWITCHES 33 5 6 HIGH LIMIT 33 5 7 AVENGER SOLA 33 5 7 1 SERVICE PARTS 34 5 7 2 IGNITION MODULE LOCKOUT FUNCTIONS 34 5 8 AVENGER CONTROLLER...

Page 5: ...T EXCHANGER INSPECTION 68 10 8 RE INSTALL HEAT EXCHANGER 69 10 9 COMBUSTION AIR FAN 69 10 10 COMBUSTION AND VENTILATION AIR 69 10 11 CONTROL CIRCUIT VOLTAGE 69 10 12 COMBUSTIBLE MATERIALS 69 10 13 FRE...

Page 6: ...tered in precise proportion 1 1 Ratio to modulation signal allowing combustion characteristics which determine efficiency to remain the same over the entire operating range The Low End Gas Valve works...

Page 7: ...e tee The normally open dry contacts in the Low Water Cutoff LWCO are to be wired in series with the normally open contacts of the Flow Switch Locate the probe type LWCO in the piping above the boiler...

Page 8: ...arget The modulation rate is controlled via a 4 20 mA signal If the heat demand is sustained without change the boiler firing rate will reach a point of steady state and the fan will rotate at constan...

Page 9: ...and on it or in any way block the flow of fresh air to your appliance UNDER NO CIRCUMSTANCES may flammable materials such as gasoline or paint thinner be used or stored in the vicinity of this applian...

Page 10: ...ng instructions Adjust thermostat so that the appliance operates continuously If provided test for spillage at the draft control device relief opening after 5 minutes of main burner operation Use a co...

Page 11: ...e Maintain minimum specified clearances for adequate operation All installations must allow sufficient space for servicing the vent connections water pipe connections circulating pump bypass piping an...

Page 12: ...to allow easy access to the heat exchanger The appliance must be installed so that the ignition system components are protected from water dripping spraying etc during appliance operation and service...

Page 13: ...in Water X in Gas Y in air Weight lbs 1000 13 5 3 7 8 16 7 8 18 7 8 24 74 33 1 4 18 1 2 3 1 2 5 3 8 2 1 8 1180 1500 15 4 17 7 8 19 3 8 24 74 36 1 2 20 1 2 3 1 2 5 3 8 2 1 2 1 1 4 10 1530 2000 17 4 20...

Page 14: ...5 10 1 ARN 4000 4000 160 3 748 25 1 ARP 4000 4000 400 3 748 10 1 Table 3B Water Content Model Volume Gallon AR N P 1000 55 AR N P 1500 68 AR N P 2000 96 AR N P 2500 96 AR N P 3000 107 AR N P 3500 120...

Page 15: ...ng codes The distance of the vent terminal from adjacent building windows that open and building openings MUST comply with the latest edition of the National Fuel Gas Code ANSI Z223 1 in Canada the la...

Page 16: ...mended location and clearances For direct vent applications the maximum wall thickness must be between 0 5 12 1 2 cm to 30 cm 2 1 3 APPROVED VENTING MATERIALS Exhaust Vent for Use for Avenger Category...

Page 17: ...nt cap can result in a blocked flue condition Some discoloration to exterior building surfaces can be expected Adjacent brick or masonry surfaces should be protected with a rust resistant sheet metal...

Page 18: ...nry chimney must be capped and sealed to provide a dead air space around the sealed corrosion resistant liner Consult with local code officials to determine code requirements or the advisability of us...

Page 19: ...all be provided as a drain line from the tee and from the boiler condensate line The drain tubing from the tee must have a trap provided by a 4 10 cm diameter circular trap loop in the drain tubing an...

Page 20: ...rovide two permanent openings a Net free area for combustion air opening shall be in accordance with all applicable codes In the absence of such codes provide combustion air opening with a minimum fre...

Page 21: ...INATION The vent terminal shall terminate at least 3 feet 1 m above any forced air inlet within 10 feet 3 m horizontally The vent terminal MUST NOT terminate below a forced air intake at any distance...

Page 22: ...combustion air inlet to any other appliance 36 91 cm 12 30 cm K Clearance to a mechanical air supply inlet 6 1 83 m 3 91 cm above if within 10 3 m horizontally L Clearance above paved sidewalk or pav...

Page 23: ...is located between two single family dwellings and serves both dwellings Permitted only if veranda porch deck or balcony is fully open on a minimum of two sides beneath the floor For clearances not sp...

Page 24: ...for every 50 feet or part thereof that the vent line extends beyond the initial 50 feet The increase is to be made at the connection to the relief valve Table 6 Recommended Gas Pipe Size Input 0 100 f...

Page 25: ...trol is passed from the Low End Valve to the High End Valve and at the same time the fan air Inlet Damper is gradually opened The High End Valve controls the pressure difference across a flow orifice...

Page 26: ...ply pressure Gas supply pressure must be at least at minimum allowed with all appliances on the gas line firing at full rate before a manifold pressure measurement is made Use the following procedure...

Page 27: ...ceives the proper operating signal If a second manometer is available it can be connected to the appropriate gas ports Typically the gas signal will closely follow the air signal on all models If the...

Page 28: ...9 GAS TRAIN AND CONTROLS NOTE Illustrations below do not reflect actual gas train assemblies on these models Figure 12 Typical Gas Train Models AR1000 3000 Figure 13 Typical Gas Train Models AR3500 4...

Page 29: ...mixing tube provides the transition which mounts the discharge from the combustion air fan into the burner The bottom side of the mixing tube is attached to a stainless steel perforated sleeve This st...

Page 30: ...ischarge of the appliance Use suitable pipe hangers or floor stands to support the weight of all water and gas piping Always pump toward the heat exchanger inlet Never pump away from the exchanger sin...

Page 31: ...IONS All water connections are groove lock fittings For ease of service install unions on inlet and outlet of the appliance The connection to the appliance marked Inlet on the header should be used fo...

Page 32: ...P 4000 374 5 9 0 187 2 2 1 124 8 1 2 4 8 WATER HEATER THERMOSTAT SETTING 1 This appliance is provided with an electronic temperature controller as detailed in Section 6 2 The maximum setting for this...

Page 33: ...4 12 CIRCULATING PUMP SELECTION The appliance has a stainless steel heat exchanger for fast response and high heat absorption Selecting the proper pump will ensure that temperature rise does not exce...

Page 34: ...ieve the desired temperature rise For DHW applications with other than normal water hardness consult the factory for recommendations NOTE The use of a system sensor is required in lead lag operation 1...

Page 35: ...30 Figure 21 Recommended Piping with Reverse Return and Variable Primary Flow...

Page 36: ...A 460V 3 60 variable frequency drive replaces the standard VFD and the combustion blower fan has been configured to operate at 460 3 60V using the standard fan Part numbers as well as FLA and MOCP inf...

Page 37: ...o the combustion air fan is 230VAC 3 Phase AVOID contact with high voltage wiring 5 3 ELECTRONIC LOW AIR PRESSURE SWITCH DIFFERENTIAL A pressure transducer coupled with an electronic controller is use...

Page 38: ...the appliance will shut down and an open gas pressure switch will be shown on the display 5 6 HIGH LIMIT A high limit Aquastat control is located at the back of the appliance and the control bulb is i...

Page 39: ...t button on the ignition control is the only way to reset an ignition module that is in a hard lockout condition The reset button is located on the ignition module Turning the main power OFF and ON or...

Page 40: ...high limit tripped 82 Stack limit tripped PVC 149 F CPVC 194 F 250 F 105 Flame detected out of sequence 106 Flame lost if Main Flame Establishing Period MFEP 107 Flame lost early in run 108 Flame lost...

Page 41: ...rcuit is open 283 Demand off during measured purge time 291 Abnormal Recycle Flame was not on at end of Ignition period 292 Abnormal Recycle Flame was lost during Main Flame Establishing Period 293 Ab...

Page 42: ...d outlet water temperatures as well as flame signal Operation as an auto reset limit Operation as a control for inlet water temperature outlet temperature system temperature T heat exchanger protectio...

Page 43: ...Description Configure Access Avenger parameters CH Parameters DHW Parameters Outdoor Reset Pump Configuration etc Operation Details of Boiler Operation Set point Firing Rate Pump Status Safety Circuit...

Page 44: ...et Operation Standalone Description Electrical Connection s Programming Instructions Boiler operates with variable setpoint determined by outdoor reset curve Modulates on inlet sensor default Heat dem...

Page 45: ...rature WWSD 9 Select Minimum outdoor temperature Outdoor Design 10 Select Low Water Temperature Min Water Temp 11 Select Outdoor boost maximum off point Design Max 12 Press Show Line to confirm reset...

Page 46: ...A water temperature 7 Select 20mA water temperature 8 Place toggle switch to REMOTE for remote operation if required 4 20mA 0 10Vdc Firing Rate Operation Standalone Description Electrical Connection s...

Page 47: ...Water Configuration 4 Select Demand Switch Modulation sensor only 5 Select Modulation sensor Inlet Sensor Proceed to Step 17 DHW Sensor Stat operation 6 Press Sensor Configuration 7 Select S6S7 J9 1...

Page 48: ...d 3 Select System Identification Access 4 Verify MB1 Modbus address 1 5 Verify MB2 Modbus address 1 6 Select Lead Lag Master Configuration 7 Select Master Enabled Enabled Fixed Setpoint operation 8 En...

Page 49: ...mit Master Boiler System Sensor Connected to Master Boiler 1 Description Electrical Connection s Programming Instructions Master boiler system sensor configuration System temperature sensor must be co...

Page 50: ...elect Outdoor boost maximum off point Design max 17 Press Show Line to confirm reset curve 18 Press the to arrive at Warm Weather Shutdown 19 Select Enable Shutdown after demand ends Rotation Schedule...

Page 51: ...Instructions Upon a call for heat the lead boiler will fire up to the specified base load rate 80 If the temperature is not within Error threshold 5o F of setpoint after Interstage delay 2 minutes a l...

Page 52: ...pt 9 Lead boiler fires up to base load rate and both boilers modulate in unison up to 100 or as low as 4 based on heating demand 10 Lag boiler shuts down first when Lead lag temp Lead lag setpoint Dro...

Page 53: ...SOLA to control a Central Heating pump Default Auto Pump is activated whenever a call for heat is present ON ON Pump is constantly powered Pump Output Pump B Specify pump contact Over run time 1 5 mi...

Page 54: ...NER CONTROL TIMING AND RATES Figure 30 Burner Control Timing and Rates Menu Group Selection Sub Menu Group Selection Parameter Selection Description Burner Control Timing and Rates Prepurge rate 3000...

Page 55: ...modulation After a period of Interstage delay the master boiler compares the lead lag temperature with the lead lag set point and will check if 1 An additional boiler is needed Lead lag temperature L...

Page 56: ...ocal position on ALL lag boilers 6 4 LOCAL REMOTE SWITCH The local remote switch mounted inside the control box is designed to deliver an enable signal either relying on an external contact closure Re...

Page 57: ...Vdc output freq 01 160 Speed at minimum signal Refer to factory test sticker report 161 Speed at maximum signal Refer to factory test sticker report 181 Skip Frequency 1 Refer to factory test report 1...

Page 58: ...ion It is recommended that the Hot Surface Igniter be replaced every 4 000 hours of appliance operation to maintain peak ignition efficiency 7 2 UV SCANNER The UV Scanner is screwed on a NPT pipe nipp...

Page 59: ...firing rate there may be large volumes of condensate generated At high fire with condensing inlet water temperatures less than 130 F condensate will be ejected from the vent outlet pipe and into the...

Page 60: ...issues 8 2 CHECKING THE CONSTRUCTION Check the boiler wiring to see that it agrees with the wiring diagram supplied Confirm that all terminal strips and field connections are identified Confirm that...

Page 61: ...operate the boiler at this firing rate for 5 minutes Increase CO2 Decrease CO2 Low Fire Adjustment Clockwise Counter Clockwise After adjusting the screw wait a moment for the combustion levels to sta...

Page 62: ...2 Press Diagnostic Tests button 3 Move the firing rate slider to firing rate indicated on test reports 4 Press Start Test to operate the boiler at max fire for 5 minutes Increase CO2 Decrease CO2 Low...

Page 63: ...lize before attempting to make any further adjustments Continue this procedure until combustion levels are satisfied NOTE Metering valve is factory set and should not normally require adjustment NOTE...

Page 64: ...trol Allow the unit to cycle on the limit This can be done by gradually restricting outlet water flow to raise outlet temperature and then slowly rotating the limit dial The auto reset limits are set...

Page 65: ...Verify that the vent air inlet piping if equipped are correctly installed and obstructions are not present Verify 24 VAC is being supplied to the Low End Gas Valve relay from the Avenger Controller d...

Page 66: ...detected check wiring Verify that the pump is circulating when 120VAC is supplied If so pump impeller may be stuck Use a flat head screwdriver on face of pump to turn impeller manually If 120VAC is pr...

Page 67: ...Check internal wiring for proper connections Check the UV Scanner and verify that viewing window is clean and scanner is not flashing Replace scanner Blank Display Screen Blank display screen Check w...

Page 68: ...circuit is open 324 374 379 Hardware flame bias Flame sensor wire needs to be re routed 352 Stack sensor fault 355 Outlet sensor fault 357 DHW sensor fault 359 Inlet sensor fault 460 LCI lost in run...

Page 69: ...ch Check flow switch paddle Check Low Water Cutoff if equipped Check system water level LWCO location High Limit Check high limit Reset high limit Gas pressure switch Low gas switch Check inlet gas pr...

Page 70: ...anger Before this error appears the combustion air blower would have slowed down in an effort to prevent such an error from occurring Verify pump motor load to pump rated load Purge air from water lin...

Page 71: ...The area around the burner view port is hot Avoid direct contact to this area Figure 131 Normal Burner Flame Profile short dense and blue at full fire infrared at low fire Normal Flame A normal flame...

Page 72: ...neutralizer As the pH number increases in numerical value the relative acidity of the discharge decreases The neutralized condensate may then be discharged into a suitable drain system without fear of...

Page 73: ...igniter vertically out of the burner mounting flange Use care to not hit or break the silicon carbide igniter DO NOT pull out by leads 10 6 2 RE INSTALLING THE IGNITER Confirm that the end of the rep...

Page 74: ...nt temperature alarm is recommended for the mechanical room Damage to the appliance by freezing is non warrantable Location Heating boilers hot water supply boilers or water heaters must be located in...

Page 75: ...nsate to required level 6 Check pH level of condensate WARNING The neutralizer condensate collection box must be filled with water to prevent flue gas emissions from escaping during boiler operation C...

Page 76: ...iler and on the suction side of the system pump 6 Support all water piping b Placing the Boiler in Operation Pre Start Check List 1 Review the location of the boiler clearances from combustible surfac...

Page 77: ...ult After this has been verified recycle power on the boiler and open the firing valve 8 Once the boiler is running and the flame has stabilized open the UV Scanner wires at an interconnection point i...

Page 78: ...controller as detailed in Section 6 2 The maximum setting for this water heater is 140 F 3 There is a hot water scald potential if the temperature controller is set too high 11 10 WATER FLOW CONTROL T...

Page 79: ...ank to achieve the proper temperature rise The required temperature rise and the recommended pump size are based on the heating of potable water with normal hardness Consult the factory when heating p...

Page 80: ...75 PART 12 EXPLODED VIEW Note Some items may not be as shown AVENGER PARTS LIST Figure A JACKET ASSMEBLY...

Page 81: ...6 01783 000 x x 446 01776 000 x x x 6 A Junction Box Assembly 125 00555 000 x 7 A Back Panel Outer Jacket 136 00301 000 x 136 00302 000 x 136 04345 000 x x 136 04355 000 x 136 04338 000 x x 8 A Panel...

Page 82: ...x x x 019 00201 000 x x x 20 A Bezel Top 832 18241 000 x 21 A Top Cover Front 125 90027 000 x x 125 90030 000 x x 125 90028 000 x x x 22 A Condensate Box Assembly 125 00520 000 x 23 A Manual reset hig...

Page 83: ...9 A Compression Latch 1 043 00028 000 x 29 A Compression Latch 1 043 00028 000 x 30 A Latch Frame Catch 043 00063 000 x 31 A Honeywell Touch Screen 833 25171 000 x 32 A 12 Air Filter Assy 125 00623 00...

Page 84: ...79 Figure B BLOWER BURNER ASSEMBLY...

Page 85: ...5 00518 000 4 x 125 00507 000 8 x x x 125 01464 000 10 x x x 7 B Hot Surface Igniter Mounting Plate 285 03646 000 x 8 B Primary Burner incl Burner Flange 829 20004 001 4 x 829 20005 001 5 1 2 x 829 20...

Page 86: ...n Kit 813 02817 000 x 813 02818 000 x x x 813 02819 000 x x 813 02820 000 x 833 25219 000 x 833 25208 000 x x 833 25211 000 x x x 833 25215 000 x 15 B Air Gas Mixing Tube 090 05000 000 x x x 090 10301...

Page 87: ...82 Figure C TYPICAL GAS TRAIN AR1000 AR3000 Figure D TYPICAL GAS TRAIN AR3500 AR4000...

Page 88: ...0884 000 x x x x 225 00885 000 x LP 225 00925 000 Nat 4 C D High End Gas Valve 996 30920 000 x 5 C D High End Gas Valve Body 949 00461 000 x x x x x 949 00490 000 x x 6 C D Low End Gas Valve 833 25180...

Page 89: ...84 Figure E CONTROL BOARD ASSEMBLY...

Page 90: ...6 000 x 2 E Control Box Mounting Plate 125 00566 000 x 3 E Pump Delay Relay up to 1hp 959 05241 000 x 4 E Transformer 75VA 834 03852 000 x 5 E Contactor Relay 175 00362 000 x 6 E Gas Valve Staging Con...

Page 91: ...000 x 6 Not Shown Stack Sensor 817 11078 000 x 7 Not Shown Pilot Regulator Combination Control 833 25191 000 x x x 8 Not Shown 2 10Vdc Converter 832 18249 000 x 9 Not Shown Snap Action Thermostat 817...

Page 92: ...87 PART 13 ELECTRICAL DIAGRAMS...

Page 93: ...88...

Page 94: ...89...

Page 95: ...90...

Page 96: ...91...

Page 97: ...92...

Page 98: ...93...

Page 99: ...94...

Page 100: ...95...

Page 101: ...96...

Page 102: ...97...

Page 103: ...98...

Page 104: ...99...

Page 105: ...100...

Page 106: ...101...

Page 107: ...e repaired heat exchanger will be returned to the customer and a credit will not be issued Heat Exchanger shall be warranted for 20 years of the appliance having declared FOB from Camus against Therma...

Page 108: ...teel water heaters and heating boilers as well as a supplier of specialty HVAC products Our service line is open 24 hours 7 days a week The CAMUS CERTIFIED Seal assures you that Reliability Efficiency...

Reviews: