background image

Pub No. 49-1000491  Rev. 4  10-20 GEA

Write the model and serial numbers here:

Model # _______________________________

Serial #  _______________________________

Find these numbers on a label inside of your 
beverage center on the left side near the top.

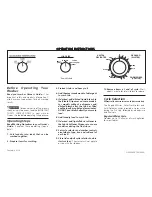
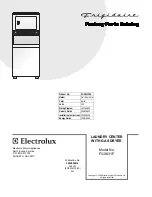
Undercounter Beverage Center

CCP06BP*****

CCR06BM*****

Contents

Safety Information

  . . . . . . . . . . . . . . . . . . . . . . . . . . . . . . .3

Using the Beverage Center

Controls  . . . . . . . . . . . . . . . . . . . . . . . . . . . . . . . . . . . . . .6
WiFi   . . . . . . . . . . . . . . . . . . . . . . . . . . . . . . . . . . . . . . . . .7
Shelves and Drawers . . . . . . . . . . . . . . . . . . . . . . . . . . . .8

Care And Cleaning

  . . . . . . . . . . . . . . . . . . . . . . . . . . . . . .9

Cleaning the Outside . . . . . . . . . . . . . . . . . . . . . . . . . . . .9
Cleaning the Inside  . . . . . . . . . . . . . . . . . . . . . . . . . . . . .9
Vacation and Moving . . . . . . . . . . . . . . . . . . . . . . . . . . . .9

Installation Instructions

Before You Begin . . . . . . . . . . . . . . . . . . . . . . . . . . . . . .10
Location Requirements  . . . . . . . . . . . . . . . . . . . . . . . . .10
Dimensions  . . . . . . . . . . . . . . . . . . . . . . . . . . . . . . . . . .11

The Installation Space . . . . . . . . . . . . . . . . . . . . . . . . . .11
Product Clearances . . . . . . . . . . . . . . . . . . . . . . . . . . . .11
Removing Packaging . . . . . . . . . . . . . . . . . . . . . . . . . . .11
Reversing the Door Swing . . . . . . . . . . . . . . . . . . . . . . .12
Door Adjustment  . . . . . . . . . . . . . . . . . . . . . . . . . . . . . .14
Handle Installation . . . . . . . . . . . . . . . . . . . . . . . . . . . . .14
Method 1 - Undercounter Installation . . . . . . . . . . . . . . .15
Method 2 - Freestanding Installation . . . . . . . . . . . . . . .16
Connect to Power  . . . . . . . . . . . . . . . . . . . . . . . . . . . . .16
Complete Installation . . . . . . . . . . . . . . . . . . . . . . . . . . .16

T

roubleshooting Tips

  . . . . . . . . . . . . . . . . . . . . . . . . . . .17

Limited Warranty

  . . . . . . . . . . . . . . . . . . . . . . . . . . . . . . .19

Consumer Support

  . . . . . . . . . . . . . . . . . . . . . . . . . . . . .20

Owner's Manual and Installation Instructions

ENGLISH/FRANÇAIS/ESPAÑOL

TM

Summary of Contents for CCR06BM Series

Page 1: ...wers 8 Care And Cleaning 9 Cleaning the Outside 9 Cleaning the Inside 9 Vacation and Moving 9 Installation Instructions Before You Begin 10 Location Requirements 10 Dimensions 11 The Installation Spac...

Page 2: ...ill too Among other things registration of your appliance ensures that we can deliver important product information and warranty details when you need them Register your Caf appliance now online Helpf...

Page 3: ...H WHQVLRQ FRUG HHS IODPPDEOH PDWHULDOV DQG YDSRUV DZD IURP WKH refrigerator R QRW VWRUH H SORVLYH VXEVWDQFHV VXFK DV DHURVRO cans with a flammable propellant in this appliance 7R SUHYHQW VXIIRFDWLRQ D...

Page 4: ...pull straight out from the outlet Immediately discontinue use of a damaged supply cord If the supply cord is damaged it must be replaced by a qualified service professional with an DXWKRUL HG VHUYLFH...

Page 5: ...UL HG VHUYLFH SHUVRQQHO 8VH RQO PDQXIDFWXUHU DXWKRUL HG VHUYLFH parts 3 Dispose of appliance in accordance with Federal and Local Regulations Flammable refrigerant and insulation material used require...

Page 6: ...larm Display and Control Lock for 3 seconds Press and hold Alarm Display and Control Lock for 3 seconds again to reactivate the feature Display Mode The interior light enhances the display of your col...

Page 7: ...the dealer or an experienced radio television technician for help Labelling Changes or modifications to this unit not expressly approved by the manufacturer could void the user s authority to operate...

Page 8: ...the shelf below Step 1 Lift the front edge of the front half of the shelf Step 2 Lower the back edge of the front half of the shelf while sliding it underneath the back half The entire Quick Space she...

Page 9: ...gerant To remove frost scrape with a plastic or wood spatula or scraper Do not use an ice pick or a metal or sharp edged instrument as it may puncture the appliance liner and then the refrigerator tub...

Page 10: ...cause it will not run often enough to maintain proper temperatures Do not install the beverage center where the temperature will go above 110 F 43 C because it will not perform properly Install it on...

Page 11: ...amage the surface of your beverage center For more LQIRUPDWLRQ VHH HYHUDJH HQWHU 6DIHW Dispose of recycle all packaging materials WARNING Small objects are a choke hazard for children Remove and disca...

Page 12: ...hinges open 4 Remove the hinge screws and install them on the other side Install screws only part of the way so that hinges can slide behind the screw heads 5 Remove trim screws and install in opposi...

Page 13: ...slide behind the screw heads 7 Remove trim screws and install in opposite corners 8 Remove the hinges by fully loosening 2 screws 9 Use a flat screw driver to remove the top and bottom door trim 10 R...

Page 14: ...o position by tightening the set screw in the handle cap with the allen wrench provided DO NOT over tighten HHS VXSSRUWLQJ WKH KDQGOH DV RX ORFN WKH RWKHU end of the handle into position by tightening...

Page 15: ...ttach the toe kick brackets to each side of the bottom of the cabinet as shown in the picture 2 Install the toe kick Use Screw B or Screw E depending on the color of your toe kick Right Side Left Side...

Page 16: ...ication are not provided with the unit REAR WALL Installation Use screw D Qty 2 to secure the bracket using the pair of marked holes at Loc C The screws MUST enter into a wood sill plate If the wall c...

Page 17: ...this sound when the compressor starts and stops Humming or buzzing sounds The compressor and fans can make this sound If the beverage center is not level the sound will be louder Cracking or clicking...

Page 18: ...18 49 1000491 Rev 4 Notes...

Page 19: ...a service Servicing your refrigerator may require the use of the onboard data port for diagnostics This gives a Caf Factory Service technician the ability to quickly diagnose any issues with your appl...

Page 20: ...Extended Warranties Purchase a Caf extended warranty and learn about special discounts that are available while your warranty is still in effect You can purchase it on line anytime Caf Service will st...

Page 21: ...ettoyage 9 Nettoyage de l ext rieur 9 Nettoyage de l int rieur 9 Vacances et d m nagement 9 Instructions d installation Avant de commencer 10 Emplacement requis 10 Dimensions 11 Espace d installation...

Page 22: ...ue nous vous rappelons que l enregistrement de votre lectrom nager vous assure la communication de renseignements importants sur le produit et la garantie lorsque vous en avez besoin Enregistrez votre...

Page 23: ...DU DXFXQH GHV IRQFWLRQV VXU OH panneau de commande Remarque HV UpSDUDWLRQV GRLYHQW rWUH HIIHFWXpHV SDU un professionnel qualifi 5HPHWWH WRXWHV OHV SLqFHV HW SDQQHDX HQ SODFH DYDQW d utiliser l apparei...

Page 24: ...igation de la remplacer par une prise triphas e correctement mise la terre N utilisez pas d adaptateur H UpIULJpUDWHXU GRLW WRXMRXUV rWUH EUDQFKp j VD SURSUH SULVH lectrique d une tension nominale cor...

Page 25: ...VRQQHO GH VHUYLFH DXWRULVp 8WLOLVH VHXOHPHQW GHV pi ces de rechange autoris es par le fabricant 3 Mettez le r frig rateur au rebut conform ment aux r glementations f d rales et locales Le fluide frigo...

Page 26: ...activ lorsqu une personne s approche du refroidisseur de boissons Pour d sactiver cette fonction maintenir une pression sur Alarm Display et Contro Lock durant 3 secondes Maintenir une pression sur Al...

Page 27: ...vous obtenez un cran vous informant que l appareil est connect la connexion a r ussi Si la connexion choue l application affichera Oops Something Went Wrong Oups Quelque chose n a pas fonctionn Vous...

Page 28: ...DOH GH OD tablette eWDSH EDLVVHU OH ERUG DUULqUH GH OD PRLWLp IURQWDOH GH OD tablette tout en la glissant en dessous de la moiti arri re Il est possible de retirer ou replacer la tablette Quickspace e...

Page 29: ...laisser l appareil en marche une pr paration de celui ci est n cessaire 1 Retirer tous les articles 2 Maintenir une pression sur POWER alimentation sur le panneau de commande durant 3 secondes pour d...

Page 30: ...our maintenir des temp ratures convenables 1H SDV LQVWDOOHU OH UHIURLGLVVHXU GDQV XQ HQGURLW R OD temp rature sera sup rieure 43 C 110 F car il ne fonctionnera pas correctement Installer le refroidiss...

Page 31: ...plus d informations voir la section sur les consignes de s curit HWHU UHF FOHU WRXV OHV PDWpULDX G HPEDOODJH AVERTISSEMENT Les petits objets posent un risque d touffement pour les enfants Retirer et...

Page 32: ...tirer les vis de charni re et les poser sur le c t oppos 1H SDV YLVVHU OHV YLV MXVTX DX ERXW GH IDoRQ TXH OHV FKDUQLqUHV SXLVVHQW JOLVVHU GHUULqUH OHV WrWHV GH YLV 5 Retirer les vis de garniture et le...

Page 33: ...s poser dans les coins oppos s 8 Retirer les charni res en d vissant compl tement les deux 2 vis YHF XQ WRXUQHYLV j WrWH SODWH UHWLUHU OHV JDUQLWXUHV sup rieure et inf rieure de la porte 10 R installe...

Page 34: ...agonale fournie NE PAS serrer excessivement 5 Continuer de supporter la poign e pour verrouiller l autre extr mit de la poign e en serrant la vis de serrage dans le capuchon de poign e NE PAS serrer e...

Page 35: ...coup de pied dans le bas de la carrosserie sur chaque c t comme illustr 2 QVWDOOH OH FRXS GH SLHG 8WLOLVH OD YLV RX OD YLV selon la couleur de votre coup de pied C t droit C t gauche Vis BRANCHEMENT D...

Page 36: ...OH VXSSRUW HQ XWLOLVDQW OD SDLUH de trous identifi s Pos C Les vis DOIVENT p n trer dans la lisse murale en bois Si le mur est compos de montants m talliques ou de mat riaux similaires il faut alors...

Page 37: ...oissons ne repose pas solidement sur le plancher Voir la section sur la mise niveau Sons normaux Un son d eau qui s coule provient du refroidisseur de boissons Le r frig rant qui circule dans la tubul...

Page 38: ...18 49 1000491 Rev 4 Notes...

Page 39: ...e mod le port e de main lorsque vous appelez pour obtenir un service Pour le diagnostic la r paration de votre r frig rateur peut n cessiter l utilisation du port de donn es embarqu Celui ci permet au...

Page 40: ...ice Prolongation de garantie Procurez vous une prolongation de garantie Caf et informez vous des rabais sp ciaux en vigueur pendant la dur e de votre garantie Vous pouvez vous la procurer en ligne en...

Page 41: ...Limpieza de la Parte Exterior 9 Limpieza de la Parte Interior 9 Vacaciones y Mudanzas 9 Instrucciones de Instalaci n Antes de Comenzar 10 Requisitos de Ubicaci n 10 Dimensiones 11 El Espacio de Insta...

Page 42: ...lectrodom stico asegura que podamos entregarle informaci n importante del producto y detalles de la garant a cuando los necesite Registre su electrodom stico Caf ahora a trav s de Internet Sitios Web...

Page 43: ...con las Instrucciones de Instalaci n antes de ser usado HVHQFKXIH HO HOHFWURGRPpVWLFR DQWHV GH KDFHU reparaciones reemplazar una l mpara de luz o hacer una limpieza NOTA La corriente que va al electr...

Page 44: ...ca desenchufe el centro de bebidas tirando del cable de corriente Siempre tome su enchufe firmemente y empuje el mismo hacia afuera para retirarlo Repare o reemplace de inmediato todos los cables de c...

Page 45: ...del servicio autorizadas por el fabricante 3 Descarte el electrodom stico de acuerdo con las Regulaciones Federales y Locales El refrigerante inflamable y el material aislante inflamable usados requie...

Page 46: ...3 segundos Mantenga presionados Alarm Alarma Display Pantalla y Control Lock Bloqueo del Control durante 3 segundos para reiniciar la funci n Modo de Pantalla La luz interior mejora la pantalla de re...

Page 47: ...conectado entonces el dispositivo fue conectado con xito Si la aplicaci n no logra conectarse sta exhibir la SDQWDOOD 2RSV 6RPHWKLQJ HQW URQJ 8 OJR 6DOLy Mal Se le dar n al usuario razones posibles p...

Page 48: ...Paso 2 Baje el extremo trasero de la mitad frontal de la repisa mientras la desliza por debajo de la mitad trasera Toda la repisa Quick Space se podr retirar y reemplazar consulte la secci n de Repis...

Page 49: ...de acero inoxidable LPSLH ODV VXSHUILFLHV LQWHULRUHV H WHULRUHV FRQ DJXD FDOLHQWH MDEyQ VXDYH R GHWHUJHQWH XQD WHOD VXDYH R GH microfibra a fin de evitar da os 6HTXH ODV VXSHUILFLHV GHO HOHFWURGRPpVWL...

Page 50: ...ria para mantener las temperaturas apropiadas No instale el centro de bebidas donde la temperatura sea superior a los 110 F 43 C ya que no funcionar de forma correcta Instale el mismo en un piso lo su...

Page 51: ...Desh gase de todos los materiales de empaque o rec clelos ADVERTENCIA Los objetos peque os representan un riesgo de asfixia para los ni os Retire y descarte cualquier pieza que no se use LIMPIEZA ANT...

Page 52: ...nillos de las bisagras e instale los mismos del otro lado Instale los tornillos s lo hasta la mitad de modo que las bisagras se puedan deslizar detr s de las cabezas de los tornillos 5 Retire los torn...

Page 53: ...tornillos de ajuste e instale los mismos en las esquinas opuestas 8 Retire las bisagras aflojando completamente los tornillos 2 9 Use un destornillador plano para quitar la moldura superior e inferio...

Page 54: ...ja mientras bloquea el otro extremo de la manija en su posici n ajustando el tornillo HQ OD WDSD GH OD PDQLMD 12 DMXVWH HQ H FHVR AFLOJAR tornillo de ajuste tornillo de ajuste tensor tapa de la manija...

Page 55: ...os soportes del z calo a cada lado de la parte inferior del gabinete como se muestra en la imagen 2 Instale el z calo Use el Tornillo B o el Tornillo E dependiendo del color de su z calo Lado Derecho...

Page 56: ...cciones puede ocasionar la muerte incendio o choque el ctrico INSTALACI N CON MODO DE PIE Adhiera la guarda de protecci n sobre la bisagra 1 Retire la tapa de los agujeros de la parte superior del lad...

Page 57: ...el sonido de agua que circula desde el centro de bebidas El refrigerante que circula por las tuber as producir este sonido cuando el compresor se inicie y se detenga Sonidos de zumbido Es posible que...

Page 58: ...18 49 1000491 Rev 4 Notas...

Page 59: ...ibles En Canad visite cafeappliances ca service Para realizar el servicio t cnico de su refrigerador se podr requerir el uso de datos del puerto de abordaje para su diagn stico Esto da al t cnico del...

Page 60: ...service Garant as Extendidas Adquiera una garant a extendida deCaf y conozca los descuentos especiales que est n disponibles mientras su garant a a n est vigente La puede adquirir en cualquier moment...

Reviews: