background image


2003RF Quick Installation Guide 

3100505740 v.1.0


Wireless Keyboard & Mouse Kit 

Quick Installation Guide


Hardware Installation 

Slide Switch Setting 


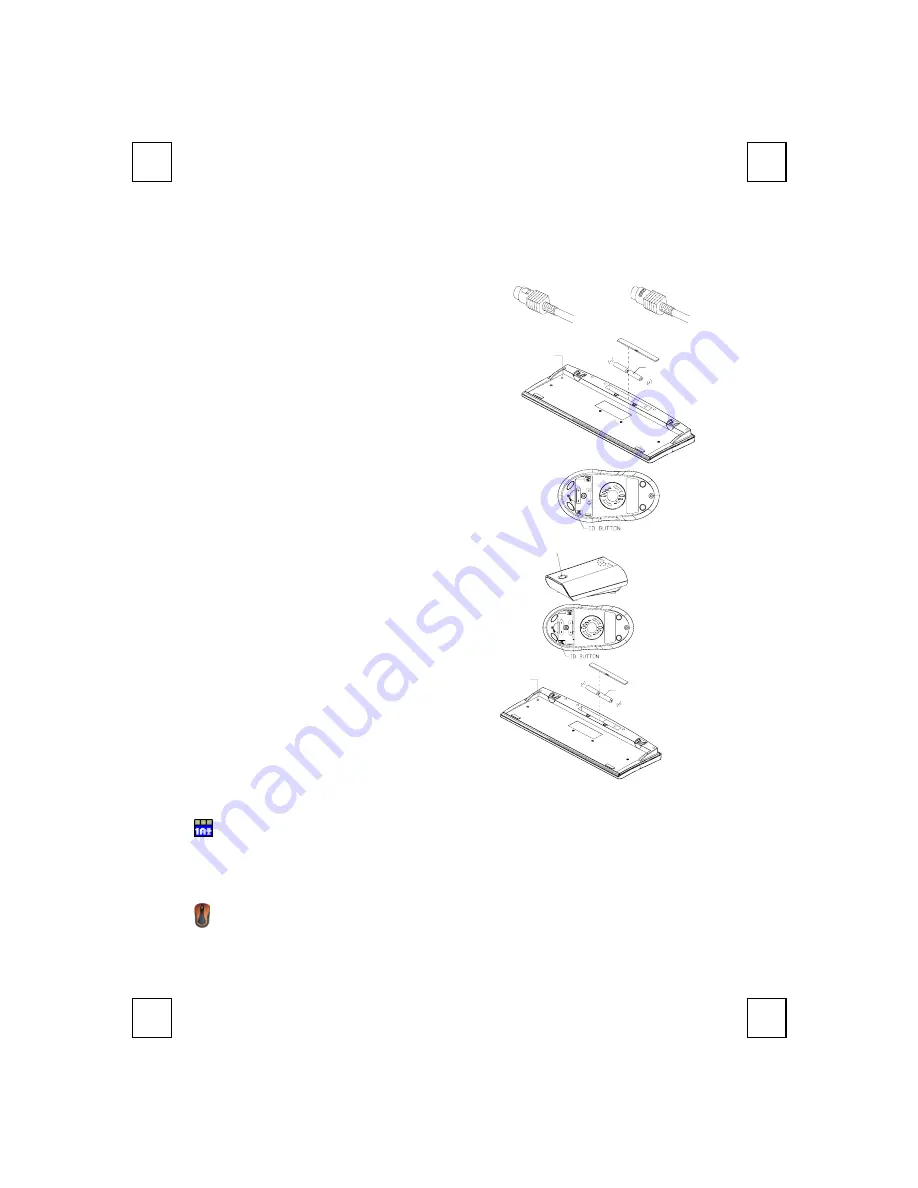
Mouse Connector      Keyboard Connector 

ID Button

1.5V 2pcs


1. 

Make sure your PC is switched off. 

2.  Connect the receiver to your PC by plugging in the 

receiver’s green connector into the mouse port of 
your PC and the purple connector into the keyboard 
port. 

3.  Take the keyboard and make sure the batteries on 

the back are installed correctly. (Follow the polarity 
signs in the battery compartment.)   

4.  Take the mouse and make sure the batteries on the 

back are installed correctly. (Follow the polarity 
signs in the battery compartment.) 


ID Button Setting 

ID Button


This ID-recognition function helps to protect against 
interference from other RF keyboards in the same 
environment. Remember to set the ID when you replace 
the batteries or your keyboard kits do not work 
properly. 
The word CONNECT labels the ID button on each unit. 

1. 

Your PC must be on to change the ID setting. 

2. 

Press ID button on the side of the receiver once. 

3. 

Press ID button on the bottom of the mouse once 

4.  Press ID button on the bottom of the keyboard 

once. 

ID Button

1.5V 2pcs


Software Installation 

Keyboard Driver Installation 


In order to take advantage of the special button functionality of the keyboard you will have to install 
the keyboard driver which is located on the driver CD included in the box. 

1.  Insert the driver CD into your drive. 
2. Run 

the 

SetupKey.exe

 in the 

\2003RF&2001ARF\keyboard software

 directory of the driver CD. 

3.  Follow the on screen instructions to finish the installation procedure. 

Mouse Driver Installation 


In order to take advantage of the special shortcut button functionality of the mouse you will have to 
install the mouse driver which is located on the driver CD included in the box. 

1. 

Insert the driver CD into your drive.


2. 

Run the 

setup.exe

 in the

 \2003RF&2001ARF\mouse softwar

e directory of the driver CD.


3.  Follow the on screen instructions to finish the installation procedure. 


ID Button of 

Keyboard 

ID Button of 

Receiver 

ID Button of 

Mouse 

Summary of Contents for 2003RF

Page 1: ... button on each unit 1 Your PC must be on to change the ID setting 2 Press ID button on the side of the receiver once 3 Press ID button on the bottom of the mouse once 4 Press ID button on the bottom of the keyboard once ID Button 1 5V 2pcs Software Installation Keyboard Driver Installation In order to take advantage of the special button functionality of the keyboard you will have to install the ...

Page 2: ...接收器 滑鼠和鍵盤上會有 CONNECT 字樣以標示 ID 設定鈕的位置 1 電腦為開機狀態下 才可設定 ID 2 按一次接收器上方的 ID 設定鈕 3 按一次滑鼠底部的 ID 設定鈕 4 按一次鍵盤底部的 ID 設定鈕 ID Button 1 5V 2pcs 軟體安裝 鍵盤驅動程式安裝 為使您的鍵盤發揮最大的功能 請安裝 KeyMaestro 驅動程式 KeyMaestro 驅動程式位於包裝內 所附的光碟片中 1 將驅動程式光碟片至於您的光碟機中 2 執行在 2003RF 2001ARF keyboard software 子目錄中的 SetupKey exe 3 依照螢幕上的指示 以完成安裝的步驟 滑鼠驅動程式安裝 為使您的滑鼠發揮最大的功能 請安裝滑鼠驅動程式 滑鼠驅動程式位於包裝內所附的光碟片 中 1 將驅動程式光碟片至於您的光碟機中 2 執行在 2003RF 2001ARF mo...

Page 3: ... être mis en marche pour modifier le Réglage d ID 2 Pressez une fois le bouton ID sur le dessus du récepteur 3 Pressez une fois le bouton ID situé sous la souris 4 Pressez une fois le bouton ID situé sous le clavier ID Button 1 5V 2pcs Installation Logicielle Installation du Pilote Clavier Afin de profiter de la fonction spéciale du bouton du clavier vous devrez installer le pilote du clavier se t...

Page 4: ...hnet 1 Ihr PC muss eingeschaltet sein um die ID Einstellung zu ändern 2 Drücken Sie einmal den ID Knopf auf der oberen Teil des Empfängers 3 Drücken Sie einmal die ID Taste auf der Unterseite der Maus 4 Drücken Sie einmal die ID Taste auf der Unterseite der Tastatur ID Button 1 5V 2pcs Softwareinstallation Installation des Tastaturtreibers Um die Funktion der speziellen Taste der Tastatur verwende...

Page 5: ...impostazione dell ID 2 Premere una volta il tasto ID sulla parte superiore del ricevitore 3 Premere una volta il pulsante ID nella parte inferiore del mouse 4 Premere una volta il pulsante ID nella parte inferiore della tastiera ID Button 1 5V 2pcs Installazione Software Installazione Driver Tastiera Al fine di trarre vantaggio dalla funzionalità del pulsante speciale della tastiera occorrerà inst...

Page 6: ...定するのを忘れないでくださ い CONNECT という文字が各装置の ID ボタンに付け られています 1 お使いの PC は ID 設定を変更する必要がありま す 2 レシーバーの上にある ID ボタンを一度押します 3 マウスの底面にある ID ボタンを一度押します 4 キーボードのボタン上の ID ボタンを一度押します ID Button 1 5V 2pcs ソフトウェアのインストール キーボードドライバのインストール キーボードの特殊ボタンの機能を利用するには 梱包に付属するドライバ CD のキーボードドライバを インストールする必要があります 1 ドライバディスクをお使いのドライブに挿入します 2 ドライバディスクの 2003RF 2001ARF keyboard software ディレクトリで SetupKey exe を実行し ます 3 オンスクリーンの指示に従って インス...

Page 7: ... definição da ID 2 Prima uma vez o botão ID localizado na parte de cima do receptor 3 Prima o botão ID localizado na parte de baixo do rato uma vez 4 Prima o botão ID localizado na parte de baixo do teclado uma vez ID Button 1 5V 2pcs Instalação do software Instalação do controlador do teclado Para tirar partido da funcionalidade dos botões do teclado tem de instalar o controlador do teclado conti...

Page 8: ...metro ID 2 Pulse el botón ID en la parte superior del receptor una vez 3 Pulse una vez el botón ID situado en la parte inferior del ratón 4 Pulse una vez el botón ID situado en la parte inferior del teclado ID Button 1 5V 2pcs Instalación del software Instalación del controlador de teclado Para aprovechar las ventajas de la funcionalidad del botón especial del teclado debe instalar el controlador ...

Reviews: