BROSA Mensa Table Lamp, Assembly Manual
Introducing the sleek and stylish BROSA Mensa Table Lamp. Illuminate your space with this contemporary piece of art. Enhance your reading or workspace in style. Simple assembly required. Download the comprehensive Assembly Manual for free at manualshive.com, ensuring a hassle-free setup.
Share
Download


Reviews:
No comments
Related manuals for Mensa Table Lamp
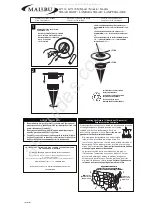
Malibu LZ312
Brand: Intermatic Pages: 2

A64PN9
Brand: OttLite Pages: 2

LD641
Brand: Malibu Boats Pages: 1

LEDP5W-60XC-1227
Brand: Larson Electronics Pages: 2

FL 160
Brand: Gardena Pages: 8

LT8
Brand: Malibu Boats Pages: 2

4190-01
Brand: Adesso Pages: 2

PRE-WIRED COMPACT FLUORESCENT
Brand: Lightolier Pages: 2

EN53
Brand: IN HOUSE LED Pages: 17

TwinSpin
Brand: GAM Pages: 6

CY4G59-FFP
Brand: OttLite Pages: 2

IPL1015BEAM
Brand: Light Sky Pages: 29

IR-200/24
Brand: Speco Pages: 4

LLB-26/CBS/24V/ADR
Brand: olympia electronics Pages: 5

LSB-5
Brand: Lightolier Pages: 2

UberLight 8000S
Brand: Reliable Pages: 2

280508
Brand: LIVARNO LUX Pages: 2

8580
Brand: Wagan Pages: 10


